Acer Aspire 5003WLMi Manual de Usario
Acer
Computadora portátil
Aspire 5003WLMi
Lee a continuación 📖 el manual en español para Acer Aspire 5003WLMi (34 páginas) en la categoría Computadora portátil. Esta guía fue útil para 6 personas y fue valorada con 4.5 estrellas en promedio por 2 usuarios
Página 1/34

Aspire 3000/5000 Series
User's Guide

Changes may be made periodically to the information in this publication without obligation
to notify any person of such revisions or changes. Such changes will be incorporated in new
editions of this manual or supplementary documents and publications. This company makes
no representations or warranties, either expressed or implied, with respect to the contents
hereof and specifically disclaims the implied warranties of merchantability or fitness for a
particular purpose.
Record the model number, serial number, purchase date, and place of purchase information in
the space provided below. The serial number and model number are recorded on the label
affixed to your computer. All correspondence concerning your unit should include the serial
number, model number, and purchase information.
No part of this publication may be reproduced, stored in a retrieval system, or transmitted, in
any form or by any means, electronically, mechanically, by photocopy, recording, or otherwise,
without the prior written permission of Acer Incorporated.
Model Number: __________________________________
Serial Number: ___________________________________
Purchase Date: ___________________________________
Place of Purchase: ________________________________
Copyright © 2005. Acer Incorporated.
All Rights Reserved.
Aspire 3000/5000 Series User's Guide
Original Issue: March 2005
Aspire 3000/5000 Series Notebook Computer
Acer and the Acer logo are registered trademarks of Acer Incorporated. Other companies'
product names or trademarks are used herein for identification purposes only and belong to
their respective companies.

iii
First things first
We would like to thank you for making the Aspire series of notebook
computers your choice for your mobile computing needs.
Your guides
To help you use your Aspire, we have designed a set of guides:
Basic care and tips for using your computer
Turning your computer on and off
To turn on the computer, simply press and release the power button below the
LCD screen beside the launch keys. See "Front
"Front
"Front
"Front"Front view"
view"
view"
view" view" on page
on page
on page
on pageon page 1
1
1
1 1 for the location
of the power button.
To turn the power off, do any of the following:
•Use the Windows shutdown command
Click on Sta
Sta
Sta
StaStart
rt
rt
rtrt, Turn Off Computer
Turn Off Computer
Turn Off Computer
Turn Off ComputerTurn Off Computer; then click on Turn Off
Turn Off
Turn Off
Turn OffTurn Off.
•Use the power button
First off, the Just for starters...
Just for starters...
Just for starters...
Just for starters...Just for starters... poster helps you get started with
setting up your computer.
The printed User's Gu
User's Gu
User's Gu
User's GuUser's Guide
ide
ide
ideide introduces you to the basic features and
functions of your new computer. For more on how your computer
can help you to be more productive, please refer to the
AcerSystem User's Guide.
AcerSystem User's Guide.
AcerSystem User's Guide.
AcerSystem User's Guide. AcerSystem User's Guide. This guide contains detailed
information on such subjects as system utilities, data recovery,
expansion options, and troubleshooting. In addition it contains
warranty information and the general regulations and safety
notices for your notebook. It is available in Portable Document
Format (PDF) and comes preloaded on your notebook. Follow
these steps to access it:
1 Click on Start
Start
Start
StartStart, All Progra
All Progra
All Progra
All PrograAll Programs
ms
ms
msms, AcerSystem
AcerSystem
AcerSystem
AcerSystemAcerSystem.
2 Click on AcerSystem User's
AcerSystem User's
AcerSystem User's
AcerSystem User's AcerSystem User's Guide
Guide
Guide
GuideGuide.
Note:
Note:
Note:
Note:Note: Viewing the file requires Adobe Acrobat Reader. If Adobe
Acrobat Reader is not installed on your computer, clicking on
AcerSystem User's Guide
AcerSystem User's Guide
AcerSystem User's Guide
AcerSystem User's GuideAcerSystem User's Guide will run the Acrobat Reader setup
program first. Follow the instructions on the screen to complete
the installation. For instructions on how to use Adobe Acrobat
Reader, access the Help and Su
Help and Su
Help and Su
Help and SuHelp and Support
pport
pport
pportpport menu.
1
English
An Aspire tour
After setting up your computer as illustrated in the Just for Starters...
Just for Starters...
Just for Starters...
Just for Starters...Just for Starters... poster, let
us show you around your new Aspire computer.
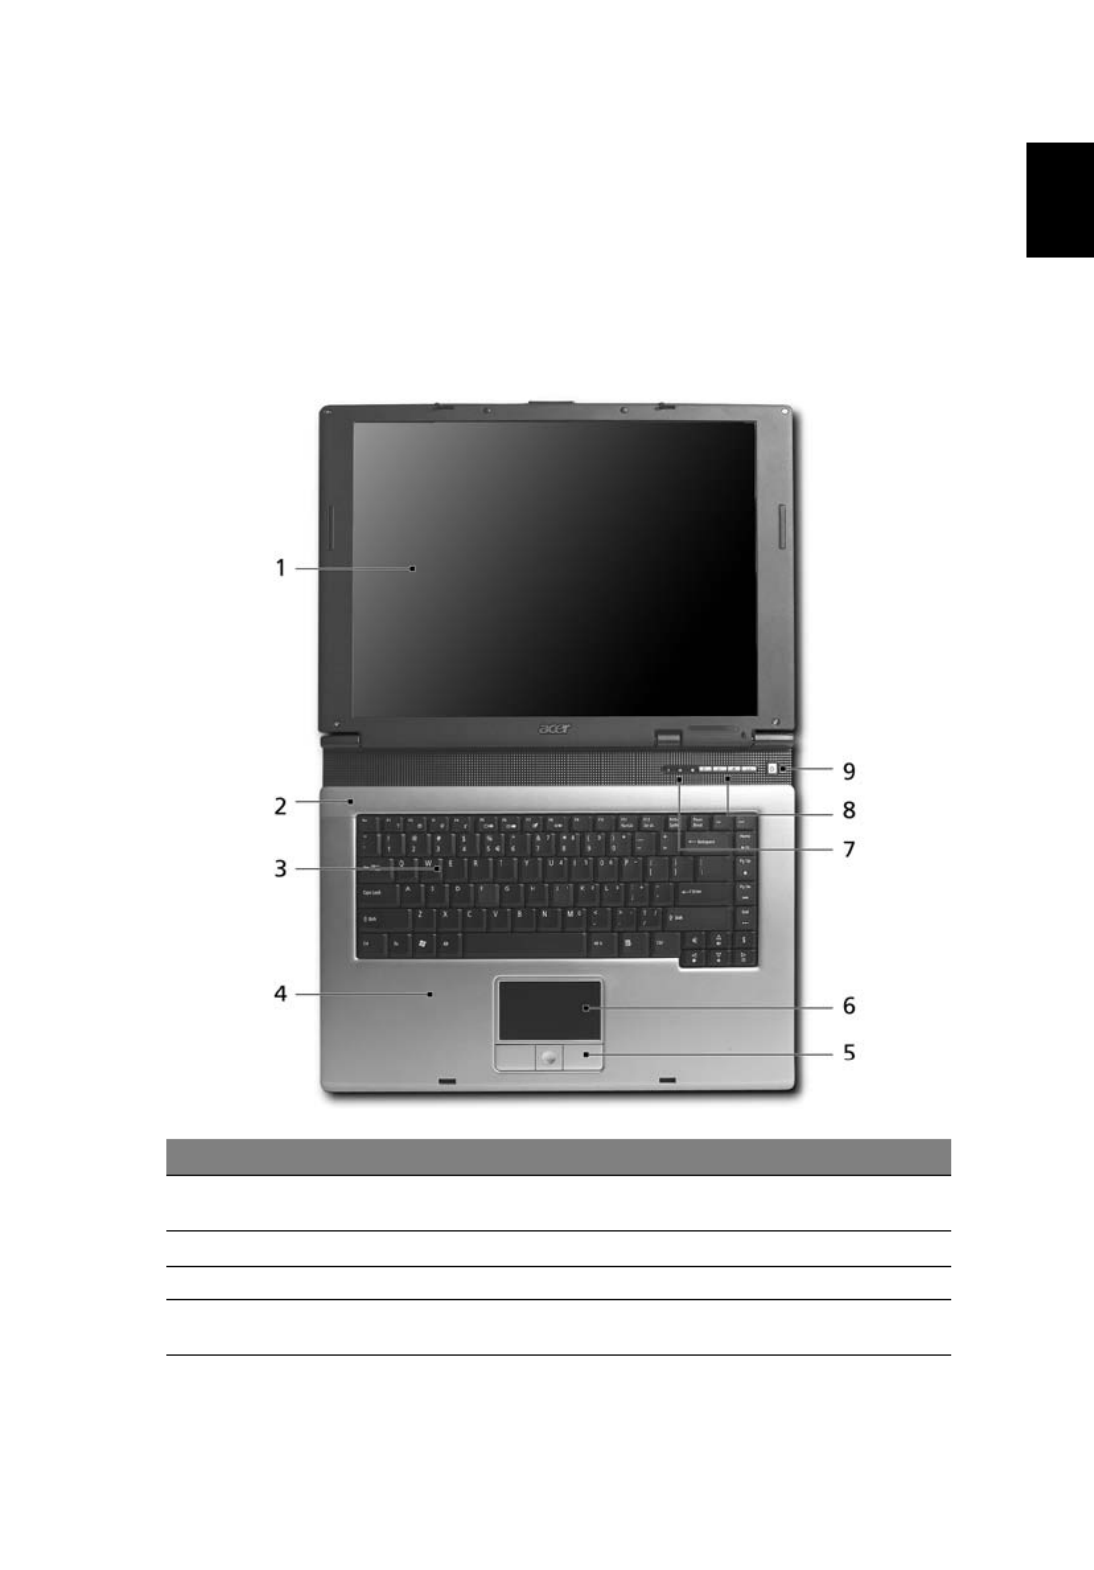
Front view
#
#
#
## Item
Item
Item
ItemItem Description
Description
Description
DescriptionDescription
1 Display screen Also called Liquid-Crystal Display (LCD), displays computer
output.
2 Microphone Internal microphone for sound recording.
3 Keyboard For entering data into your computer.
4 Palmrest Comfortable support area for your hands when you use the
computer.

2
English
Closed front view
5 Click buttons
(Left, center and
right)
The left and right buttons function like the left and right mouse
buttons; the center button serves as a 4-way scroll button.
6 Touchpad Touch-sensitive pointing device which functions like a computer
mouse.
7 Status indicators Light-Emitting Diodes (LEDs) that turn on and off to show the
status of the computer’s functions and components.
8 Launch keys Buttons for launching frequently used programs. See “Launch
“Launch
“Launch
“Launch “Launch
keys” on page 14
keys” on page 14
keys” on page 14
keys” on page 14keys” on page 14 for more details.
9 Power button Turns the computer on and off.
#
#
#
##
Item
Item
Item
ItemItem Description
Description
Description
DescriptionDescription
1 Speakers Left and right speakers deliver stereo audio
output.
2 Power indicator Lights up when the computer is on.
3 Battery indicator Lights up when the battery is being charged.
4 Bluetooth communication
button/indicator (for
selected models)
Press to enable/disable the Bluetooth
function. Indicates the status of Bluetooth
communication (optional).
5 Wireless communication
button/indicator
Press to enable/disable the wireless function.
Indicates the status of wireless LAN
communication (optional).
6 Line-in jack Accepts audio line-in devices (e.g., audio CD
player, stereo walkman).
7 Mic-in jack Accepts inputs from external microphones.
#
#
#
## Item
Item
Item
ItemItem Description
Description
Description
DescriptionDescription

3
English
Left view
Right view
8 Speaker/Line-Out/
Headphone jack
Connects to audio line-out devices
(e.g., speakers, headphones).
9 USB 2.0 port Connects to Universal Serial Bus (USB) 2.0
devices (e.g., USB mouse, USB camera).
#
#
#
## Item
Item
Item
ItemItem Description
Description
Description
DescriptionDescription
1 Optical drive Internal optical drive; accepts CDs or DVDs depending
on the optical drive type.
2 LED indicator Lights up when the optical drive is active.
3 Emergency eject hole Ejects the optical drive tray when the computer is
turned off
4 Optical drive eject button Ejects the optical drive tray from the drive.
#
#
#
## Item
Item
Item
ItemItem Description
Description
Description
DescriptionDescription
1 PC Card slot
eject button
Ejects the PC Card from the slot.
2 PC Card slot Accepts one Type II CardBus PC Card.
#
#
#
##
Item
Item
Item
ItemItem Description
Description
Description
DescriptionDescription

5
English
Base view
#
#
#
## Item
Item
Item
ItemItem Description
Description
Description
DescriptionDescription
1 Hard disk bay Houses the computer's hard disk (secured by a screw).
2 Battery release
latch
Releases the battery for removal.
3 Battery bay Houses the computer's battery pack.
4 Battery lock Locks the battery in place.
5 Cooling fan Helps keep the computer cool.
Note
Note
Note
NoteNote: Do not cover or obstruct the opening of the fan.
6 Memory
compartment
Houses the computer's main memory.

8
English

9
English
Indicators
The computer has three easy-to-read status indicators on the upper-right above
the keyboard, and four on the front panel.
The power, battery, and wireless communication status indicators are visible
even when the LCD display is closed.
1. Charging:
1. Charging:
1. Charging:
1. Charging:1. Charging: the light shows amber when the battery is charging.
2. Fully charged:
2. Fully charged:
2. Fully charged:
2. Fully charged:2. Fully charged: light shows green when in AC mode.
Icon
Icon
Icon
IconIcon Function
Function
Function
FunctionFunction Description
Description
Description
DescriptionDescription
Caps Lock Lights up when Caps Lock is activated.
Num Lock Lights up when Num Lock is activated.
Media activity Indicates when the hard disk or optical
drive is active.
Bluetooth Indicates the status of Bluetooth
communication.
Wireless LAN Indicates the status of wireless LAN
communication.
Power Lights up when the computer is on.
Battery Lights up when the battery is being
charged.

11
English
Touchpad
The built-in touchpad is a pointing device that senses movement on its surface.
This means the cursor responds as you move your finger across the surface of
the touchpad. The central location on the palmrest provides optimum comfort
and support.
Touchpad basics
The following items show you how to use the touchpad:
•Move your finger across the touchpad (2)
(2)
(2)
(2)(2) to move the cursor.
•Press the left (1)
(1)
(1)
(1)(1) and right (4)
(4)
(4)
(4)(4) buttons located beneath the touchpad to
perform selection and execution functions. These two buttons are similar
to the left and right buttons on a mouse. Tapping on the touchpad is the
same as clicking the left button.
•Use the 4-way scroll (3)
(3)
(3)
(3)(3) button to scroll up or down and move left
or right a page. This button mimics your cursor pressing on the
right scroll bar of Windows applications.

12
English
Note:
Note:
Note:
Note:Note: Keep your fingers dry and clean when using the touchpad.
Also keep the touchpad dry and clean. The touchpad is sensitive to
finger movement, hence, the lighter the touch, the better the
response. Tapping harder will not increase the touchpad's
responsiveness.
Function
Function
Function
FunctionFunction Left button (1)
Left button (1)
Left button (1)
Left button (1)Left button (1) Right
Right
Right
Right Right
button (4)
button (4)
button (4)
button (4)button (4) Main touch
Main touch
Main touch
Main touchMain touchpad (2)
pad (2)
pad (2)
pad (2)pad (2) Center
Center
Center
Center Center
button (3)
button (3)
button (3)
button (3)button (3)
Execute Quickly click
twice.
Tap twice (at the same
speed as double-clicking
a mouse button).
Select Click once. Tap once.
Drag Click and hold,
then use
finger on the
touchpad to
drag the
cursor.
Tap twice (at the same
speed as double-clicking
a mouse button); rest
your finger on the
touchpad on the second
tap and drag the cursor.
Access
context
menu
Click once.
Scroll Click and
hold to move
up/down/
left/right.

17
English
Ejecting the optical (CD or DVD)
drive tray
To eject the optical drive tray when the computer is turned on, press the drive
eject button.
When the power is off, you can eject the drive tray by using the emergency
eject hole.
Using a computer security lock
A security keylock notch, located on the left hand side of the computer, lets you
connect a Kensington-compatible computer security lock.
Wrap the computer security lock cable around an immovable object such as a
table or handle of a locked drawer. Insert the lock into the notch and turn the
key to secure the lock. Some keyless models are also available.
Especificaciones del producto
| Marca: | Acer |
| Categoría: | Computadora portátil |
| Modelo: | Aspire 5003WLMi |
¿Necesitas ayuda?
Si necesitas ayuda con Acer Aspire 5003WLMi haz una pregunta a continuación y otros usuarios te responderán
Computadora portátil Acer Manuales

19 Octubre 2024
17 Octubre 2024
13 Octubre 2024
11 Octubre 2024
8 Octubre 2024
8 Octubre 2024
4 Octubre 2024
2 Octubre 2024
30 Septiembre 2024
23 Septiembre 2024
Computadora portátil Manuales
- Computadora portátil Sony
- Computadora portátil Samsung
- Computadora portátil LG
- Computadora portátil Huawei
- Computadora portátil HP
- Computadora portátil Panasonic
- Computadora portátil Medion
- Computadora portátil Toshiba
- Computadora portátil Alienware
- Computadora portátil Apple
- Computadora portátil Airis
- Computadora portátil Lexibook
- Computadora portátil Thomson
- Computadora portátil Pyle
- Computadora portátil Emachines
- Computadora portátil Asus
- Computadora portátil Micromax
- Computadora portátil Maxdata
- Computadora portátil Lenovo
- Computadora portátil Hähnel
- Computadora portátil Denver
- Computadora portátil Tripp Lite
- Computadora portátil Schneider
- Computadora portátil Gigabyte
- Computadora portátil Sylvania
- Computadora portátil Microsoft
- Computadora portátil Haier
- Computadora portátil Coby
- Computadora portátil Fujitsu
- Computadora portátil Razer
- Computadora portátil Goclever
- Computadora portátil Evga
- Computadora portátil Dell
- Computadora portátil Honor
- Computadora portátil Ricatech
- Computadora portátil Mpman
- Computadora portátil Vizio
- Computadora portátil MSI
- Computadora portátil Targa
- Computadora portátil Zebra
- Computadora portátil Viewsonic
- Computadora portátil Peaq
- Computadora portátil Ematic
- Computadora portátil Hannspree
- Computadora portátil ADATA
- Computadora portátil XPG
- Computadora portátil ECS
- Computadora portátil Odys
- Computadora portátil HKC
- Computadora portátil Ibm
- Computadora portátil Atdec
- Computadora portátil Packard Bell
- Computadora portátil XMG
- Computadora portátil Fujitsu Siemens
- Computadora portátil Flybook
- Computadora portátil Compaq
- Computadora portátil SIIG
- Computadora portátil Hercules
- Computadora portátil Oregon Scientific
- Computadora portátil Belinea
- Computadora portátil Kogan
- Computadora portátil Getac
- Computadora portátil Jay-tech
- Computadora portátil Vulcan
- Computadora portátil Visual Land
- Computadora portátil Motion Computing
- Computadora portátil System76
- Computadora portátil Prixton
- Computadora portátil General Dynamics Itronix
- Computadora portátil Topline
- Computadora portátil CTL
- Computadora portátil Everex
- Computadora portátil Olidata
- Computadora portátil Dynabook
- Computadora portátil Hamilton Buhl
- Computadora portátil AORUS
- Computadora portátil Humanscale
- Computadora portátil TechBite
- Computadora portátil Aplic
- Computadora portátil Schenker
Últimos Computadora portátil Manuales
27 Octubre 2024
26 Octubre 2024
26 Octubre 2024
26 Octubre 2024
25 Octubre 2024
24 Octubre 2024
24 Octubre 2024
24 Octubre 2024
24 Octubre 2024
24 Octubre 2024