Becker Professional.6SL EU Manual de Usario
Lee a continuación 📖 el manual en español para Becker Professional.6SL EU (155 páginas) en la categoría navegador. Esta guía fue útil para 6 personas y fue valorada con 4.5 estrellas en promedio por 2 usuarios
Página 1/155

OPERATING GUIDE

2
>>> CONTENTS
Contents 2
24-month warranty 6
Warranty 6
Safety instructions 7
The Navigation device 9
Operating manual contents 9
Use of the product 9
Navigation 9
Images* 9
Telephone (selected models) 10
Unpacking the Navigation device 10
Checking the contents 10
Overview of functions 11
Complaints 13
Handling the packaging 13
Description of the device 13
The basic unit 13
Cable for power supply from cigarette
lighter 14
Intelligent charger cable (Smart)
for power supply via cigarette
lighter (depending on the model) 14
Battery 15
USB connection cable 15
Unit bracket 15
Accessories 15
Mains power supply unit 15
Overview of the scope of Delivery 16
Overview of the navigation device 17
General operation 19
Maintenance and care 19
Battery quality declaration 20
Display quality declaration 20
Start-up 20
Power supply 20
Using the battery 21
Connection for the cigarette lighter 21
Connection to the mains outlet 22
Connecting to power supply 22
TMC antenna (depending on the
model) 22
GPS antenna 22
Unit antenna 22
Cable for vehicle integration
(depending on model, optional) 23
Cable for rear view camera
(depending on the model, optional) 23
Memory card 23
Inserting the memory card 24
Ejecting the memory card 24
Unit bracket 24
Fitting the unit bracket 24
On the windscreen 25
Adjusting the unit holder’s position 26
Attaching the Navigation device 26
Removing the Navigation device 26
Devices with magnetic holders 26
Switching the Navigation
device on/off 26
Switching on 27
Switching off 27
Basic information about the touch
screen 28
Operation 28
Calibration (model dependent) 28
Basic information about the menus 29
The main menu 29
Entries made with the entry menu 30
Entering characters 30
Accepting proposals 30
Scrolling through the lists 31
Special characters and accent
marks 31
Other character sets 32
Entering numbers 32
Switching between upper and
lower case: 32
Deleting characters 33
Inserting spaces 33
The back button 33
Content Manager 33
Installing the Content Manager 34
Starting the Content Manager 34
Transferring pictures 36
Faults 36
Download manager
(model dependent) 36
Map Update 37
Speed camera detector update 38
Resuming downloads 38
Installing updates 39
Co nten ts

3
CONTENTS >>>
Transferring pictures 39
Faults 39
Navigation Mode 40
What is navigation? 40
Selecting Navigation 41
Home address 41
Smart Guess 42
Last destinations list 42
The destination list 42
Icons used 43
Operating the last destinations list 43
Start with existing destination 43
Scrolling through stored
destinations 43
Displaying or editing a destination 43
Personal destinations 44
Contacts 44
Selecting a destination from Personal
destinations 44
Editing Personal destinations 45
Selecting a destination from Contacts 45
The New destination menu 46
Layout of the New destination menu 47
Enter address 47
Select Point of Interest 47
Travel Guide (model dependent) 47
Select on map 47
Enter geo-coordinates 47
Route planning 47
Entering the address 47
Selecting a country 48
Selecting an address and starting
route guidance 48
Entering address by speech
(selected models) 53
Speech Dialogue System
(selected models) 54
Explanation of symbols 54
Objective 54
Route 55
More... 55
Live POI Search (model dependent) 55
Points of interest 55
Point of interest in the vicinity 56
Point of interest near to an address 57
Point of interest near to destination 58
POI on route 58
Entering a point of interest directly 58
Calling special destination phone
number
(depending on the model) 59
Additional point of interest
information 59
Travel Guide (model dependent) 59
Selecting a destination from the map 60
Coordinate entry 61
Route planning 61
Simulation of the route 63
Creating a new route 63
Editing a route 64
Optimising a route 65
Navigation settings 65
The Map view button 66
Auto zoom 67
Select POI categories 68
Selecting Info box data fields 68
3D city view 69
The Route overview button 70
The Guidance info button 70
The Route options button 72
Selecting the vehicle profile
(depending on model) 72
Truck and mobile home functions
(depending on model) 73
Setting truck profiles 74
Selecting vehicle category
and name 76
Selecting the route type 76
Time-dependent route guidance 77
Avoiding particular types of road 77
The TMC or Traffic button
(model dependent) 77
The Traffic Button (model dependent) 78
The Voice guidance button 78
Setting the Voice 79
Setting the Volume 80
The Warnings button 80
Setting Driver alerts 81
Setting environmental zones
(depending on model) 82
Truck warnings
(depending on model) 82
Setting Speed info 83
The Blocked roads button 84
The Vehicle data button 85

4
>>> CONTENTS
The Format button 86
The Time button 86
The Reset button 86
Traffic announcements using TMC
(depending on the model) 87
Live Traffic – Traffic Announcements
via Data Connection
(model dependent) 87
Displaying traffic messages
on the map 88
Using TMC or Live-Traffic 88
Reading a message 89
Taking announcements into
consideration when calculating routes 90
Automatic recalculation 90
Manual recalculation 90
The map display 91
Calling up the map display 91
Structure of the map display 91
Map display without route guidance 91
Map display with route guidance 91
The Information box 92
Split screen with route guidance 93
Route guidance with arrow display 94
Lane Assistant Pro 3D
(model dependent) 94
Map display with Junction view 94
Tunnel view 95
Using the map display 95
Repeating the last announcement 95
Changing the announcement volume 96
Map zooming 96
Moving the map 97
Map orientation 97
The Route overview 98
SituationScan 99
The detour assistant 99
The Park Assistant 99
The departure assistant 99
Map display options 100
Displaying the whole route 100
Move route (model-dependent) 101
Selecting alternative routes 102
Change route options 103
Canceling route guidance 103
Entering/deleting a stopover 103
Blocking route temporarily 104
Setting day/night display 105
Displaying current position
(Where am I?) 105
Entering the destination 106
Skipping a destination 107
Supplementary functions for trucks and
mobile homes (selected models only) 108
Feedback after route calculation 108
Zooming in on the map 108
Warnings with planned route 108
Warnings without planned route 109
Show route 109
Other additional functions
(only selected models) 110
Display height profile 110
Telephone mode 111
Calling up the telephone mode
(only selected models) 111
Telephone menu (only selected
models) 112
Dialing a number 112
Phonebook 113
Call list 114
Icons used 115
Scrolling through the call list 115
Dialing an available number 115
Displaying or editing entries 115
Lists loaded from cell phone 116
Connecting Bluetooth® telephones 116
Calling up a device list 116
Automatic connection 117
Searching for cell phones 118
Connect new devices 118
Connecting a mobile phone 119
Disconnecting a connected
telephone 119
Telephone calls 119
Establishing a call 119
Accepting a call 120
Ending a call 120
During a call 121
Bluetooth settings
(model dependent) 122
Bluetooth: on/off 122
Telephone settings 122
Automatic connection 122

5
CONTENTS >>>
Automatic call acceptance 122
Telephone volume 123
Updating the phonebook 123
Bluetooth® name 123
Data settings / Bluetooth Tethering
(model dependent) 124
Audio Out settings
(model dependent) 124
Tools 125
Travel Guide (model dependent) 125
Rear View camera 125
Displaying Rear view camera
(depending on the model) 125
Image viewer* 125
The image viewer menu 126
Selecting an image 126
Enlarging the image 127
Rotating the picture 127
Displaying image information 127
Slide show 128
Settings 128
Where am I? 128
Traffic forecast
(depending on model) 128
Country information 129
Blocking a section of the road
permanently 130
Trip computer
(depending on model) 131
Settings 133
Selecting system settings 133
The system settings menu 133
Operation 133
Selection options 133
Closing the settings menu 133
The individual menu items 134
Battery 134
Automatic on/off 135
Day/night display 136
Brightness 136
Design by day 136
Design by night 137
Setting the colour 137
Language 138
Keyboard layout 138
Sounds 138
Rear view camera
(depending on the model) 138
Screen animations 139
Driver profiles (depending on model) 139
Renaming driver profile 140
Deleting driver profile 140
Driver profile Pro
(model dependent) 141
Service information 141
Factory settings 142
Calibration (model dependent) 142
Wi-Fi® settings (model dependent) 143
Technical terminology 144
index 146
Model overview and technical s
pecifications 149
NOTICE 151
EU Declaration of Conformity 151
Disposal of the unit 152
Disposal of the battery 153
Duty to supply information according to
battery legislation (BattV) 153
Removing the battery 153
The information and data contained in
these documents are subject to change
without prior notice.
No part of these documents may be
duplicated or transmitted for any
purpose whatsoever without express
written permission of United Navigation
GmbH. All technical information,
drawings etc. are subject to copyright
law.
© Copyright 2015, United Navigation GmbH
All rights reserved.
The Bluetooth® word mark is a
registered trademark owned by
Bluetooth SIG, Inc. and any use of such
marks by United Navigation GmbH is
under license.
Wi-Fi® is a registered trademark of the
Wi-Fi Alliance.

6
>>> WARRANTY
24-month warranty
The company United Navigation GmbH,
Zeppelinstraße 41, 73760 Ostfildern,
Germany, provides a world-wide,
24-month warranty (battery: 6 months)
for BECKER units, beginning on the day
of delivery to the final customer (buyer).
Within the framework of the warranty,
functional defects will be eliminated
free-of-charge, provided that these can
be shown to be the result of material or
manufacturing faults and this shall be ef-
fected either by elimination of the fault or
by provision of a new unit, at the discre-
tion of the manufacturer. Warranty
claims must be registered by the buyer
immediately after defects are discovered
and must be accompanied by the initial
buyer’s purchase contract.
The warranty expires after 24 months
(battery: 6 months); neither warranty
claims nor fulfilment shall effect an ex-
tension of the warranty period.
Faults resulting from improper handling,
incorrect installation of the unit, improper
noise suppression of the vehicle, static
charge or mechanical damage are exclud-
ed from the warranty.
The warranty is invalidated in the case of
repairs or tampering on the part of the
buyer or unauthorised third parties.
Repairs may only be performed by per-
sons and service centres expressly au-
thorised by the manufacturer or by the
manufacturer himself.
This warranty does not affect or
restrict the legal warranty rights of
the buyer.
Warrant y

7
SAFETY INSTRUCTIONS >>>
Safety in structions
¤ Safety instructions
• Use of the device is only permitted if the traffic conditions are suitable and you are absolutely sure that its use presents
no risk, distraction or inconvenience to you, your passengers or other road users.
Traffic laws and regulations will apply in each and every case. Destinations may only be entered when the vehicle is
stationary.
• The navigation system is merely an aid, data/information may in select cases be incorrect. The driver must decide in each
situation by him- or herself if he or she will follow the directions. No liability will be assumed for incorrect directions
provided by the navigation system. Imprecise or incorrect directions may be provided due to changing traffic patterns or
deviations in data. Therefore, you must always observe the actual road signs and traffic regulations. In particular, the
navigation system must not be used as an orientation aid at times of poor visibility.
• The device must only be used for its intended purpose. The volume of the navigation system should be adjusted so that
noises external to the vehicle are still well audible.
• Turn the unit off immediately if a defect occurs (e.g. emission of smoke or odors).
• For reasons of safety and security, the device must only be opened by a professional. In case of needed repair please
consult your dealer.
• Navigation devices from Becker could contain magnets. Do not bring them near magnetic data carriers (notebooks) or
cards (EC cards, credit cards etc.). These could get damaged or be rendered unusable if brought into contact. Magnets can
impair the function of cardiac pacemakers! Persons with cardiac pacemakers should not carry the device to close to their
bodies.

9
THE NAVIGATION DEVICE >>>
The Navig ation de vice
Operating manual contents
This operating manual contains the
description of your Becker navigation
equipment.
This manual contains descriptions for
different model versions in a single
document. Therefore, some of the
functions described here might not be
available for your equipment under
certain circumstances.
All pictures are similar.
Use of the product
This product is a high performance PND
(Personal Navigation Device) for use in
vehicles. Protect the product and the
accessories from moisture and dirt.
Navigation
The use of the GPS = G Plobal ositioning
system eliminates the tedious process
of looking in street maps.
The receiver antenna integrated into the
product allows constant access to the
navigation services outside buildings.
Within buildings, it is currently not
possible to access any navigation
functions. When using in vehicles, it
might not possible to receive sufficent
GPS data depending on the installation
position of the Navigation device.
Images*
The Navigation device has a Picture
Viewer with a lot of image display
functions.
*depending on model, must be activated via the Content Manager

10
>>> THE NAVIGATION DEVICE
Telephone (selected models)
Your Navigation device is equipped with
Bluetooth® wireless technology. Via
Bluetooth®, you may connect to a cell
phone equipped with Bluetooth®
wireless technology.
Your Navigation device can then be used
as a very comfortable hands-free unit.
You also have the option to read out the
address book or phonebook of the cell
phone and to read any received short
messages.
Unpacking the Navigation device
Checking the contents
Before you start using the Navigation
device, the scope and condition of the
contents must be thoroughly checked
(see also page 16).
>Unpack the contents carefully and
check them thoroughly.
Note:
Your Navigation device is delivered in a
stable packaging. If the packaging or its
contents show the signs of serious
damages, you must not continue to
unpack the product. In such case, please
contact your dealer.

11
THE NAVIGATION DEVICE >>>
Overview of functions
: standard
-: not available
: optional
Navigation system
active.6s CE / EU
BE H00
ready.6l EU plus
BE B95 / BBF96
active.6s EU plus
BE H10
active.6sl EU plus
BE H40
professional.6sl EU
BE H50
transit.6s EU
BE H02
transit.6sl EU plus
BE H50
TMC
Becker OneShot Pro Voice control – – – – –
Free speed camera detector for 1 year (download product) –––––
Lifelong speed camera detector (download product) – –––––
Lifelong live speed camera detector – – –
Driver warnings – – – –
Bluetooth hands-free – –
On-board computer -
Environmental zones
Truck & Camper Navigation Pro – – – – –
Display height profile – – – –
BECKER RouteMove –
ADAC Camping Guide
MARCO POLO Travel Guide
Lane assistant Pro 3D
Connection for reversing camera – – – – –
WLAN interface – – –
Live Traffic (Bluetooth and/or WLAN Tethering) – –
Live POI Search (Bluetooth and/or
WLAN Tethering) – –
Becker Connect / Download Manager – – –
Track recording – – – –
EU Truck Driving Ban Calendar – – – – –
Power saving mode –

12
>>> THE NAVIGATION DEVICE
: standard
-: not available
: optional
Navigation system
active.5s EU
BE 2B00
BE 3B00
active.7s EU
BE 2B30
BE 3B30
active.5sl EU
BE 2B10
BE 3B10
active.7sl EU
BE 2B40
BE 3B40
transit.7sl EU
BE 3B40
TMC
Becker OneShot Pro Voice control – – – – –
Free speed camera detector for 1 year (download product) –––
Lifelong speed camera detector (download product) – –
Lifelong live speed camera detector – – – – –
Driver warnings – – – –
Bluetooth hands-free – – – – –
On-board computer
Environmental zones
Truck & Camper Navigation Pro – – – –
Display height profile – – – –
BECKER RouteMove
ADAC Camping Guide
MARCO POLO Travel Guide
Lane assistant Pro 3D
Connection for reversing camera – – – – –
WLAN interface – –
Live Traffic (Bluetooth and/or
WLAN Tethering) – –
Live POI Search (Bluetooth and/or
WLAN Tethering) – –
Becker Connect / Download Manager – –
Track recording – – – –
EU Truck Driving Ban Calendar – – – –
Power saving mode – – – – –

13
THE NAVIGATION DEVICE >>>
Complaints
In case of complaints, please consult
your dealer. The equipment may be sent
directly to United Navigation in its
original packaging.
Handling the packaging
Keep the original packaging in a dry
place, at least for the warranty period.
Description of the device
The navigation device consists of the
basic unit and the accessories included in
the scope of delivery.
For descriptions of the individual parts,
see:
• "Overview of the scope of Delivery" on
page 16
The basic unit
The basic unit consists of the complete
electronic unit:
• Integrated antenna
• a TMC receiver for receiving traffic
messages (depending on the model),
• Touchscreen
• an integrated loudspeaker
• a microphone (dependingon the
model).
On the side of the unit, there are also
various connections and ports.
You will find more details of the unit
under:
• "Model overview and technical
specifications" on page 149
Note:
The disposal must be performed in a
professional manner, according to the
country-specific regulations. The
packaging must not be combusted.
Depending on the country of delivery, it
might be possible to return the
packaging to the dealer.
Note:
The basic unit and accessories must not
be opened or modified in any way.
14
>>> THE NAVIGATION DEVICE
Cable for power supply from cigarette
lighter
This cable allows the unit to be connect-
ed up to the car's cigarette lighter.
The power supply must satisfy the
following requirements:
• DC current 12/24 volts
1 amps
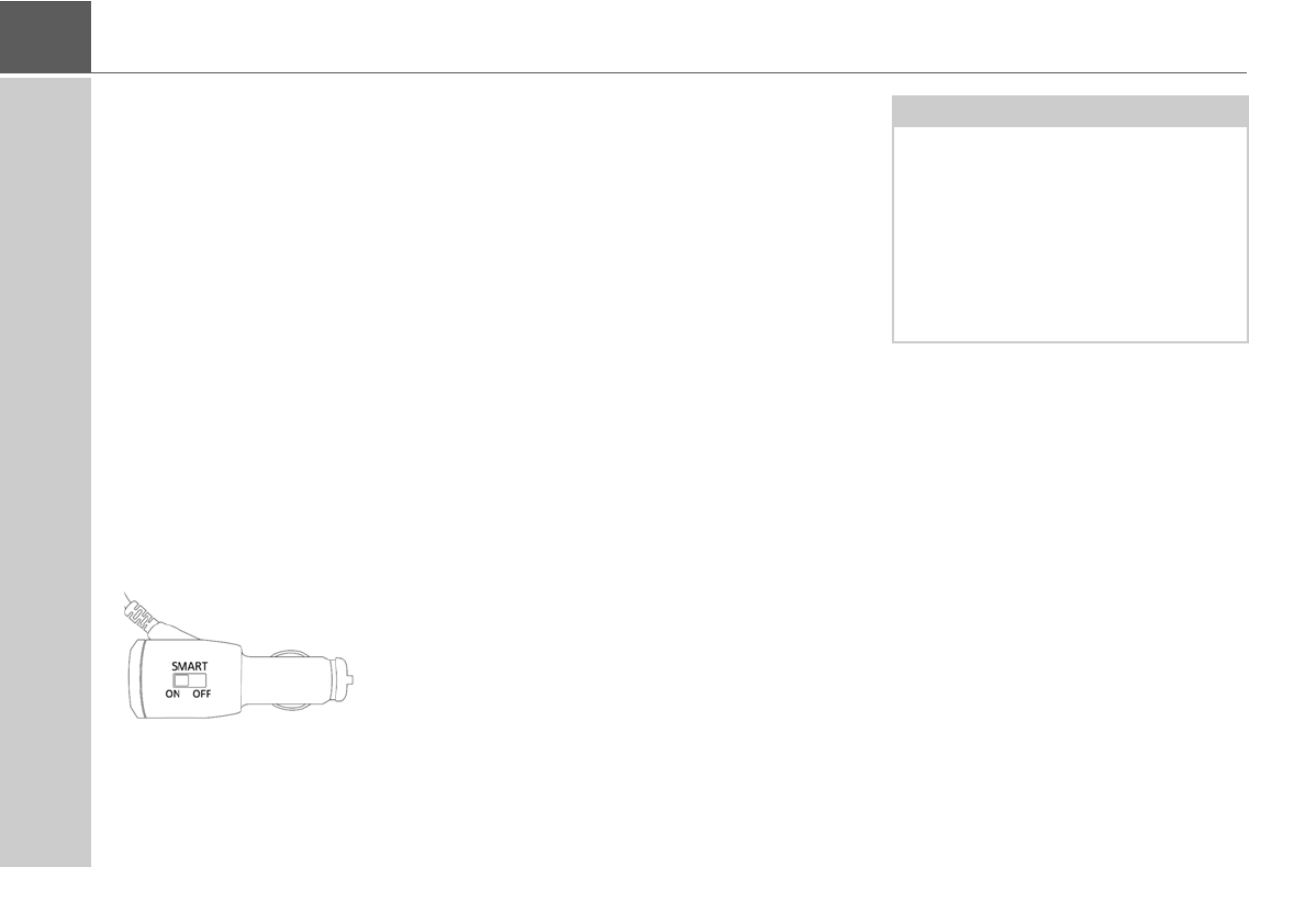
Intelligent charger cable (Smart)
for power supply via cigarette
lighter (depending on the model)
This cable allows the unit to be connec-
ted up to the car's cigarette lighter.
The power supply must satisfy the follo-
wing requirements:
• DC current 12/24 volts
1.3 amps
This cable allows the function "Automatic
on/off", described page 135, to also be
used for vehicles without switched ciga-
rette lighters.
The cable detects whether the engine is
running or switched off and switches the
power supply to your navigation system
on or off accordingly.
The function is switched on when the
switch is on the position On.
The function is switched off when the
switch is on the position Off.
This cable also allows the function
"Automatic on/off", described on
page 135, without switched cigarette
lighters:
• For cars with unswitched cigarette
lighters.
• Charger cable detects whether the en-
gine is running or not and switches the
power supply to the navigation system
on or off accordingly.
If the function is switched off, the
navigation system is always supplied
with power when there is voltage on the
cigarette lighter.
Note:
The function can be switched off on
vehicles with switched vehicle voltage
sockets. It does not work on vehicles
with 24V vehicle voltage.
On vehicles with an automatic start/
stop feature, your navigation device
might always be switched off when the
engine is stopped.

15
THE NAVIGATION DEVICE >>>
Battery
When depleted, the integrated
rechargeable battery can be recharged
by connecting the Navigation device to
the power supply.
For this purpose, connect the unit via a
car power adapter to a 12/24 V socket in
a vehicle or via the optional mains power
supply unit to the 230 V mains.
USB connection cable
With the USB connection cable provided,
it is possible to connect the Navigation
device to a standard PC with a USB
interface. The integrated flash memory
of the navigation device and a micro SD
card that may eventually be inserted can
then be addressed by the PC like a
removable storage device.
Unit bracket
The Navigation device can be mounted in
the vehicle using the unit bracket.
Accessories
Mains power supply unit
This power supply allows connection of
the Navigation device to a mains outlet.
Note:
You can charge the Navigation device
via the car charger cable included in the
scope of delivery or via the optionally
available mains power supply unit.
When the Navigation device is
connected to a PC, it is supplied with
power via the PC and does not consume
battery power.
Note:
Switch the navigation device completely
off, see "Devices with magnetic holders"
on page 26, before connecting the navi-
gation device to the computer.

16
>>> OVERVIEW OF THE SCOPE OF DELIVERY
Overview o f the scop e of Delivery
Scope of delivery
1Basic device – PND (P N Dersonal avigation evice)
2USB connection cable
3Unit holder with carrier plate (the design depending on the
model)
4Cable for power supply via the vehicle cigarette lighter
(12/24 Volt) with integrated TMC-antenna (depending
on the model)
5Micro USB mains charger (selected models)
In the case of devices with magnetic holders, the carrier plate
and car adapter cable form one unit.
1
2
3
4
3
5
2
4

17
OVERVIEW OF THE NAVIGATION DEVICE >>>
Overvie w of the n avigatio n device
Front of unit with controls and displays
1Back button
Model dependent: either on the left bottom side of the
screen or in the left top corner of the housing.
Press = Back function in most applications
Press and hold = Open the main menu
2Touch screen showing the main menu selected
3Touch screen key
Press = activates the corresponding key command
4Microphone (depending on the model, sometimes in the
right top corner, too))
1
2
3
4

21
GENERAL OPERATION >>>
Using the battery
The internal power supply is via the
integrated rechargeable battery. The
rechargeable battery is maintenance-
free and does not require any particular
care.
You are alerted by a warning message
when the battery should be recharged.
After the alert, the device can still be
used for approximately 10 minutes
before switching off automatically.
Connection for the cigarette lighter
Connect the power supply via the vehicle
battery and the cable provided for the
cigarette lighter as follows:
>Grasp the connector of the connection
cable and insert it gently without force
into the connector socket of the
navigation device up to the stop, or in
the case of a device with an active
cradle, on the underside of the
supporting plate. (Model dependent,
this step is not required on navigation
devices with magnetic holders)
>Insert the adapter into the cigarette
lighter.
Note:
Note that if the battery is completely
discharged, it may take up to a minute
before the device can be switched on
again.
Note:
In the event of a defective battery,
please contact your authorised dealer.
Please do not attempt to remove the
battery yourself.
Note:
If the cigarette lighter has recently been
used and is still hot, wait until the lighter
socket has cooled down.
Note:
When the engine is switched off, the
power supply slowly discharges the
vehicle battery via the cigarette lighter!
Do not therefore operate the Navigation
device for long periods with the engine
switched off.
To receive TMC messages (depending
on the model), the power supply must
be connected to the supporting plate in
the case of a device with an active
cradle.

23
GENERAL OPERATION >>>
Cable for vehicle integration
(depending on model, optional)
With a 4-pin 3.5mm jack cable you can
integrate your Navigation device
seamlessly into your vehicle.
• connect your Navigation device to the
phone mute function of your audio
system. If the cable is connected
correctly, your audio system will mute
the car radio during navigation
announcements.
• connect your Navigation device to your
audio system for output of the audio
signal.
>Plug the cable into the designated 3.5
socket on the underside of the device.
Cable for rear view camera
(depending on the model,
optional)
You can connect your rear view camera
to your navigation device using a 4-pin
2.5mm AV cable. Insert the cable into the
socket provided on the back of the basic
unit, also see page 18.
You can make the necessary settings in
the chapter “Rear View camera” on
page 125.
Memory card
Your Navigation device has a slot for a
micro SD memory card.
As the map data is stored in an internal
memory on the Navigation device, the
slot for a micro SD memory card is used
for updates and for viewing images.
The memory card can also be used for
supplementing the map data.
The card slot is located on the bottom
side of the device. The card slot is
equipped with a spring-actuated locking
and ejector mechanism.
Note:
Once the cable is connected, the
loudspeaker of the basic device is
switched off.
GND
Video
Audio-R
Audio-L
GND
Telephone Mute:
Audio-R
Audio-L
Especificaciones del producto
| Marca: | Becker |
| Categoría: | navegador |
| Modelo: | Professional.6SL EU |
¿Necesitas ayuda?
Si necesitas ayuda con Becker Professional.6SL EU haz una pregunta a continuación y otros usuarios te responderán
navegador Becker Manuales

4 Septiembre 2024
4 Septiembre 2024
4 Septiembre 2024
4 Septiembre 2024
4 Septiembre 2024
4 Septiembre 2024
4 Septiembre 2024
4 Septiembre 2024
4 Septiembre 2024
4 Septiembre 2024
navegador Manuales
- navegador Sony
- navegador Philips
- navegador Garmin
- navegador JVC
- navegador Kenwood
- navegador Motorola
- navegador Medion
- navegador Nokia
- navegador Pioneer
- navegador Acer
- navegador Alpine
- navegador Airis
- navegador Silvercrest
- navegador Thomson
- navegador Pyle
- navegador Caliber
- navegador Bushnell
- navegador Lowrance
- navegador Overmax
- navegador Blaupunkt
- navegador Harman Kardon
- navegador Humminbird
- navegador Skoda
- navegador BMW
- navegador Sanyo
- navegador Midland
- navegador Sylvania
- navegador Marquant
- navegador Toyota
- navegador Binatone
- navegador Volkswagen
- navegador Magellan
- navegador Chrysler
- navegador Clarion
- navegador Mio
- navegador Uniden
- navegador Audiovox
- navegador Insignia
- navegador Goclever
- navegador Dual
- navegador Navigon
- navegador Boss
- navegador Cobra
- navegador Eagle
- navegador TomTom
- navegador Navitel
- navegador Navman
- navegador Lanzar
- navegador Simrad
- navegador Jensen
- navegador Zenec
- navegador Furuno
- navegador Scosche
- navegador Coyote Systems
- navegador Rand McNally
- navegador VDO
- navegador Soundstream
- navegador VDO Dayton
- navegador Igo
- navegador Kalkhoff
- navegador Route 66
- navegador Falk
- navegador Seecode
- navegador Nav N Go
- navegador Sygic
- navegador Raymarine
- navegador Pharos
- navegador Viamichelin
- navegador Xzent
- navegador ModeCom
- navegador CarTrek
- navegador V7
- navegador Whistler
- navegador Dynavin
- navegador Cheetah
- navegador Cydle
- navegador ESX
- navegador Lark
- navegador LXNAV
- navegador Planet Audio
- navegador Eclipse
- navegador Voice Caddie
- navegador SkyCaddie
- navegador TELE System
- navegador IZZO Golf
- navegador Zoleo
- navegador Dashmate
- navegador GlobalSat
Últimos navegador Manuales
19 Octubre 2024
14 Octubre 2024
14 Octubre 2024
14 Octubre 2024
12 Octubre 2024
12 Octubre 2024
12 Octubre 2024
10 Octubre 2024
9 Octubre 2024
9 Octubre 2024