Gigabyte GA-H270M-D3H Manual de Usario
Gigabyte
Placa madre
GA-H270M-D3H
Lee a continuación 📖 el manual en español para Gigabyte GA-H270M-D3H (18 páginas) en la categoría Placa madre. Esta guía fue útil para 12 personas y fue valorada con 4.5 estrellas en promedio por 2 usuarios
Página 1/18

- 1 -
Table of Contents
Conguring a RAID Set (Intel® Z270/H270 Series) .........................................................2
1-1 Conguring SATA Controllers ............................................................................. 2
1-2 Installing the SATA RAID/AHCI Driver and Operating System.......................... 16

- 2 -
Conguring a RAID Set (Intel® Z270/H270 Series)
To create a RAID set, follow the steps below:
A. Install SATA hard drive(s) in your computer.
B. Congure SATA controller mode in BIOS Setup.
C. Congure a RAID array in RAID BIOS. (Note 1)
D. Install the SATA RAID/AHCI driver and operating system.
Before you begin, please prepare the following items:
•At least two SATA hard drives or SSDs (Note 2) (to ensure optimal performance, it is recommended that you
use two hard drives with identical model and capacity). (Note 3)
•A Windows setup disk.
•Motherboard driver disk.
•A USB thumb drive.
RAID Levels
1-1 Conguring SATA Controllers
A. Installing hard drives
Install the hard drives/SSDs in the Intel® Chipset controlled connectors on the motherboard. Then connect
the power connectors from your power supply to the hard drives.
RAID RAID RAID RAID 0 1 5 10
Minimum
Number of Hard
Drives
≥2 ≥32 4
Array Capacity Number of hard
drives * Size of the
smallest drive
Size of the smallest
drive
(Number of hard
drives -1) * Size of
the smallest drive
(Number of hard
drives/2) * Size of the
smallest drive
Fault Tolerance No Yes Yes Yes
(Note 1) Skip this step if you do not want to create RAID array on the SATA controller.
(Note 2) An M.2 PCIe SSD or an U.2 SSD cannot be used to set up a RAID set either with an M.2 SATA SSD
or a SATA hard drive.
(Note 3) Refer to Chapter 1, "Internal Connectors," for the installation notices for the U.2, M.2, and SATA
connectors.
- 3 -
The BIOS Setup menus described in this section may differ from the exact settings for your motherboard.
The actual BIOS Setup menu options you will see shall depend on the motherboard you have and
the BIOS version.
B. Conguring SATA controller mode in BIOS Setup
Make sure to congure the SATA controller mode correctly in system BIOS Setup.
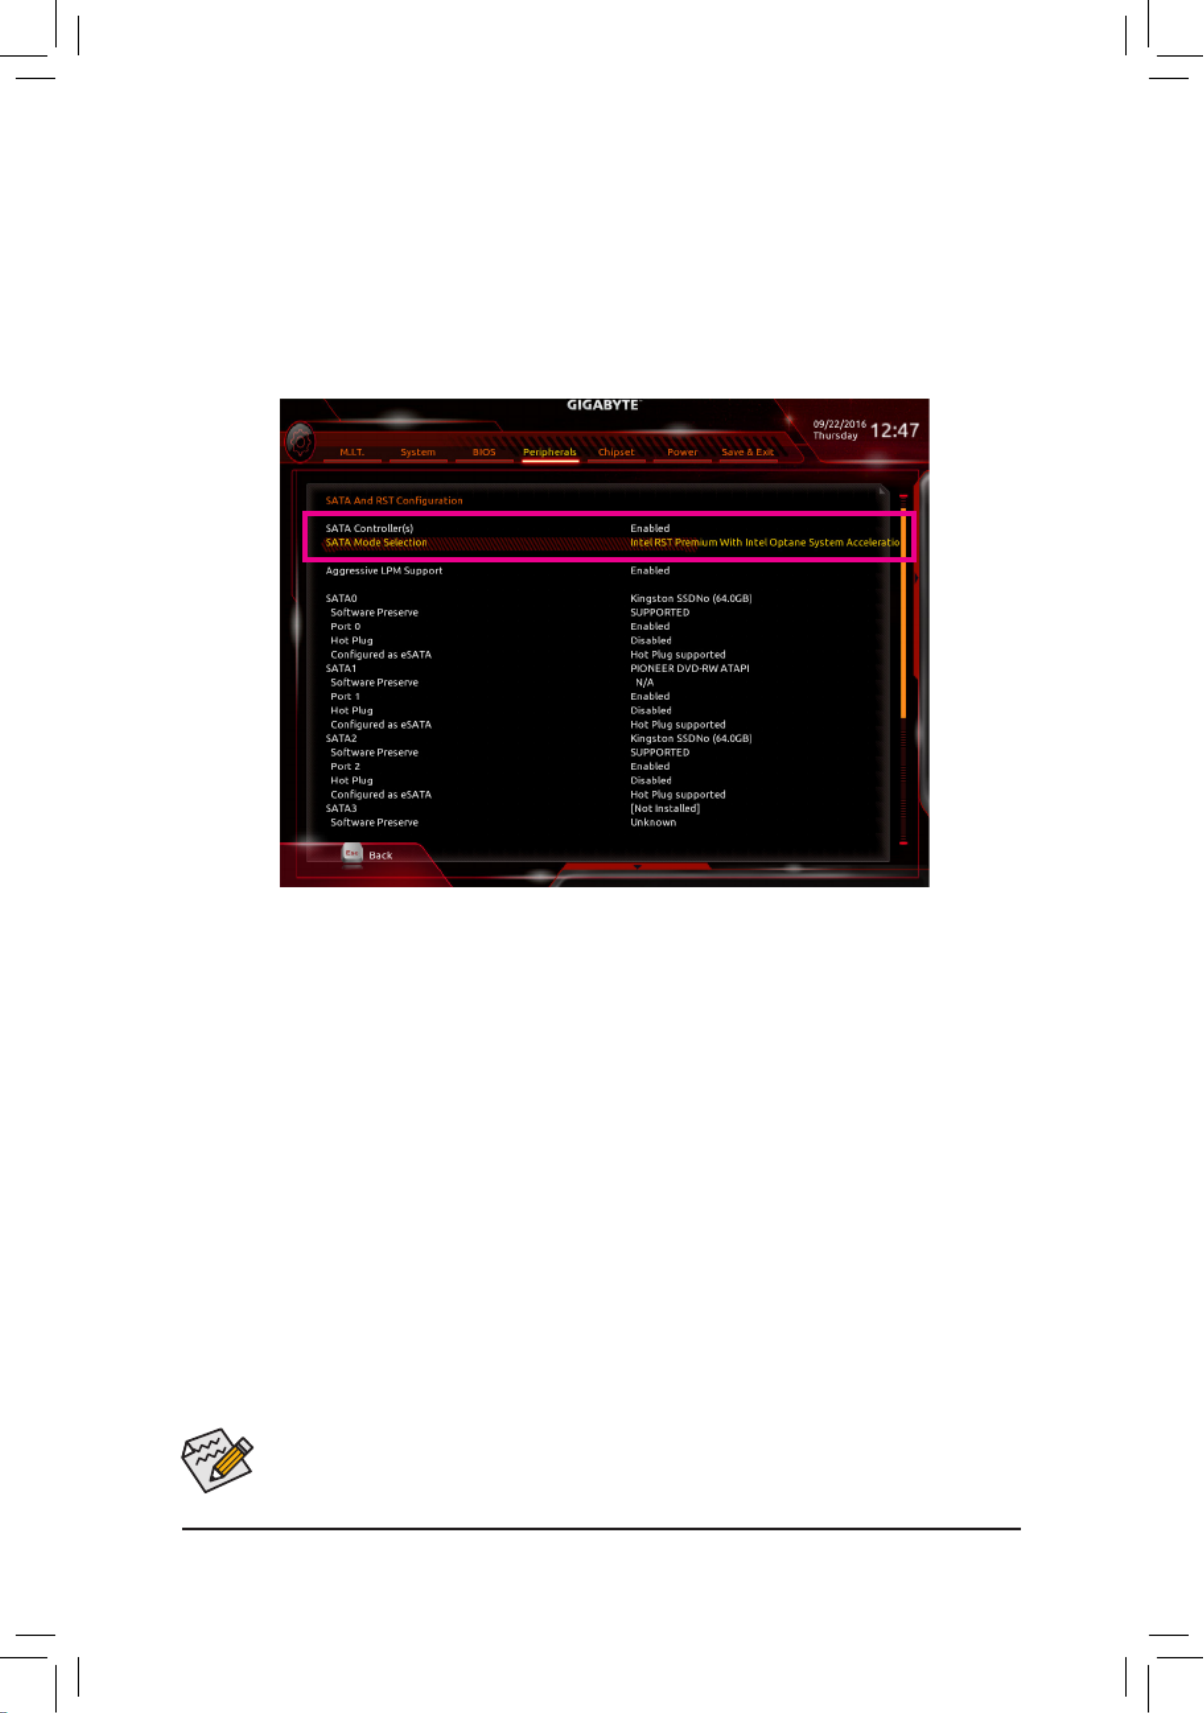
Step 1:
Turn on your computer and press <Delete> to enter BIOS Setup during the POST (Power-On Self-Test). Go to
Peripherals\SATA And RST Conguration SATA Controller(s), make sure is enabled. To create RAID, set
SATA Mode Selection Intel RST Premium With Intel Optane System Acceleration to (Figure 1).
Step 2:
To use the EZ RAID feature, follow the steps in "C-1." To congure UEFI RAID, follow the steps in "C-2." To
enter the legacy RAID ROM, refer to "C-3" for more information. Finally, save the settings and exit BIOS Setup.
Figure 1
Especificaciones del producto
| Marca: | Gigabyte |
| Categoría: | Placa madre |
| Modelo: | GA-H270M-D3H |
| Indicadores LED: | Ja |
| Tipo de conexión en serie: | RS-232/422/485 |
| Número de puertos Ethernet LAN (RJ-45): | 1 |
| Certificación: | UL, CSA, TUV, FCC, CE, FM Class I, Div. 2 |
| Voltaje de entrada: | 9 - 30 V |
| LAN Ethernet, velocidades de transferencia de datos: | 10, 100 Mbit/s |
| Tecnología de cableado: | 10/100Base-T(X) |
| Estándar de red: | IEEE 802.3, IEEE 802.3u |
| Sistemas operativos compatibles: | Windows 95/98/ME/NT/2000 |
| Protocolos de red compatibles: | ARP, UDP/IP, TCP/IP, ICMP, SNMP, BOOTP, DHCP, TFTP, Telnet, HTTP |
| LED de enlace/actuación: | Ja |
| Puertos seriales): | 1 |
| Protocolos de gestión: | SNMP, Telnet, HTTP |
| Ratio de transferencia: | 0.1152 Mbit/s |
| Temperatura de funcionamiento (TT): | 0 - 60 °C |
| Humedad relativa de funcionamiento (VV): | 20 - 90 procent |
| Aislamiento: | 1.5 kV |
¿Necesitas ayuda?
Si necesitas ayuda con Gigabyte GA-H270M-D3H haz una pregunta a continuación y otros usuarios te responderán
Placa madre Gigabyte Manuales

27 Octubre 2024
19 Octubre 2024
18 Octubre 2024
17 Octubre 2024
6 Octubre 2024
6 Octubre 2024
4 Octubre 2024
3 Octubre 2024
1 Octubre 2024
1 Octubre 2024
Placa madre Manuales
- Placa madre Asus
- Placa madre Sharkoon
- Placa madre Asrock
- Placa madre Supermicro
- Placa madre Evga
- Placa madre Intel
- Placa madre MSI
- Placa madre ECS
- Placa madre Foxconn
- Placa madre Elitegroup
- Placa madre EPoX
- Placa madre Biostar
Últimos Placa madre Manuales
27 Octubre 2024
27 Octubre 2024
27 Octubre 2024
27 Octubre 2024
27 Octubre 2024
27 Octubre 2024
27 Octubre 2024
20 Octubre 2024
19 Octubre 2024
18 Octubre 2024