LG 21FU2RLX Manual de Usario
LG
Television
21FU2RLX
Lee a continuación 📖 el manual en español para LG 21FU2RLX (32 páginas) en la categoría Television. Esta guía fue útil para 6 personas y fue valorada con 4.5 estrellas en promedio por 2 usuarios
Página 1/32

Colour Television
OWNER’S MANUAL
Please read this manual carefully before operating your set.
Retain it for future reference.
Record model number and serial number of the set.
See the label attached on the back cover and quote this infor-
mation to your dealer when you require service.
Model number :
Serial number :
P/NO : 38289U0578R (MC05HA/B, 145H/J/K/U TX) a

Contents
Installation 3
Location and function of controls 4
Remote control handset / Battery installation
Front panel / Side panel
Basic operation 8
On and o / Programme selection
Volume adjustment / Quick view
Mute function / Auto Demonstration
On screen language selection (option)
On screen menus 9
Menu selection
Setting up TV stations 10
Auto programme tuning
Manual programme tuning
Fine Tuning / Programme edit
Favourite programme
Calling the programme table
Picture adjustment 15
PSM (Picture Status Memory) / XD /
Cinema (option)
VM (Velocity Modulation) / Virtual HD (option)
Picture adjustment / Eye (option)
Turbo picture selection (option) / Picture format
Sound adjustment 19
SSM (Sound Status Memory) / Sound adjustment
X-WAVE (Wireless Sound) (option)
Turbo sound selection (option)
Sound output selection / Stereo/Dual reception
NICAM reception (option)
Time setting 22
Setting the clock / Setting the On/O timer
Auto sleep
Other functions 23
TV and AV modes / Auto AV switching (option)
Child lock /
XD Demo (option) /
Blue back (option)
Tilt / Degaussing (option) / Sleep timer
PIP operation (option) 26
On and o / Input mode selection for sub picture
Swapping between main and sub pictures
Programme selection for sub picture
Sub picture size / Sub picture freeze
Sub picture position change
Teletext (option) 27
Switch on/o
SIMPLE text / TOP text (option)
FASTEXT / Special teletext functions
Connection of external equipment 30
Aerial socket
Audio/Video in/out sockets (option)
Euro scart sockets (option)
S-Video/Audio in sockets (S-AV) (option)
Component in sockets
DTV in sockets / AV out sockets
Headphone socket (option)
Troubleshooting check list
2

Installation
Power
This set operates on an AC mains supply, the voltage is as indicat-
ed on the label on the back cover. Never apply DC power to the set.
In the event of thunderstorms or powercuts, please pull out the aer-
ial and mains plugs.
Warning
To prevent re or shock hazard, do not expose the set to rain or
moisture.
Do not place anything containing liquid on top of the set, this may
cause a re or could give an electric shock.
Service
Never remove the back cover of the set as this can expose you to
very high voltage and other hazards. If the set does not operate
properly, unplug it and call your dealer.
Aerial
Connect the aerial cable to the socket marked on the back
cover. For the best reception an outdoor aerial should be used.
Location
Position your set so that no bright light or sunlight falls directly onto
the screen. Care should be taken not to expose the set to any
unnecessary vibration, moisture, dust or heat. Also ensure that the
set is placed in a position to allow a free ow of air. Do not cover
the ventilation openings on the back cover.
3

Location and function of controls
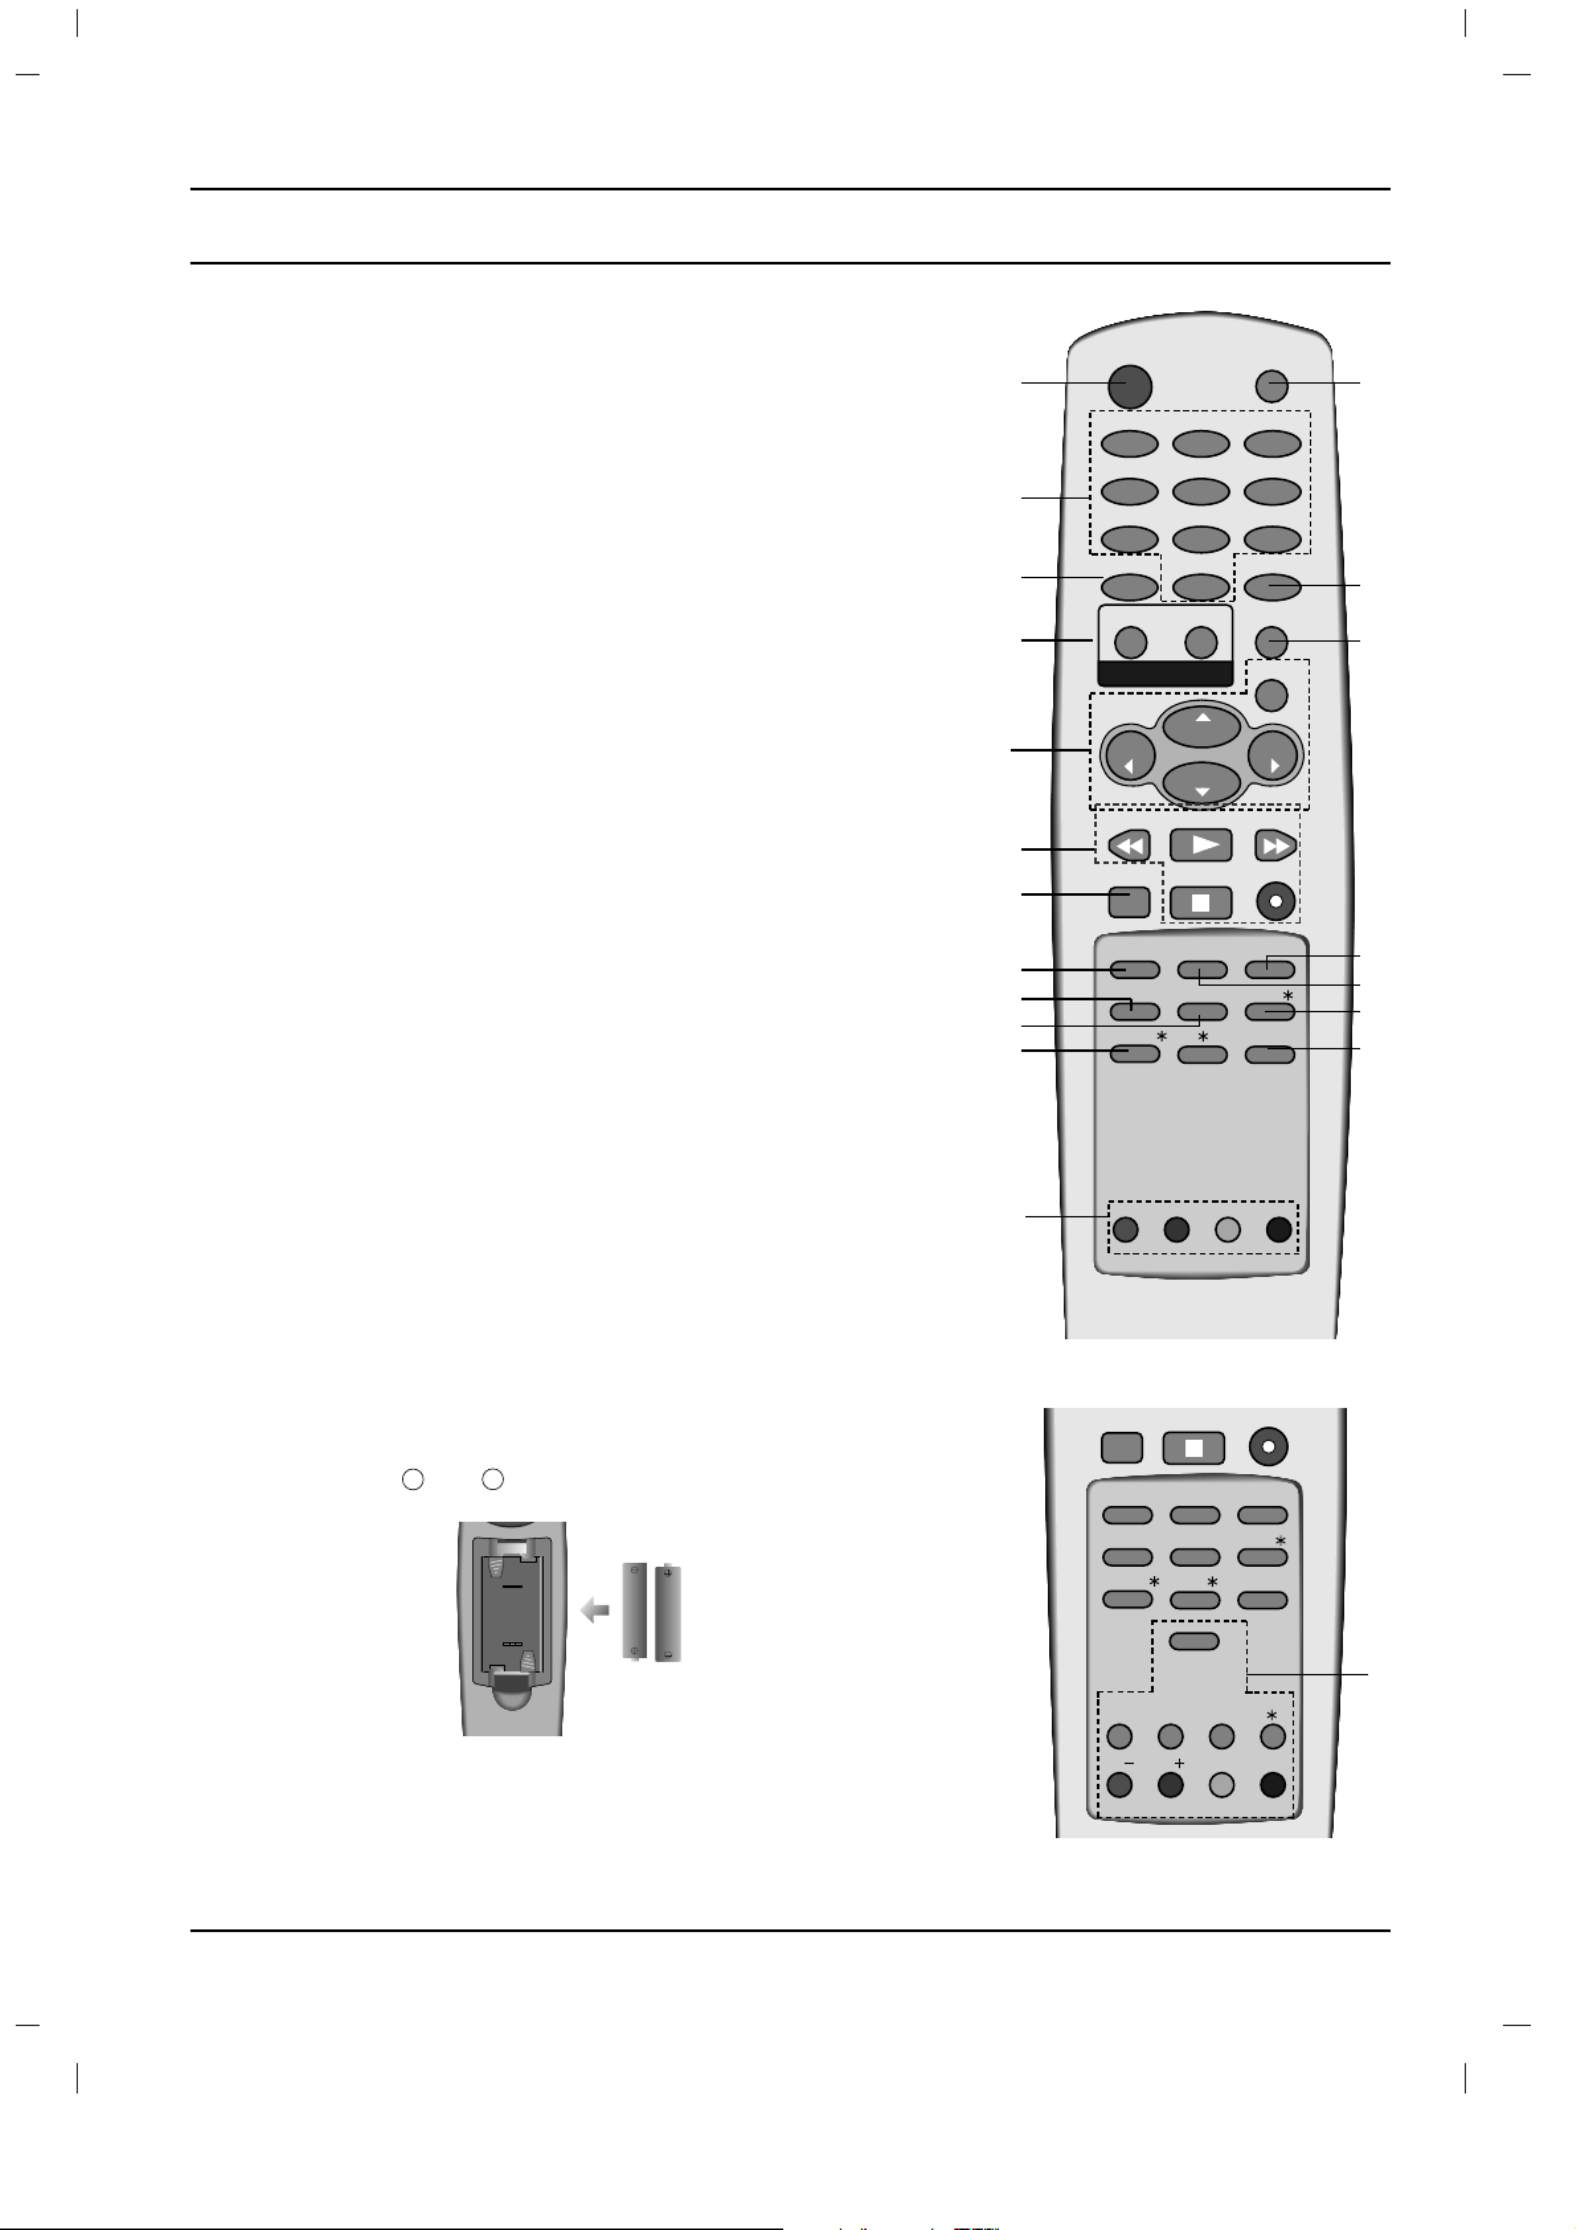
4
All the functions can be controlled with the remote control hand-
set. Some functions can also be adjusted with the buttons on the
front panel of the set.
Remote control handset
Before you use the remote control handset, please install the bat-
teries. See the next page.
1. POWER
switches the set on from standby or o to standby.
2. NUMBER BUTTONS
Switches the set on from standby or directly select a number.
3. ARC (Aspect Ratio Control)
changes the picture format.
4. TURBO PICTURE BUTTON / SOUND BUTTON (option)
selects Turbo picture/sound.
5. D
D
D
D
D
/ E
E
E
E
E(Programme Up/Down)
selects a programme or a menu item.
switches the set on from standby.
F
F
F
F
F
/ G
G
G
G
G
(Volume Up/Down)
adjusts the volume.
adjusts menu settings.
OK
accepts your selection or displays the current mode.
6.
VCR BUTTONS (option)
control a LG video cassette recorder.
7.
I/II
selects the language during dual language broadcast.
selects the sound output (option).
8. PSM (Picture Status Memory)
recalls your preferred picture setting.
9.
SLEEP
sets the sleep timer.
10.
MAIN STILL/*
( STILL)or
freezes motion of the picture.
11. TELETEXT BUTTONS (option)
These buttons are used for teletext.
For further details, see the ‘Teletext’ section.
12. MUTE
switches the sound on or o.
13. TV/AV
selects TV or AV mode.
switches the set on from standby.
( With TELETEXT / PIP)
FAVOURITE
STOP REC
I/II SSM LIST
PSM
SLEEP
MAIN STILL/
Q.VIEW
?
MIX TIME
SWAP INPUT
REVEAL MODE
SIZE STILL
POSITION
i
M
TEXT
PRPR
EYE/
INDEX/
PIP
20
OK
PR
VOL
PR
VOL
PLAY
FAVOURITE
STOP REC
REW FF
I/II SSM LIST
PSM
SLEEP
Q.VIEW
?
MIX TIME
REVEAL MODE
SIZE STILL
UPDATE
i
M
0
ARC TV/AV
MENU
PICTURE
SOUND
12 3
4 5 6
7 8 9
POWER MUTE
TEXT
T U R B O
EYE/
INDEX/
MAIN STILL/
1
2
4
3
5
6
21
7
9
12
13
14
15
18
17
16
19
8
11
10
10
(With TELETEXT / Without PIP)
Location and function of controls
14.
MENU
selects a menu.
15. LIST
displays the programme table.
16. SSM (Sound Status Memory)
recalls your preferred sound setting.
17.
EYE/*(option)
switches the eye function on or off.
18. Q.VIEW
returns to the previously viewed programme.
19. INDEX
/*
(option)
switches FRONT DISPLAY on or off.
20.
PIP BUTTONS (option)
PIP
switches the sub picture on or off.
PR +/-
selects a programme for the sub picture.
SWAP
alternates between main and sub picture.
INPUT
selects the input mode for the sub picture.
SIZE
adjusts the sub picture size.
STILL
freezes motion of the sub picture.
POSITION
relocates the sub picture in clockwise direction.
21. FAVOURITE
selects a favourite programme.
*: No function
COLOURED BUTTONS : These buttons are used for teletext (only
TELETEXT models) or programme edit.
Battery installation
The remote control handset is powered by two AA type batteries. To
load the batteries, turn the remote control handset over and open
the battery compartment. Install two batteries as indicated by the
polarity symbols ( and ) marked inside the compartment.
Note : To avoid damage from possible battery leakage, remove the
batteries if you do not plan to use the remote control handset for an
extended period of time.
5
+
-
FAVOURITE
STOP REC
I/II SSM LIST
PSM
SLEEP
Q.VIEW
SWAP INPUT
SIZE
STILL
POSITION
PRPR
EYE/
INDEX/
PIP
MAIN STILL/
20
(Without TELETEXT / With PIP)
OK
PR
VOL
PR
VOL
PLAY
FAVOURITE
STOP REC
REW FF
I/II SSM LIST
PSM
SLEEP
Q.VIEW
0
ARC TV/AV
MENU
PICTURESOUND
12 3
4 5 6
7 8 9
POWER MUTE
T U R B O
EYE/
MAIN STILL/
1
2
4
3
5
6
21
7
9
12
13
14
15
17
16
8
(Without TELETEXT / PIP)
18
10
20

ON/OFF
MENU
OK
VOL
PR
Location and function of controls
6
Front panel
ON/OFF
ON/OFF
ON/OFF
ON/OFF
ON/OFF
12 7
7
5
3
4
29/32FS2 series
25
29/32FS4 series 25/29FX5 series
1 2 5 3 74
25/29FB9 series
1 2 5 3 4 7
PR
L
ON/OFF
MENU
OK
PR
VOL
3
29FC9 series
4
1
24
5
7
4
3
1
1 32 4
29FY1 series
75
25/29FC1 series
MENU OK VOL PR
1 2 5 3 4
MEN U OK VOL PR
25/29FA5 series
1 53 74 2
25/29FE6 series
1 2 3 45
ON/OFF
VOLMENU OK PR
25/29CC2 series
1 2 5 3 4
25/29FX6 series
1 3 4
5
7
2
ON/OFF
MENU OK VOL PR
VID EO
AUDIO
L
R
AV IN3
29FB5 series
2 5 3 41 7
6

Location and function of controls
7
Side panel
S-VIDEO VIDEO L/MONO RAUDIO
S-VIDEO VIDEO L/MONO RAUDIO
AV IN3 AV IN3
S-VIDEO VIDEO L/MONO RAUDIO
AV IN3
8
6 6
1. MAIN POWER (ON/OFF)
switches the set on or o.
2. POWER/STANDBY INDICATOR
illuminates brightly when the set is in standby
mode.
dims when the set is switched on.
3. MENU
selects a menu.
4. OK
accepts your selection or displays the current
mode.
F
F
F
F
F
/ G
G
G
G
G
(Volume Down/Up)
adjusts the volume.
adjusts menu settings.
D
D
D
D
D
/ E
E
E
E
E(Programme Up/Down)
selects a programme or a menu item.
switches the set on from standby.
5. REMOTE CONTROL SENSOR
Note : Only use the supplied remote control
handset. (When you use others, they will not
be able to function.)
6. AUDIO/VIDEO IN SOCKETS (AV IN3)
(option)
Connect the audio/video out sockets of exter-
nal equipment to these sockets.
S-VIDEO/AUDIO IN SOCKETS (S-AV)
Connect the video out socket of an S-VIDEO
VCR to the socket. S-VIDEO
Connect the audio out sockets of the
S-VIDEO VCR to the audio sockets as in AV
IN3 (option).
7. EYE (option)
adjusts picture according to the surrounding
conditions.
8. HEADPHONE SOCKET (option)
Connect the headphone plug to this socket.
9. TURBO SOUND / PICTURE (option)
switches Turbo sound or Turbo picture func-
tion on or o.
ON/OFF
MENU OK VOL PR
1
25/29FA3 series
23 4 68 75
1
29FC2 series
2 3 45
1
29FX4 series
2 3 45
7
ON/OFF
MENU
VOL SOU N D
OK
PR PICT U R E
TU R BO
29Q9 series
1 2 5 4 9 7
3

Basic operation
On and o
1. Press the main power button to switch the set on.
2. If the set is in standby mode, press the , POWER D
D
D
D
D
/ E
E
E
E
E, TV/AV or
NUMBER buttons on the remote control handset to switch it on fully.
3. Press the button on the remote control handset. POWER
The set reverts to standby mode.
4. Press the main power button again to switch the set o.
Note : If, while the set is switched on, the mains plug is discon-
nected the set will switch to standby or power on when the mains
plug is replaced in the mains power socket.
Programme selection
You can select a programme number with the
D
D
D
D
D
/ E
E
E
E
E
or NUMBER
buttons.
Volume adjustment
Press the F
F
F
F
F
/ G
G
G
G
G
button to adjust the volume.
Quick view
Press the button to view the last programme you wereQ.VIEW
watching.
Mute function
Press the button. The sound is switched off and the displayMUTE
W appears.
You can cancel it by pressing the , MUTE F
F
F
F
F
/ G
G
G
G
G
, , , SSM I/II TURBO
SOUND button.
Auto Demonstration
To review all the menus programmed in the set, press the but-OK
ton of the panel control for about 10 seconds. To stop auto demon-
stration, press any button of the panel control or button ofPOWER
the remote control.
On screen language selection (option)
The menu can be displayed on the screen in desired language.
First select your language.
1. Press the button and then MENU D
D
D
D
D
/ E
E
E
E
E
button to select the
Special menu.
2. Press the G
G
G
G
Gbutton and then D
D
D
D
D
/ E
E
E
E
E
button to select Language.
3. Press the G
G
G
G
Gbutton and then
D
D
D
D
D
/ E
E
E
E
Ebutton to select your desired
language.
All the on screen displays will appear in the selected language.
Press the or OK F
F
F
F
F
button to select the Special menu.
4. Repeatedly press the button to return to normal TVMENU
viewing.
8
OK
PR
VOL
PR
VOL
I/II SSM
Q.VIEW
0
ARC TV/AV
MENU
PICTURE
SOUND
12 3
4 5 6
7 8 9
POWER MUTE
T U R B O

The dialogue between you and your set takes place on screen with
an operator menu. The buttons required for the operating steps are
also displayed.
Menu selection
1. Press the button and then MENU D
D
D
D
D
/ E
E
E
E
E
button to display each
menu.
2. Press the G
G
G
G
Gbutton and then D
D
D
D
D
/ E
E
E
E
E
button to select a menu item.
3. Press the G
G
G
G
Gbutton to display the sub menu or the pull-down
menu.
4. Change the setting of an item in the sub or pull-down menu with
the F
F
F
F
F
/ G
G
G
G
Gor D
D
D
D
D
/ E
E
E
E
E.
You can move to the higher level menu with the OK or F
F
F
F
Fbut-
ton and to move to the lower level menu press the G
G
G
G
Gbutton.
Note :
a. In the teletext mode, menus are not displayed.
b. In some models, the
Normal
/
Turbo search
will not display,
only the
Start
will display in the
Auto programme
menu.
c. On some models, the
Language
,
Cinema
,
XD Demo
,
X-WAVE
or
Virtual HD
will not display.
On screen menus
9
OK
PR
VOL
PR
VOL
ARC
MENU
TV programme
Auto
O
programme {
Manual
O
programme {
Program me
O
edit {
Favourite programmeO
{
() OKO}{O OMENU
Storage from {O
Normal search {O
Turbo search {O
5 S 69OOO OO O
O OO O OOO OO O1 C 03 6 S 17
O OO O OOO OO O2 C 12 7 S 22
O OO O OOO OO O3 S 66 8 C 09
O OO O OOO OO O4 S 67 9 C 11
DeleteOOOCopy
MoveOOOOOSkip
O OO O0 C 03
Picture menu
Station menu
PSM {
XD {
Cinema {
VM {
Virtual
O
HD {
Contrast {
Brightness {
Colour {
Sharpness {
() OKO}{O OMENU
Sound menu
() OKO}{O OMENU
Special menu
() OKO}{O OMENU
Time menu
() OKO}{O OMENU
() OKO}{O OMENU
System {
Channel {
Fine {
Search {
Name {
Booster {
() OKO}{O OMENU
() OK MENU}{O O
System {
Storage {
Station
Picture
Sound
Time
Special
Auto programme
Manual programme
Programme edit
BG
I
DK
L
2
SSM {
DBS {
AVL {
Balance {
X WAVE {-
Clock {
Off time {o
On time {o
Auto sleep {o
Language {
Input {
Child lock {o
XD Demo {o
Blue back {o
Tilt {
Degauss {

10
Setting up TV stations
OK
PR
VOL
PR
VOL
0
ARC
MENU
12 3
4 5 6
7 8 9
Auto
O
programme {
Manual
O
programme {
Program me
O
edit {
Favourite programme {O
() OKO}{O OMENU
Station
Up to 100 TV stations can be stored by programme numbers (0 to 99).
Once you have preset the stations, you will be able to use the D
D
D
D
D
/ E
E
E
E
E
or NUMBER buttons to scan the stations you programmed.
Stations can be tuned using automatic or manual modes.
Auto programme tuning
All stations that can be received are stored by this method. It is rec-
ommended that you use auto programme during installation of this set.
1. Press the button and then MENU D
D
D
D
D
/ E
E
E
E
E
button to select the
Station menu.
2. Press the G
G
G
G
Gbutton and then D
D
D
D
D
/ E
E
E
E
E
button to select Auto pro-
gramme .
3. Press the G
G
G
G
Gbutton to display the Auto programme menu.
4. Press the G
G
G
G
Gbutton. Select a TV system with the D
D
D
D
D
/ E
E
E
E
Ebutton
on the System pull-down menu;
BG : PAL B/G, SECAM B/G (Europe/East Europe)
I: PAL I/II (U.K./Ireland)
DK : PAL D/K, SECAM D/K (East Europe)
L: SECAM L/L’ (France)
5. Press the F
F
F
F
F
button.
6. Press the D
D
D
D
D
/ E
E
E
E
E
button to select Storage from.
7. Press the G
G
G
G
Gbutton. Select the beginning programme number
with the F
F
F
F
F
/ G
G
G
G
G
button or NUMBER buttons on the Storage
from pull-down menu. Any number under 10 is entered with a
numeric ‘0’in front of it, i.e. ‘05’for 5.
8. Press the button.OK
9. Press the D
D
D
D
D
/ E
E
E
E
E
button to select or Normal Turbo search.
Option: In some models, you can only select Start.
Note :
a.
Turbo search
is faster than
Normal search
and in some mod-
els, these searches will automatically store all receivable stations.
b.
If the programmed station has poor quality and sound, select
the system again in the
Manual programme
menu.
10. Press the G
G
G
G
Gbutton to begin auto programming.
All receivable stations are stored. The station name is stored for
stations which broadcast VPS (Video Programme Service),
PDC (Programme Delivery Control) or TELETEXT data. If no
station name can be assigned to a station, the channel number
is assigned and stored as C S(V/UHF 01-69) or (Cable 01-47),
followed by a number.
To stop auto programming, press the button. MENU
When auto programming is completed, the Programme edit
menu appears on the screen. See the ‘Programme edit’ section
to edit the stored programme.
11. Repeatedly press the button to return to normal TVMENU
viewing.
Storage fromO
{
Normal searchO
{
Turbo searchO
{
BG
I
DK
L
System
{
() OKO}{O OMENU
Auto programme
System
{
Storage fromO
{
Normal searchO
{
Turbo searchO
{
MENU
Auto programme
MENU
OO OC 01O( )BG
7 36%
Normal search

Setting up TV stations
Manual programme tuning
Manual programme lets you manually tune and arrange the sta-
tions in whatever order you desire. Also you can assign a station
name with ve characters to each programme number.
1. Press the button and then MENU D
D
D
D
D
/ E
E
E
E
E
button to select the
Station menu.
2. Press the G
G
G
G
Gbutton and then D
D
D
D
D
/ E
E
E
E
E
button to select Manual
programme.
3. Press the G
G
G
G
Gbutton to display the Manual programme
menu.
4. Press the D
D
D
D
D
/ E
E
E
E
E
button to select .Storage
5. Press the G
G
G
G
Gbutton to select the programme number. Select the
desired programme number (0 to 99) with the F
F
F
F
F
/ G
G
G
G
G
button or
NUMBER buttons on the Storage pull-down menu. Any num-
ber under 10 is entered with a numeric ‘0 05’ ‘in front of it, i.e. ’
for 5.
6. Press the button.OK
7. Press the D
D
D
D
D
/ E
E
E
E
E
button to select . System
8. Press the G
G
G
G
Gbutton. Select a TV system with the D
D
D
D
D
/ E
E
E
E
Ebutton
on the System pull-down menu;
BG : PAL B/G, SECAM B/G (Europe/East Europe)
I: PAL I/II (U.K./Ireland)
DK : PAL D/K, SECAM D/K (East Europe)
L: SECAM L/L’ (France)
9. Press the or OK F
F
F
F
Fbutton.
10. Press the D
D
D
D
D
/ E
E
E
E
E
button to select . Channel
11. Press the G
G
G
G
Gbutton. Press the D
D
D
D
D
/ E
E
E
E
Ebutton to select V/UHF
or Cable on the Channel pull-down menu.
If possible, select the channel number directly with the number
buttons. Any number under 10 is entered with a numeric ‘0’(or
‘00’) in front of it, i.e. ‘05 005’(or ‘ ’) for 5.
12. Press the or OK F
F
F
F
Fbutton.
13. Press the D
D
D
D
D
/ E
E
E
E
E
button to select . Search
14. Press the G
G
G
G
Gbutton. Press the F
F
F
F
F
/ G
G
G
G
G
button to commence
searching on the Search pull-down menu. If a station is found
the search will stop.
15. Press the button to store it. The display OK Stored will appear.
16. To store another station, repeat steps 4 to 15.
17. Repeatedly press the button to return to normal TVMENU
viewing.
11
OK
PR
VOL
PR
VOL
0
ARC
MENU
12 3
4 5 6
7 8 9
Auto
O
programme {
Manual
O
programme {
Program me
O
edit {
Favourite programme {O
() OKO}{O OMENU
Station
System {
Channel {
Fine {
Search {
Name {
Booster {
2
Storage {
() OKO}{O OMENU
Manual programme
Storage {
System {
Channel {
Fine {
Search {
Name {
Booster {
Stored
Manual programme
F
F
F
F
F
G
G
G
G
G
OK
PR
VOL
PR
VOL
ARC
MENU
Setting up TV stations
Assigning a station name
1. Repeat the ‘Manual programme tuning’ steps 1 to 3.
2. Press the D
D
D
D
D
/ E
E
E
E
E
button to select Name.
3. Press the G
G
G
G
G
button . on the pull-down menuName
4. Press the D
D
D
D
D
button. You can use a blank, , , the numeric to + - 0 9
and the alphabet to . A Z
With the E
E
E
E
Ebutton you can select in the opposite direction.
5. Select the position by pressing the
F
F
F
F
F
/ G
G
G
G
Gbutton and then take
your choice of the second character, and so on.
6. Press the button.OK
7. Repeatedly press the button to return to normal TVMENU
viewing.
Booster (option)
In some models, is an optional function. Only a set withBooster
Booster can perform this function.
If the reception is poor at the fringe area of the TV signal, select
Booster to On.
1 Repeat the ‘Manual programme tuning’ steps 1 to 3.
2. Press the D
D
D
D
D
/ E
E
E
E
E
button to select .Booster
3. Press the G
G
G
G
G
button.
4. Press the
D
D
D
D
D
/ E
E
E
E
Ebutton to select or on the pull-On Off Booster
down menu.
5. Press the button.OK
6. Repeatedly press the button to return to normal TVMENU
viewing.
Fine tuning
Normally ne tuning is only necessary if reception is poor.
1 Repeat the ‘Manual programme tuning’ steps 1 to 3.
2. Press the D
D
D
D
D
/ E
E
E
E
E
button to select .Fine
3. Press the G
G
G
G
G
button.
4. Press the F
F
F
F
F
/ G
G
G
G
G
button to ne tune for the best picture and
sound on the pull-down menu.Fine
5. Press the button.OK
6. Repeatedly press the button to return to normal TVMENU
viewing.
The nely tuned programme will be indicated by yellow number
during programme selection.
12
Storage {
System {
Channel {
Fine {
Search {
Name {
Booster {
O}{OOKOMENU
Manual programme
F
F
F
F
F
G
G
G
G
G
Auto
O
programme {
Manual
O
programme {
Program me
O
edit {
Favourite programme {O
() OKO}{O OMENU
Station

Setting up TV stations
PR
VOL
PR
VOL
SWAP INPUT
0
ARC
MENU
12 3
4 5 6
7 8 9
PR
PR
Programme edit
This function enables you to delete or skip the stored programmes.
Also you can move some stations to other programme numbers or
insert a blank station data into the selected programme number.
1. Press the button and then MENU D
D
D
D
D
/ E
E
E
E
E
button to select the
Station menu.
2. Press the G
G
G
G
Gbutton and then D
D
D
D
D
/ E
E
E
E
E
button to select
Programme edit.
3. Press the G
G
G
G
Gbutton to display the Programme edit menu.
Deleting a programme
1. Select a programme to be deleted with the D
D
D
D
D
/ E
E
E
E
E
or F
F
F
F
F
/ G
G
G
G
G
button.
2. Press the RED button twice.
The selected programme is deleted, and all the following pro-
grammes are shifted up one position.
Copying a programme
1. Select a programme to be copied with the
D
D
D
D
D
/ E
E
E
E
E
or F
F
F
F
F
/ G
G
G
G
Gbutton.
2. Press the GREEN button.
All the following programmes are shifted down one position.
Moving a programme
1. Select a programme to be moved with the
D
D
D
D
D
/ E
E
E
E
E
or F
F
F
F
F
/ G
G
G
G
Gbutton.
2. Press the YELLOW button.
3. Move the programme to the desired programme number with
the D
D
D
D
D
/ E
E
E
E
Eor F
F
F
F
F
/ G
G
G
G
Gbutton.
4. Press the YELLOW button again to release this function.
Skipping a programme number
1. Select a programme number to be skipped with the
D
D
D
D
D
/ E
E
E
E
E
or F
F
F
F
F
/ G
G
G
G
G
button.
2. Press the BLUE button. The skipped programme turns to blue.
3. Press the BLUE button again to release the skipped pro-
gramme. When a programme number is skipped it means that
you will be unable to select it using the
D
D
D
D
D
/ E
E
E
E
E
button during nor-
mal TV viewing. If you want to select the skipped programme,
directly enter the programme number with the but-NUMBER
tons or select it in the programme edit or table menu.
Repeatedly press the button to return to normal TV viewing.MENU
Auto
O
programme {
Manual
O
programme {
Program me
O
edit {
Favourite programme {O
() OKO}{O OMENU
Station
S 69OOO5OO O
O OO O OO O1 C 03OOO6 S 17
O OO O OO O2 C 12OOO7 S 22
O OO O OO O3 S 66OOO8 C 09
O OO O OO O4 S 67OOO9 C 11
DeleteOOOCopy
MoveOOOOOSkip
OOOO OC 01
() OK MENU}{O O
Programme edit
S 69OOO5OO O
O OO O OO O1 C 03OOO6 S 17
O OO O OO O2 C 12OOO7 S 22
O OO O OO O3 S 66OOO8 C 09
O OO O OO O4 S 67OOO9 C 11
Move
O
Off
OOOO OC 01
() MENU}{OO
Programme edit
13

OK
PR
VOL
PR
VOL
FAVOURITE
LIST
SWAP INPUT
0
ARC
MENU
12 3
4 5 6
7 8 9
PR
PR
Favourite programme
This function lets you select your favourite programmes directly.
1. Press the button MENU and then D
D
D
D
D
/ E
E
E
E
E
button to select the
Station menu.
2. Press the G
G
G
G
Gbutton and then D
D
D
D
D
/ E
E
E
E
E
button to select Favourite
programme.
3. Press the G
G
G
G
Gbutton to display the Favourite programme menu.
4. Press the D
D
D
D
D
/ E
E
E
E
E
button to select -- -----.
5. Select a desired programme with the F
F
F
F
F
/ G
G
G
G
G
button or NUMBER
buttons. Any number under 10 is entered with a numeric ‘0’in
front of it, i.e. ‘05’for 5.
6. To store another programme, repeat steps 4 and 5.
You can store up to 8 programmes.
7. Press the OK button.
8. Repeatedly press the button to return to normal TVMENU
viewing.
Repeatedly press the FAVOURITE button to select stored favourite
programmes.
Calling the programme table
You can check the programmes stored in the memory by displaying
the programme table.
Displaying programme table
Press the button to display the menu.LIST Programme table
The programme table appears on the screen. One programme
table contains ten programmes as below.
Note :
a. You may nd some blue programmes. They have been set up
to be skipped by auto programming or in the programme edit
mode.
b. Some programmes with the channel number shown in the pro-
gramme table indicate there is no station name assigned.
Selecting a programme in the programme table
Select a programme with the D
D
D
D
D
/ E
E
E
E
E
or
F
F
F
F
F
/ G
G
G
G
G
button.
Then press the button.OK
The set switches to the chosen programme number.
Paging through a programme table
There are 10 programme table pages which contain 100 pro-
grammes.
Pressing the D
D
D
D
D
/ E
E
E
E
E
or F
F
F
F
F
/ G
G
G
G
Gbutton repeatedly turns the pages.
Press the button to return to normal TV viewing.LIST
Setting up TV stations
14
S 69OOO5OO O
O OO O OO O1 C 03OOO6 S 17
O OO O OO O2 C 12OOO7 S 22
O OO O OO O3 S 66OOO8 C 09
O OO O OO O4 S 67OOO9 C 11
O OO OO C 01
() OK MENU}{O O
Station
Auto
O
programme {
Manual
O
programme {
Program me
O
edit {
Favourite programme {O
() OKO}{O OMENU
Station
Auto
O
programme {
Manual
O
programme {
Program me
O
edit {
Favourite programme {O
() OK MENU}{O O
Station
56 Cn a 0 5
Picture adjustment
15
OK
PR
VOL
PR
VOL
PSM
SWAP INPUT
ARC
MENU
PR
PR
PSM (Picture Status Memory)
1. Press the button and then MENU D
D
D
D
D
/ E
E
E
E
E
button to select the
Picture menu.
2. Press the G
G
G
G
Gbutton and then D
D
D
D
D
/ E
E
E
E
E
button to select PSM.
3. Press the G
G
G
G
Gbutton and then D
D
D
D
D
/ E
E
E
E
Ebutton to select a picture
setting on the pull-down menu.PSM
4. Press the or OK F
F
F
F
F
button.
5. Repeatedly press the button to return to normal TVMENU
viewing.
You can also recall a desired picture ( , ,Dynamic Standard
Mild, Game or User) with button on the remote control. ThePSM
picture , , and Dynamic Standard Mild Game are programmed
for good picture reproduction at the factory and cannot be changed.
XD
You can enjoy the vivid and hi-denition picture with LG’s excellent
Digital Reality processor technology.
1. Press the button and then MENU D
D
D
D
D
/ E
E
E
E
E
button to select the
Picture menu.
2. Press the G
G
G
G
Gbutton and then D
D
D
D
D
/ E
E
E
E
E
button to select XD.
3. Press the G
G
G
G
Gbutton and then D
D
D
D
D
/ E
E
E
E
Ebutton to select or On Off
on the pull-down menu.XD
4. Press the or OK F
F
F
F
F
button.
5. Repeatedly press the button to return to normal TVMENU
viewing.
Note :
When selecting picture options (
Dynamic
,
Standard
,
Mild
or
Game
) in picture menu ‘
XD
’ is automatically changed to
‘
On
’
PSM {
XD {
Cinema {
VM {
Virtual
O
HD {
Contrast {
Brightness {
Colour {
Sharpness {
() OKO}{O OMENU
Picture
Standard
Mild
Game
User
Dynamic PSM {
XD {
Cinema {
VM {
Virtual
O
HD {
Contrast {
Brightness {
Colour {
Sharpness {
() } OKO O OMENU
Picture
PSM {
XD {
Cinema {
VM {
Virtual
O
HD {
Contrast {
Brightness {
Colour {
Sharpness {
() } OKO O OMENU
Picture
On
Off

Picture adjustment
16
OK
PR
VOL
PR
VOL
ARC
MENU
Cinema (option)
When you watch the movie, this function adjusts the set to the
best picture appearance.
1. Press the button and then MENU D
D
D
D
D
/ E
E
E
E
Ebutton to select the
Picture menu.
2. Press the G
G
G
G
Gbutton and then D
D
D
D
D
/ E
E
E
E
E
button to select Cinema.
3.
Press the G
G
G
G
Gbutton and then D
D
D
D
D
/ E
E
E
E
Ebutton to select On
or
Off .
4. Press the button.OK
5. Repeatedly press the button to return to normal TVMENU
viewing.
VM (Velocity Modulation)
This is the function to enhance the sharpness of image edge.
1. Press the button and then MENU D
D
D
D
D
/ E
E
E
E
Ebutton to select the
Picture menu.
2. Press the G
G
G
G
Gbutton and then D
D
D
D
D
/ E
E
E
E
E
button to select VM.
3. Press the G
G
G
G
Gbutton and then F
F
F
F
F
/ G
G
G
G
Gbutton to adjust the VM.
4. Press the button.OK
5. Repeatedly press the button to return to normal TVMENU
viewing.
Virtual HD
(option)
1. Press the button and then MENU D
D
D
D
D
/ E
E
E
E
Ebutton to select the
Picture menu.
2. Press the G
G
G
G
Gbutton and then D
D
D
D
D
/ E
E
E
E
E
button to select Virtual HD.
3. Press the G
G
G
G
Gbutton and then D
D
D
D
D
/ E
E
E
E
E
button to select , or100 Pro
1080i.
4. Press the button.OK
5. Repeatedly press the button to return to normal TVMENU
viewing.
Note :
a. When you change to 16:9 mode after selecting
100
for
Virtual
HD
, it’s automatically changed to
Pro
.
b.
It’s not available to use
100
for
Virtual HD
in NTSC signal.
PSM {
XD {
Cinema {
VM {
Virtual
O
HD {
Contrast {
Brightness {
Colour {
Sharpness {
() OKO}{O OMENU
Picture
PSM {
XD {
Cinema {
VM {
Virtual
O
HD {
Contrast {
Brightness {
Colour {
Sharpness {
() } OKO O OMENU
Picture
1
PSM {
XD {
Cinema {
VM {
Virtual
O
HD {
Contrast {
Brightness {
Colour {
Sharpness {
() } OKO O OMENU
Picture
100
Pro
1080i

Picture adjustment
You can adjust picture contrast, brightness, colour intensity, sharp-
ness and tint (NTSC AV only) to the levels you prefer.
1. Press the button and then MENU D
D
D
D
D
/ E
E
E
E
E
button to select the
Picture menu.
2. Press the G
G
G
G
Gbutton and then D
D
D
D
D
/ E
E
E
E
E
button to select ,Contrast
Brightness Colour Sharpness, or .
3. Press the G
G
G
G
Gbutton and then F
F
F
F
F
/ G
G
G
G
G
button to make appropriate
adjustments on the each sub menu.
4. Press the button to store it for the picture .OK user
5. Repeatedly press the button to return to normal TVMENU
viewing.
Eye (option)
Eye is an optional function. Only a set with eye option can perform
this function.
In some models, the set will automatically adjust the picture accord-
ing to the surrounding conditions. This will enable you to enjoy the
most suitable picture according to the surroundings.
Press the EYE/*button to switch the eye function on or o.
When the eye function is on, the most suitable picture is automati-
cally adjusted according to the surrounding conditions.
At this time the display in green does not appear continu-
ously but the display in yellow appears each time the picture
condition changes.
Note : PSM TURBO PICTURE If you press the or button with the
eye function, the eye function is automatically switched o.
Picture adjustment
17
OK
PR
VOL
PR
VOL
PSM
MENU
PICTURE
T U R B O
EYE/
Off
}{O() OK MENUO O
Contrast 80
PSM {
XD {
Cinema {
VM {
Virtual
O
HD {
Brightness {
Colour {
Sharpness {
() } OKO O OMENU
Picture
100
Contrast {

Turbo picture selection (option)
When this function is on, the picture will be more brilliant and dis-
tinct than normal picture.
Repeatedly press the button to switch on or o.TURBO PICTURE
Note : PSMIf you press the button with the Turbo picture function,
the Turbo picture function is automatically switched o.
Picture format
You can watch TV in various picture formats; 4:3, 16:9 (Wide) or
Zoom.
In some models, you can watch TV in various picture formats; 4:3,
16:9 (Wide), 14:9, Zoom or Auto.
Repeatedly press the button to select your desired picture format.ARC
4:3
This picture format is 4 to 3 of general TV.
16:9
You can enjoy the cinema (the picture format of 16:9) or general TV
programme through the 16:9 mode.
14:9 (option)
You can enjoy the picture format of 14:9 or general TV programme
through the 14:9 mode. The screen 14:9 is viewed just like that the
screen 4:3 is magnied to the upper / lower and left / right. You can
move the screen up or down with D
D
D
D
D
/ E
E
E
E
Ebutton.
Zoom (option)
You can enjoy the cinema in a vast screen through the Zoom mode.
The screen 4:3 is magnied to the upper/lower and left/right sides
so that the screen 16:9 is full. The bottom and top of the picture
may be lost. In some models, you can move the screen up or down
with D
D
D
D
D
/ E
E
E
E
Ebutton.
Auto (option)
When your TV receives the wide screen signal, it will be automati-
cally changed to the picture format to be sent.
Note :
a. In the 1/2 PIP modes, ARC function isn’t available.
b. You can only select 4:3 in Component (720p/1080i) mode only.
Picture adjustment
18
PR
PR
PSM
ARC
PICTURE
T U R B O
(Turbo Picture o) (Turbo Picture on)

Sound adjustment
19
SSM (Sound Status Memory)
You can select your preferred sound setting; Flat, Music, Movie or
Sports and you can also adjust the sound frequency of equalizer.
1. Press the button and then MENU D
D
D
D
D
/ E
E
E
E
E
button to select the
Sound menu.
2. Press the G
G
G
G
Gbutton to select SSM.
3. Press the G
G
G
G
Gbutton and then
D
D
D
D
D
/ E
E
E
E
Ebutton to select a sound set-
ting on the pull-down menu.SSM
Sound Frequency Adjustment
a. Press the G
G
G
G
Gbutton in to display the sub menu.User User
b. Select a sound band by pressing the F
F
F
F
F
/ G
G
G
G
G
button.
c. Make appropriate sound level with the D
D
D
D
D
/ E
E
E
E
E
button.
d. Press the button to store it for the sound .OK User
Repeatedly press the button to return to normal TV viewing.MENU
You can also recall a desired sound ( , , , Flat Music Movie Sports
or User) with button on the remote control. The sound ,SSM Flat
Music, Movie and Sports are programmed for good sound repro-
duction at the factory and cannot be changed.
Note : SSM If you press the button after making appropriate adjust-
ment on the
User
sub menu, the display
User
automatically
appears even though you have already set a factory preset setting;
Flat
,
Music
,
Movie
or
Sports
.
() OKO}{O OMENU
0.1O O O O0.5 1.5 5.0 10OkHz
SSM {
DBS {
AVL {
Balance {
X WAVE {-
() } OKO O OMENU
Sound
Flat
Music
Movie
Sports
User {
OK
PR
VOL
PR
VOL
SSM
ARC
MENU
() OKO}{O OMENU
Sound
SSM {
DBS {
AVL {
Balance {
X WAVE {-

Sound adjustment
You can adjust balance, AVL (Auto Volume Leveler), DBS. AVL
automatically keeps on an equal volume level even if you change
programmes. If you switch DBS to on, the set creates a dynamic
bass sound. The Turbo sound creates an all around sound as in a
concert hall.
1. Press the button and then MENU D
D
D
D
D
/ E
E
E
E
E
button to select the
Sound menu.
2. Press the G
G
G
G
Gbutton and then D
D
D
D
D
/ E
E
E
E
E
button to select the desired
sound item; AVL, DBS
or
Balance.
3. Make desired adjustment with the F
F
F
F
F
/ G
G
G
G
G, D
D
D
D
D
/ E
E
E
E
E
or buttonOK
on each pull-down menu.
4. Repeatedly press the button to return to normal TVMENU
viewing.
X-WAVE (Wireless Sound) (option)
You can also listen to the sound through the FM receiver.
1. Press the button and then MENU D
D
D
D
D
/ E
E
E
E
E
button to select the
Sound menu.
2. Press the G
G
G
G
Gbutton and then D
D
D
D
D
/ E
E
E
E
E
button to select X-WAVE.
3. Press the G
G
G
G
Gbutton and then D
D
D
D
D
/ E
E
E
E
E
button to select Set
Frequency.
4. Press the G
G
G
G
Gbutton to tune in a frequency on the X-wave menu.
5. Use the number to or press the 0 9 F
F
F
F
F
/ G
G
G
G
Gbutton to match the
TV’s frequency and the FM receiver’s.
Note:
a. If the reception is poor or weak, select a dierent frequency.
b. For best results, there should be no more that 5m (16.4ft)
between the TV and FM Receiver.
c. In certain areas, the FM transmitter ability may be weak, such
as near a broadcast tower.
d. The reception sensitivity may depend on the kinds of receiver
(FM radio).
Turbo sound selection (option)
When this function is on, the sound will be more emphasized and
amplied than normal sound.
Repeatedly press the button to switch on or o.TURBO SOUND
Sound adjustment
20
OK
PR
VOL
PR
VOL
0
ARC
MENU
SOUND
12 3
4 5 6
7 8 9
T U R B O
() OKO}{O OMENU
Sound
SSM {
AVL {
DBS {
Balance {
X WAVE {-
X-WAVE
FM 95.0 MHZ
88 MHZ 107MHZ
}{09 MENU-OOKO
(Turbo Sound o) (Turbo Sound on)
SSM {
DBS {
AVL {
X WAVE {-
}{OOKOMENU
Sound
Balance {
Sound
() OKO}{O OMENU
SSM {
DBS {
AVL {
Balance {
X WAVE {-
Set
O
Freq
{
Off
Especificaciones del producto
| Marca: | LG |
| Categoría: | Television |
| Modelo: | 21FU2RLX |
¿Necesitas ayuda?
Si necesitas ayuda con LG 21FU2RLX haz una pregunta a continuación y otros usuarios te responderán
Television LG Manuales

26 Octubre 2024
23 Octubre 2024
23 Octubre 2024
23 Octubre 2024
23 Octubre 2024
23 Octubre 2024
10 Octubre 2024
9 Octubre 2024
7 Octubre 2024
4 Octubre 2024
Television Manuales
- Television Sony
- Television Samsung
- Television Xiaomi
- Television Casio
- Television AEG
- Television Philips
- Television Panasonic
- Television BEKO
- Television Daewoo
- Television Grundig
- Television JVC
- Television Medion
- Television Nokia
- Television Pioneer
- Television Siemens
- Television Toshiba
- Television Xiron
- Television Ag Neovo
- Television Acer
- Television Aiwa
- Television AOC
- Television Akai
- Television Alden
- Television Alphatronics
- Television Aldi
- Television Allview
- Television Airis
- Television Arcelik
- Television Aristona
- Television Apex
- Television Strong
- Television Icy Box
- Television BenQ
- Television Lexibook
- Television Sharp
- Television Techwood
- Television Loewe
- Television Brandt
- Television Telefunken
- Television Palsonic
- Television Silvercrest
- Television Walker
- Television Funai
- Television Hitachi
- Television Thomson
- Television Saba
- Television Antarion
- Television Lenco
- Television Pyle
- Television Kernau
- Television Manta
- Television Tevion
- Television SereneLife
- Television OK
- Television Hisense
- Television Hyundai
- Television Vox
- Television Proscan
- Television Westinghouse
- Television Vestel
- Television ECG
- Television Bush
- Television RCA
- Television Clatronic
- Television Tucson
- Television Sencor
- Television GPX
- Television Blaupunkt
- Television Megasat
- Television Lenovo
- Television Manhattan
- Television Svan
- Television Logik
- Television Polaroid
- Television Sagem
- Television Salora
- Television Denver
- Television Optoma
- Television Finlux
- Television Schneider
- Television Sanyo
- Television Sunstech
- Television Bang And Olufsen
- Television Philco
- Television TCL
- Television Nabo
- Television Infiniton
- Television Sylvania
- Television Mitsubishi
- Television Aspes
- Television Schaub Lorenz
- Television Nec
- Television Emerson
- Television Sunny
- Television Technisat
- Television GoGEN
- Television Marquant
- Television Orima
- Television Luxor
- Television Nordmende
- Television AudioAffairs
- Television Magnum
- Television Haier
- Television Krüger And Matz
- Television Iiyama
- Television Oki
- Television Kubo
- Television Proline
- Television Coby
- Television Muse
- Television Marantz
- Television Seg
- Television Metz
- Television Vivo
- Television Element
- Television Qilive
- Television Continental Edison
- Television Uniden
- Television Insignia
- Television Daitsu
- Television Peerless-AV
- Television Dual
- Television Terris
- Television AYA
- Television Changhong
- Television Planar
- Television Alba
- Television Naxa
- Television Technika
- Television Chiq
- Television Star-Light
- Television Fantec
- Television Nextbase
- Television Zenith
- Television Teac
- Television Mpman
- Television Sweex
- Television Trevi
- Television Vizio
- Television Tesla
- Television Cello
- Television Sogo
- Television Mx Onda
- Television Orion
- Television Wharfedale
- Television Viewsonic
- Television Peaq
- Television Vivax
- Television Hannspree
- Television Nevir
- Television Yasin
- Television Roadstar
- Television Humax
- Television Newstar
- Television XD Enjoy
- Television MT Logic
- Television Superior
- Television Kunft
- Television ITT
- Television Grunkel
- Television Avtex
- Television ILive
- Television Intenso
- Television Odys
- Television NPG
- Television Furrion
- Television Cecotec
- Television Bluesky
- Television Videocon
- Television Xoro
- Television Durabase
- Television HKC
- Television Edenwood
- Television Monster
- Television Woxter
- Television Premier
- Television Onn
- Television Packard Bell
- Television Opera
- Television LTC
- Television JTC
- Television Zalman
- Television Orava
- Television Horizon
- Television Ferguson
- Television Reflexion
- Television Viewpia
- Television JGC
- Television Dyon
- Television DirecTV
- Television Tele 2
- Television Graetz
- Television Kogan
- Television Telesystem
- Television Kemo
- Television Jay-tech
- Television Doffler
- Television EKO
- Television E-motion
- Television Mitsai
- Television Selfsat
- Television High One
- Television V7
- Television Tve
- Television ISymphony
- Television Pantel
- Television ATYME
- Television HCI
- Television Inno-Hit
- Television Lin
- Television Engel
- Television TechLine
- Television Elements
- Television Digihome
- Television Englaon
- Television Reflex
- Television Astar
- Television Visco
- Television Tivax
- Television H&B
- Television Norcent
- Television TELE System
- Television United
- Television TIM
- Television Oyster
- Television Belson
- Television Vision Plus
- Television Sbr
- Television Bauhn
- Television Voxx
- Television Rm 2000
- Television Hoher
- Television Majestic
- Television Felson
- Television SEIKI
- Television Mach Power
- Television Elbe
- Television MBM
- Television Axing
- Television FFalcon
- Television CGV
- Television Smart Tech
- Television SunBriteTV
- Television Séura
- Television Mitzu
- Television Caratec
- Television JTC24
- Television Coocaa
- Television SYLVOX
- Television Kivi
- Television Smart Brand
- Television RevolutionHD
- Television Voxicon
- Television QBell Technology
- Television Aconatic
- Television Mitchell & Brown
- Television FOX Electronics
- Television Mystery
Últimos Television Manuales
27 Octubre 2024
27 Octubre 2024
27 Octubre 2024
27 Octubre 2024
27 Octubre 2024
27 Octubre 2024
27 Octubre 2024
27 Octubre 2024
27 Octubre 2024
27 Octubre 2024