Primera PTLink Manual de Usario
Lee a continuación 📖 el manual en español para Primera PTLink (6 páginas) en la categoría Impresora. Esta guía fue útil para 3 personas y fue valorada con 4.5 estrellas en promedio por 2 usuarios
Página 1/6
1
Secon 1: Overview
The PTLink IP60 wireless print module is a print server that allows the Primera IP60 Photo
Printer to receive prints from IPhone/IPad devices. It features two separate network modes:
1. Hotspot network mode (default) allows the iPhone/iPad to connect and print directly to
the IP60 with no other network present. This is great for events where you will not
necessarily have access to a wi network.
2. Wi network mode allows users to connect the IP60 to their own wireless network,
making it accessible throughout their personal network infrastructure. This is ideal for
an oce where you want easy access to print to the IP60 just by connecng your device
to the same wi network.
Secon 2: First Time Setup
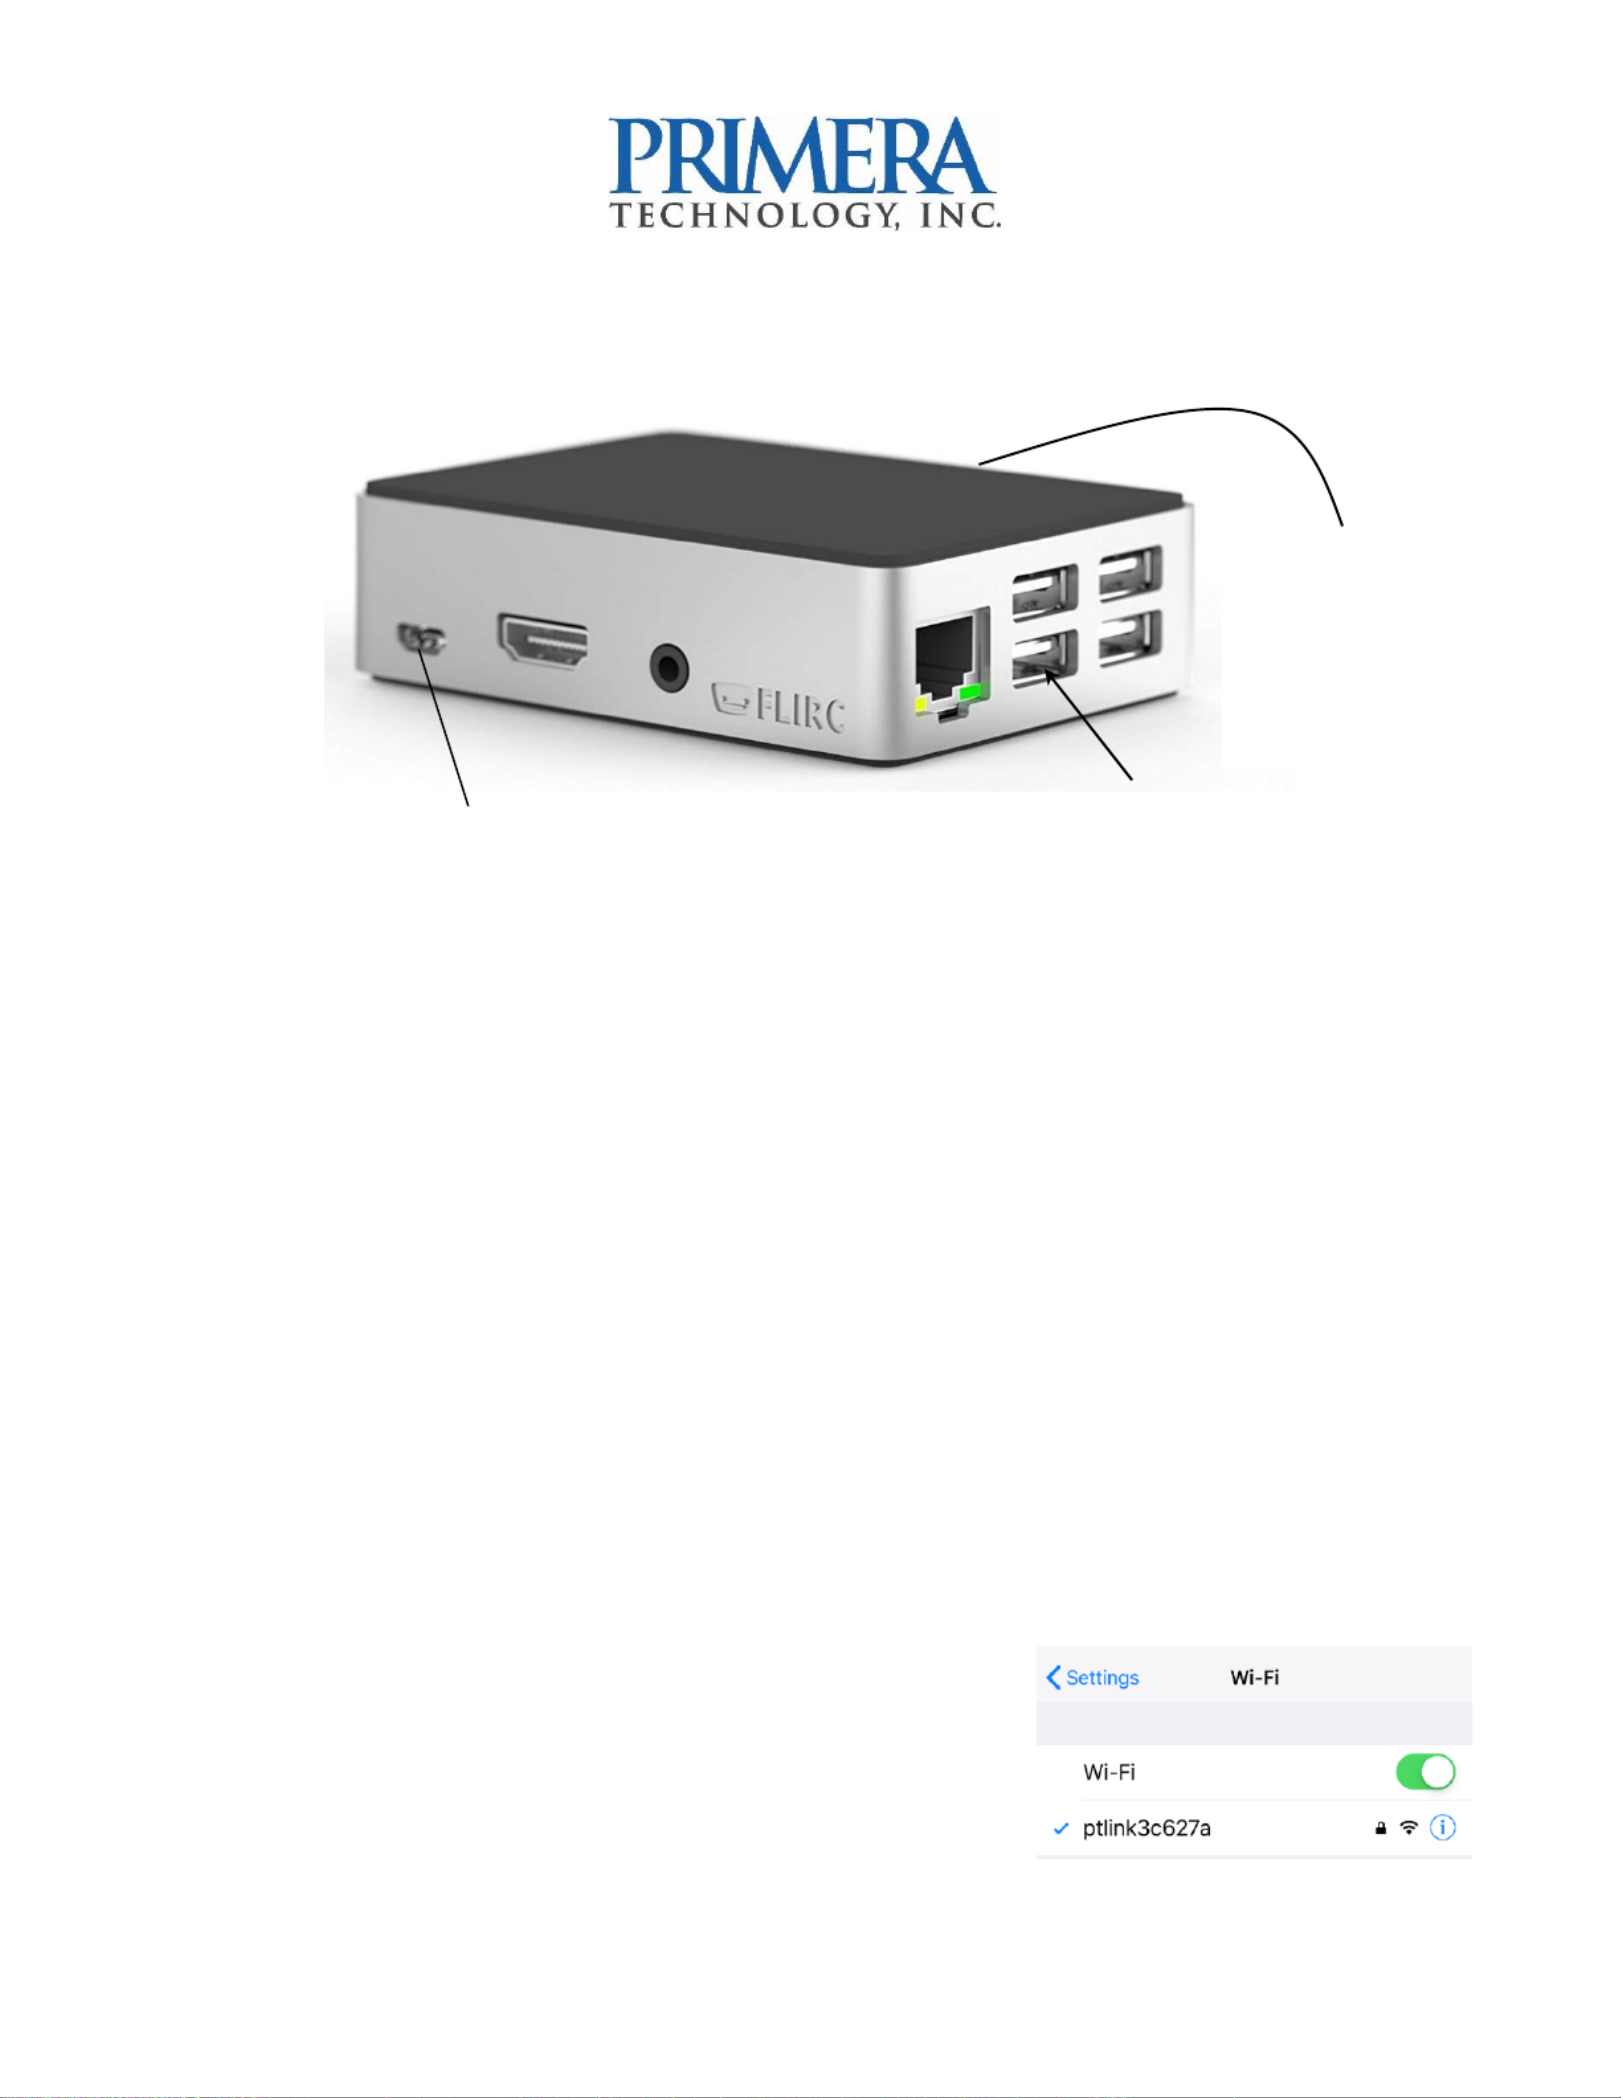
1. Connect PTLink to power using the included micro USB power supply.
2. Connect the IP60 printer to the PTLink module using the included USB cable - (a b).
3. The hotspot network will be acvated and PTLink will
create its own - network. Wi Fi
4. Go to Sengs Wi on your iPhone/iPad. Choose the –
new network name that appears in the following
format: (The Network Name = ptlink-xxxxxx
Micro USB Power
Quick Start: PTLink for IP60 Print Server –
USB (Connect cable from
Primera IP60 here)
Network Name is
printed on a label
found on the back

2
numbers/characters which are represented by the xx xx will be dierent for each xx
PTLink module and will be printed on a label aached to your PTLink.)
5. You will be prompted for a password: Default Password = primera1
6. You are now connected. To print see secon 5.
Secon 3: Connecng to Personal -Wi Fi
If you would like to connect the Primera IP60 wireless print module to your personal network
infrastructure follow these steps:
1. Starng connected to -hoc wireless network, navigate using your Safari web PTLink’s ad
browser to (The numbers/characters which are represented by the ptlink-xxxxxx.local
xxxxxx will be dierent for each PTLink module and will be printed on a label aached to
your PTLink.)
2. The web portal will appear and ask for login info. Default user and password is:
User: admin
Pass: primera1
3. The web portal will open and present you with local networks it can connect to. Once
you have found the network you would like to connect to, click/tap the name on the
screen.
4. A dropdown will appear asking for either your chosen network - password, or it ’s Wi Fi
will display a warning that there are security risks associated with connecng to open
Wi Wi- networks. For a password secured Fi - network, enter your password and press Fi
connect.
For an open Wi-Fi network, view the warning message and press either to connect or ok
close to exit and choose another.
5. Aer choosing your network and pressing connect, the web portal will show you a
message that a connecon is being aempted. Switch to the chosen Wi-Fi network on
the iPhone/iPad to connue prinng. Aer switching networks, you can verify that the
unit is now connected to the chosen network by accessing ptlink-xxxxxx.local on Safari.
If the password has been accepted and the switch has occurred, you will see “You are
currently connected to: <userwi>”
displayed above the network choices. You are now ready to print to your IP60 unit from
your local Wi-Fi connecon, and ptlink-xxxxxx.local will be accessible from any
iPhone/iPad connected to the network. *
*Note: Users must authencate before having access to the web portal. Anyone
aempng to access ptlink-xxxxxx.local from inside the network will be unable to access

3
it unless they login using admin credenals, or user credenals set up by the device
admin.
Note 2: Once the device (iPad/iPhone) is connected to the ad-hoc network it will not be
able to connect to any other wi network to access the internet. iPads/iPhones with a
mobile wireless connecon will not have this problem they will automacally use the ;
mobile carrier wireless signal to connect to the internet.
Secon 4: Hotspot Mode
4A: Manually Reverng to Hotspot
If you would like to set PTLink back to its original hotspot -Fi network, follow these steps: Wi
1. From an iPhone/iPad device on the same network as the Primera IP60 wireless print
module, navigate using the safari web browser to and type in your ptlink- .localxxxxxx
password. (The numbers/characters which are represented by the xxxxxx will be
dierent for each PTLink module and will be printed on a label aached to your PTLink.)
2. Click the menu Icon to reveal addional sengs.
3. Click/Tap . HotSpot
4. You will receive a message that the module is switching back to hotspot.
5. Go to the -Fi seng your iPad/iPhone device, it may take up to a minute for the Wi on
hotspot SSID(Network name) to appear in your Wi-Fi network list.
6. Once your IP60 hotspot network name reappears, connect using the default password
(primera1).
7. The IP60 wireless print module is now ready to print.
Note: Users can also quickly switch back to their previously connected infrastructure -Wi
Fi network by pressing the buon in the navigaon bar of the web portal. WiFi
4B: Reverng to Hotspot by Restart.
1. Unplug all Primera units from PTLink
2. Power cycle PTLink and wait 1 minute.
3. PTLink will automacally fall back to hotspot.
Especificaciones del producto
| Marca: | Primera |
| Categoría: | Impresora |
| Modelo: | PTLink |
¿Necesitas ayuda?
Si necesitas ayuda con Primera PTLink haz una pregunta a continuación y otros usuarios te responderán
Impresora Primera Manuales

1 Septiembre 2024
28 Agosto 2024
28 Agosto 2024
28 Agosto 2024
27 Agosto 2024
27 Agosto 2024
27 Agosto 2024
27 Agosto 2024
25 Agosto 2024
25 Agosto 2024
Impresora Manuales
- Impresora Sony
- Impresora Samsung
- Impresora Xiaomi
- Impresora LG
- Impresora Huawei
- Impresora HP
- Impresora Panasonic
- Impresora Epson
- Impresora Honeywell
- Impresora Olympus
- Impresora Toshiba
- Impresora Xerox
- Impresora Canon
- Impresora Brother
- Impresora Sharp
- Impresora Renkforce
- Impresora Kodak
- Impresora Lenovo
- Impresora Sagem
- Impresora Roland
- Impresora Citizen
- Impresora Fujifilm
- Impresora Konica Minolta
- Impresora Mitsubishi
- Impresora Seiko
- Impresora Argox
- Impresora Oki
- Impresora Royal Sovereign
- Impresora Fujitsu
- Impresora Olympia
- Impresora Bixolon
- Impresora Ricoh
- Impresora Lexmark
- Impresora Dell
- Impresora Olivetti
- Impresora Zebra
- Impresora D-Link
- Impresora Kyocera
- Impresora Minolta
- Impresora DNP
- Impresora GoDEX
- Impresora Triumph-Adler
- Impresora Oce
- Impresora Metapace
- Impresora Ultimaker
- Impresora Pantum
- Impresora Ibm
- Impresora Tomy
- Impresora StarTech.com
- Impresora Toshiba TEC
- Impresora Frama
- Impresora Kogan
- Impresora Brady
- Impresora ZKTeco
- Impresora Star Micronics
- Impresora Posiflex
- Impresora Datamax-O'neil
- Impresora Panduit
- Impresora Dascom
- Impresora HiTi
- Impresora GG Image
- Impresora Vupoint Solutions
- Impresora Elite Screens
- Impresora DTRONIC
- Impresora Phoenix Contact
- Impresora TSC
- Impresora Star
- Impresora EC Line
- Impresora Colop
- Impresora Equip
- Impresora Approx
- Impresora Fichero
- Impresora Raspberry Pi
- Impresora IDP
- Impresora Evolis
- Impresora Fargo
- Impresora Microboards
- Impresora Tally Dascom
- Impresora Custom
- Impresora CSL
- Impresora Nisca
- Impresora Epson 7620
- Impresora Sawgrass
Últimos Impresora Manuales
27 Octubre 2024
26 Octubre 2024
25 Octubre 2024
24 Octubre 2024
24 Octubre 2024
24 Octubre 2024
24 Octubre 2024
24 Octubre 2024
24 Octubre 2024
24 Octubre 2024