SunBriteTV SB-V-65-4KHDR-BL Manual de Usario
SunBriteTV
Television
SB-V-65-4KHDR-BL
Lee a continuación 📖 el manual en español para SunBriteTV SB-V-65-4KHDR-BL (54 páginas) en la categoría Television. Esta guía fue útil para 9 personas y fue valorada con 4.5 estrellas en promedio por 2 usuarios
Página 1/54
Veranda 4K HDR Operator’s Manual
MVE-003-00
Revision 190128_1020
Models: SB-V-43-4KHDR
SB-V-55-4KHDR
SB-V-65-4KHDR
SB-V-75-4KHDR

Page 2 All Rights Reserved. 2018 ©SunBrite® LLC
Dear SunBrite Customer:
Congratulations on the ownership of your SunBrite all-weather outdoor LCD TV, and welcome to the family of satised
SunBrite customers. You are in great company, with thousands of homeowners and esteemed commercial facilities such as
Yankee Stadium, Fenway Park, Disney World, and Sea World who have trusted us to deliver superior performance, lasting
durability and the enjoyment of superb television viewing in the great outdoors.
Our products are designed to withstand the rigors of the outdoor environment and provide our customers with many years
of optimum viewing, while delivering excellent picture and sound as well as the ease of use and convenience of conventional
indoor TVs.
To ensure safety and long product life, please read the Important Safety Instructions and complete manual carefully before
using the TV. If you have any questions about the installation procedures, please contact our qualied SunBrite Customer
Support Team at 866.357.8688.
Important Safety Instructions
!
WARNING: This product contains chemicals including Styrene which is known to the state of California to cause
cancer, and Bisphenol A (BPA), which is known to the state of California to cause birth defects or other reproductive
harm. For more information go to www.P65Warnings.ca.gov.
NOTE:
SunBriteTV operates a free mailback recycling program for consumers.
For more information on how to recycle your TV, please visit:
https://www.sunbritetv.com/support/recycling-programs or contact customer service at 866.357.8688.

4K HDR Veranda Operation Manual Page 3
Important Safety Instructions

Page 4 All Rights Reserved. 2018 ©SunBrite® LLC
Cleaning Instructions: See “Care of SunBrite” on page 46.
Attachments: Do not use attachments not specically recommended by the manufacturer. Use of improper attachments can
result in accidents.
Power Source: SunBrite must operate on a power source indicated on the specication label. If you are not sure of the type
of power supply used in your home, consult your dealer or local power company. When using the TV outdoors, you must use a
GFI-protected AC outlet with “in-use” waterproof cover.
I Do not place the product on an unstable cart, stand, tripod, table, or anywhere the unit is not permanently nstallation:
installed. Placing the product on an unstable place can cause the product to fall, resulting in potential serious personal
injuries, as well as damage to the product.
Precautions when Transporting the TV: Carrying the television requires at least two people.
Ventilation: Adequate ventilation must be maintained to ensure reliable and continued operation and to protect the
television from overheating. There must be at least 1.5” of space on all sides. Do not install inside an enclosure, Kisok, etc.
Power cord protection: The power cord must be routed properly to prevent people from stepping on it, or objects from
resting on it. Check the cords at the plugs and product.
Power source: This product must operate on a power source specied on the specication label. If you are unsure of the type
of power supply used in your home, consult your dealer or local power company.
Do not let metal pieces or objects of any kind fall into the television from ventilation holes. High voltage ows in the
product, and inserting an object can cause electric shock and/or short internal parts.
Do not mount SunBrite near a motor or transformer where strong magnetism is generated. Images on the television will
become distorted and the color irregular.
Do not mount SunBrite near heat sources such as radiators, heaters, stoves and other heat-generating products (including
ampliers).
Do not submerge SunBrite in water: The SunBrite will resist water exposure from normal rain, sprinklers, garden hoses, etc.;
however, it is not designed to be submerged in water.
Do not pressure-wash SunBrite: SunBrite will resist water exposure from normal rain, sprinklers, garden hoses, etc.;
however, it is not designed to withstand pressure washers, high-pressure water jets, or hurricane-type weather.
Do not service SunBrite yourself: Removal of the television screen cover may expose you to high voltage or other dangerous
risks. Refer all servicing to a qualied service professional. Warranty will not be honored if you service the unit yourself.
Repair: If any of the following conditions occurs, unplug the power cord, and call a qualied service professional to perform
repairs:
• When power cord or plug is damaged.
• When objects have fallen into the product.
• If unit was submerged in water or pressure-washed.
• When product does not operate properly as described in the operating instructions. Do not touch the controls other
than as described in the operating instructions. Improper adjustments of controls not described in the instructions can
cause damage, which can require extensive repair work by a qualied technician.
• When the product has been dropped or damaged.
• When the product displays an abnormal condition. Any noticeable abnormality in the product indicates that the
product needs servicing.
Replacement parts: In case the product needs replacement parts, make sure that the service person uses replacement parts
provided by SunBrite. Use of unauthorized parts can result in re, electric shock and/or other danger.
Safety checks: Upon completion of service or repair work, ask the service technician to perform safety checks to ensure that
the product is in proper operating condition.
Recycling: SunBriteTV operates a free mailback recycling program for consumers.
For more information on how to recycle your TV, please visit:
https://www.sunbritetv.com/support/recycling-programs or contact customer service at 866.357.8688.
Important Safety Instructions

4K HDR Veranda Operation Manual Page 5
Table of Contents
CONTENTS
Important Safety Instructions 2 .........................................................................................................................................................................
Part Names ............................................................................................................................................................................................................6
Remote Control Unit 7 ..........................................................................................................................................................................................
Displaying an External Equipment Image 9 ....................................................................................................................................................
Watching TV 10 ..........................................................................................................................................................................................................
Initial Installation 10 ..............................................................................................................................................................................................................................
Direct Button Operation 12 ...................................................................................................................................................................................
Changing Channels 12 ..........................................................................................................................................................................................................................
MUTE ............................................................................................................................................................................................................................................... 13
Channel Return 14 ..................................................................................................................................................................................................................................
AUDIO ............................................................................................................................................................................................................................................... 15
Sleep Timer 16 ..........................................................................................................................................................................................................................................
Sound Mode 17 ........................................................................................................................................................................................................................................
Picture Mode 18 ......................................................................................................................................................................................................................................
Closed Captions and Digital Closed Captions 19 .......................................................................................................................................................................
ASPECT MODE ................................................................................................................................................................................................................................. 21
For HD programs 21 ..............................................................................................................................................................................................................................
On-Screen Display Menu 24 ..................................................................................................................................................................................
On-Screen Display Menu Operation......................................................................................................................................................................................... 25
Menu Operation Buttons 26 ..............................................................................................................................................................................................................
Audio ............................................................................................................................................................................................................................................... 27
Picture ............................................................................................................................................................................................................................................... 28
Advanced Picture 29 ..............................................................................................................................................................................................................................
Link ............................................................................................................................................................................................................................................... 30
System ............................................................................................................................................................................................................................................... 31
System ............................................................................................................................................................................................................................................... 32
USB Photo/Music/Video Playback 33 ................................................................................................................................................................
Preparation ......................................................................................................................................................................................................................................... 33
CAUTION: ............................................................................................................................................................................................................................................ 33
Selecting the Folders to Play Back 34 .............................................................................................................................................................................................
Playing Back Files on a USB Memory Device ........................................................................................................................................................................ 36
Music Mode 38 .........................................................................................................................................................................................................................................
Video Mode 39 .........................................................................................................................................................................................................................................
Using LINK Operation 40 ........................................................................................................................................................................................
Controlling HDMI Equipment Using LINK CEC Operation ............................................................................................................................................. 40
Appendix ............................................................................................................................................................................................................42
TV Stand 42 ...............................................................................................................................................................................................................................................
Optional Speaker Bar 43 ......................................................................................................................................................................................................................
Mounting the TV on the Wall 44 .......................................................................................................................................................................................................
Caring for the LCD Panel: 46 ..............................................................................................................................................................................................................
Troubleshooting 47 ...................................................................................................................................................................................................
Specifications 49 ........................................................................................................................................................................................................

Page 6 All Rights Reserved. 2018 ©SunBrite® LLC
Part Names
TV
(Front) (Side)
* See page 8 for button operations.
Caution
When using the ethernet port for IP control, connect the cable to the network switch before connecting to the SunBriteTV
ethernet port.
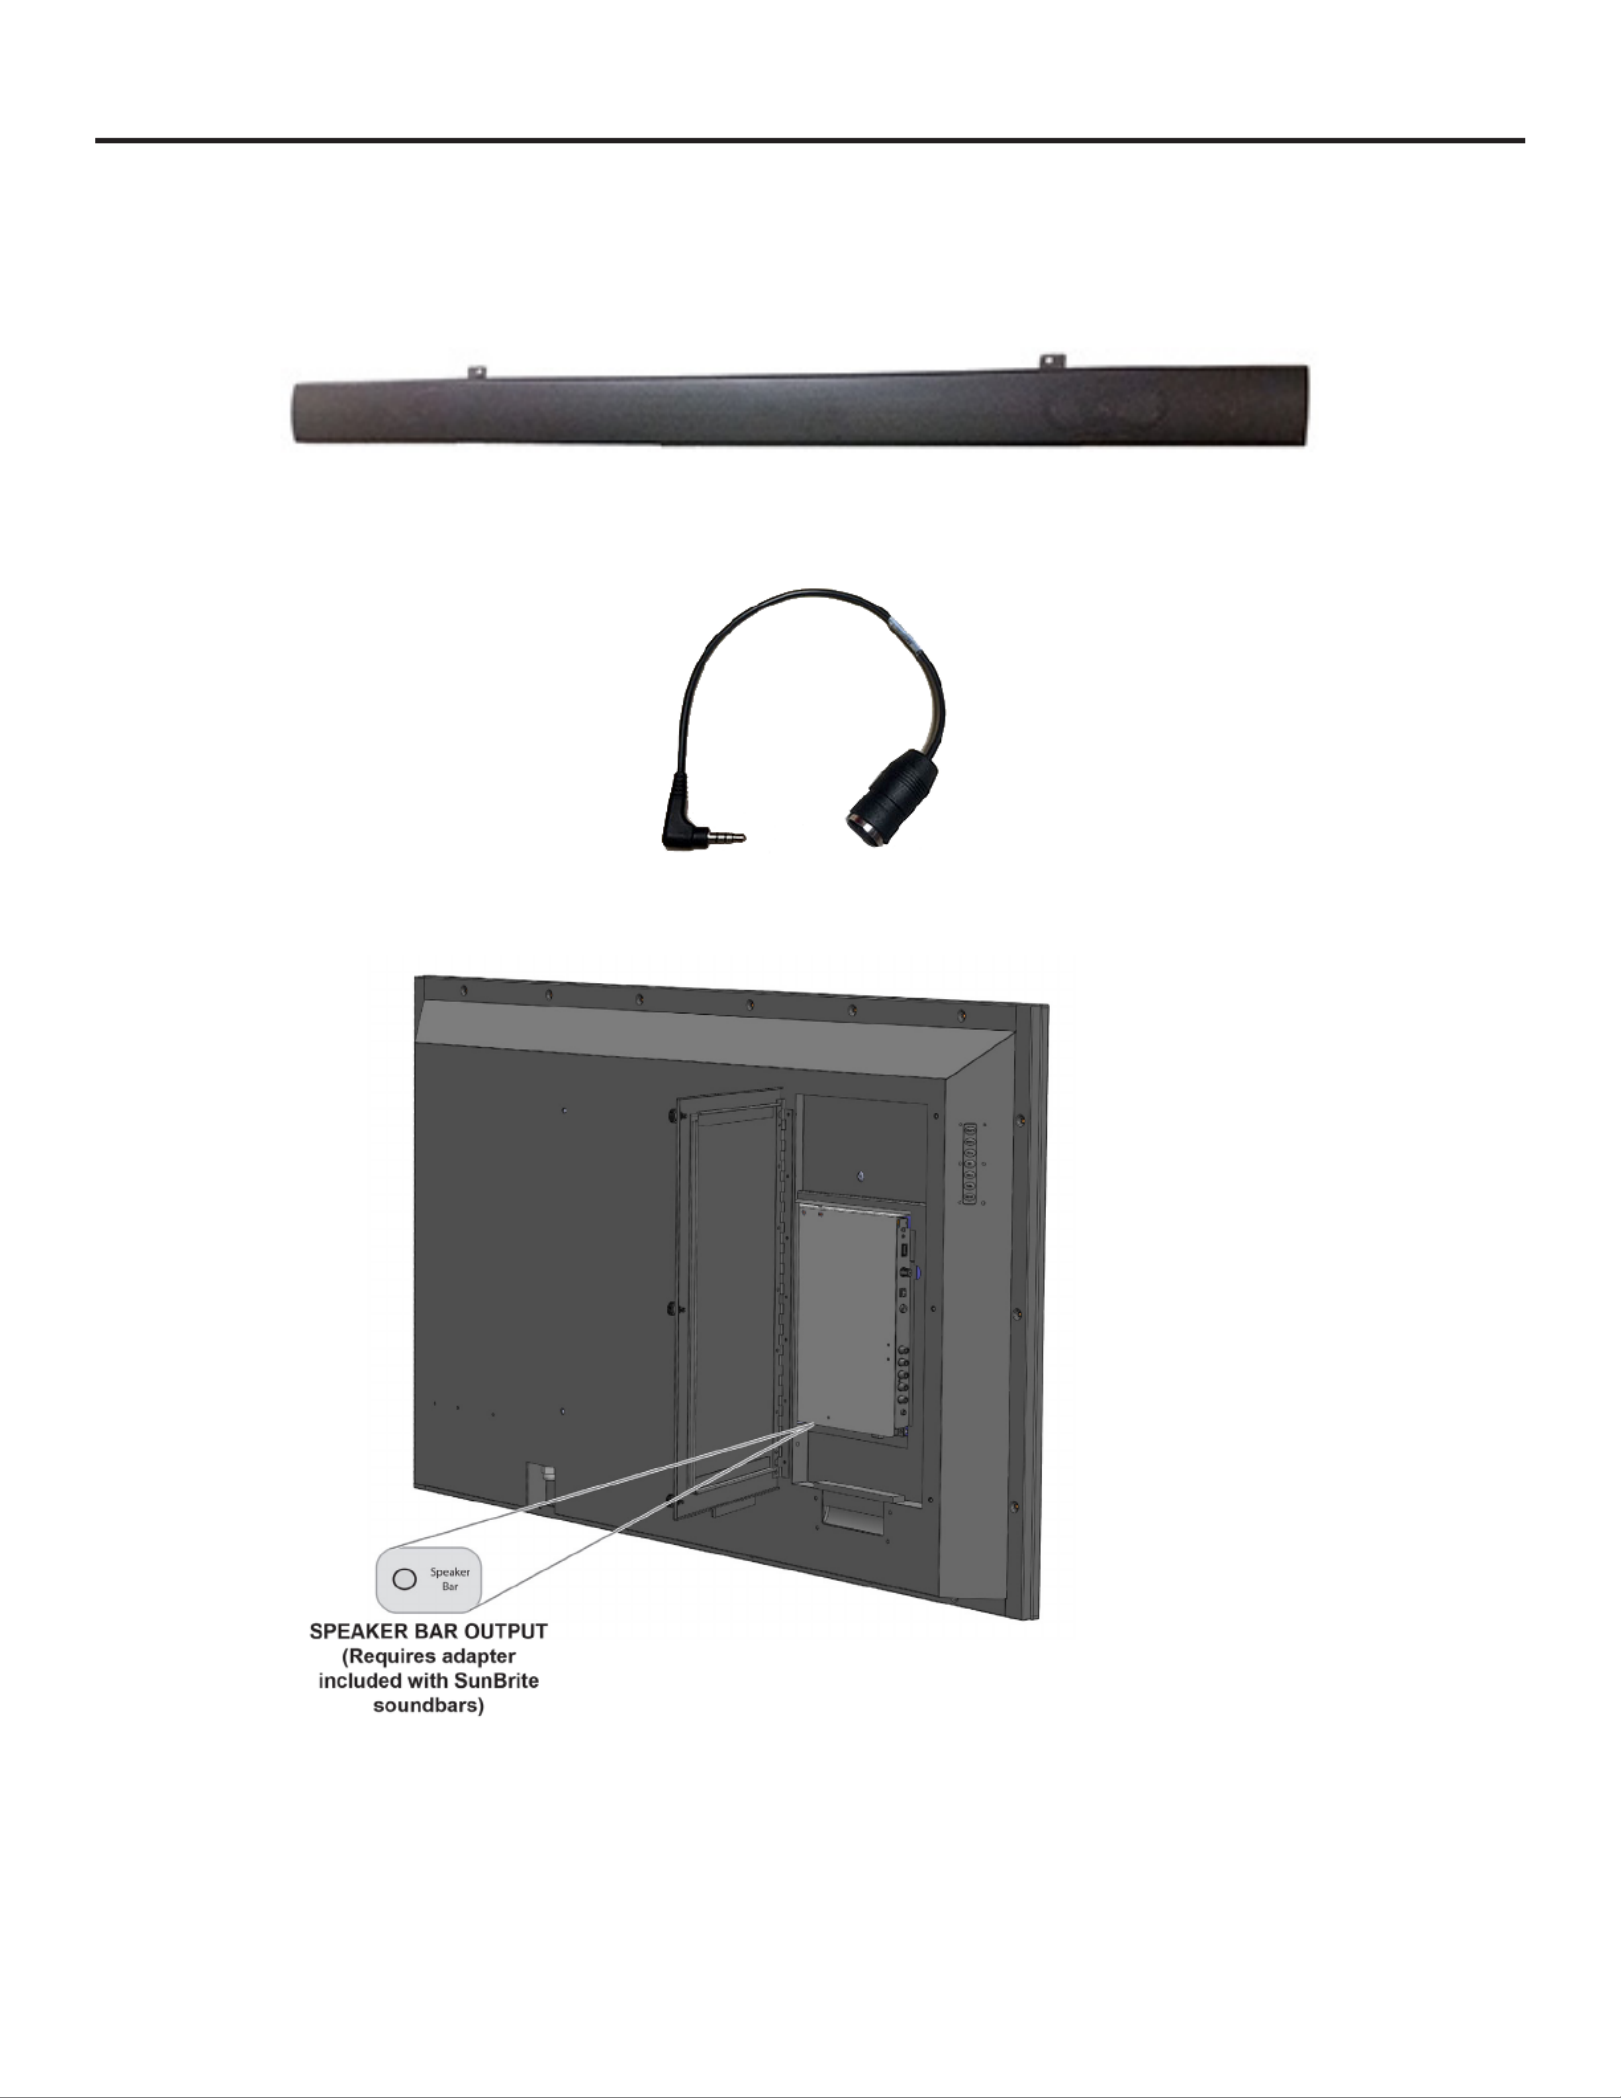
SPEAKER BAR OUTPUT.
• See page 9 for details on the Input Select function.
• ARC See page 41 for details on the Audio Return Channel.
• See page 43 for optional speaker bar connection.
Note: The illustrations and on-screen displays in this operation manual are for explanation purposes and may vary slightly
from the actual operations.
4K HDR Veranda Operation Manual Page 7
Remote Control Unit
Note: When using the remote control unit, point it at the TV.
Note: SunBrite TVs use the Sony TV IR codeset. When
programming a universal remote or control system
try Sony IR codes if SunBrite TV codes are not
listed.
1 POWER ON: Switch the TV power on.
2 POWER OFF: Switch the TV power off.
3 0–9: Set the channel.
4 - (Dash): Set a digital channel.
5 FREEZE: Freeze not supported on Veranda 2 series
6 VOL+/-: Set the volume.
7 ///, ENTER: Select a desired item on the screen.
8 SOUND: Change sound preset modes.
9 PICTURE: Change picture settings preset modes.
10 INFO: Display the channel or source information.
11 CC: Display captions from a closed-caption source.
12 SLEEP: Set the sleep timer.
13 EXIT: Turn off the menu screen.
14 ASPECT: Select the screen aspect.
Page 8 All Rights Reserved. 2018 ©SunBrite® LLC
SunbriteTV Remote Control Unit (Continued)
NOTE
When using the remote control unit, point it at the TV.
Note: SunBrite TVs use the Sony TV IR codeset. When
programming a universal remote or control
system try Sony IR codes if SunBrite TV codes are
not listed.
15 RETURN: Return to the previous channel.
16 MUTE: Mute the sound.
17 CH+/- : Select the channel.
18 MENU: Display the menu screen.
19 MTS: Selects the MTS/SAP or the audio mode during
multichannel audio broadcasts.(Antenna/Cable only)
20 BACK: Return to the previous menu screen.
21 INPUT: Select a TV input source.
22 SHIFT: Press and hold this button then press buttons
0-9 to directly select TV input
Shift-1 VIDEO
Shift-2 N/A
Shift-3 HDMI 3
Shift-4 USB
Shift-5 Component
Shift-6 N/A
Shift-7 N/A
Shift-8 HDMI 1
Shift-9 HDMI 2
Shift-0 TV Tuner
Shift-ON Power Toggle
4K HDR Veranda Operation Manual Page 9
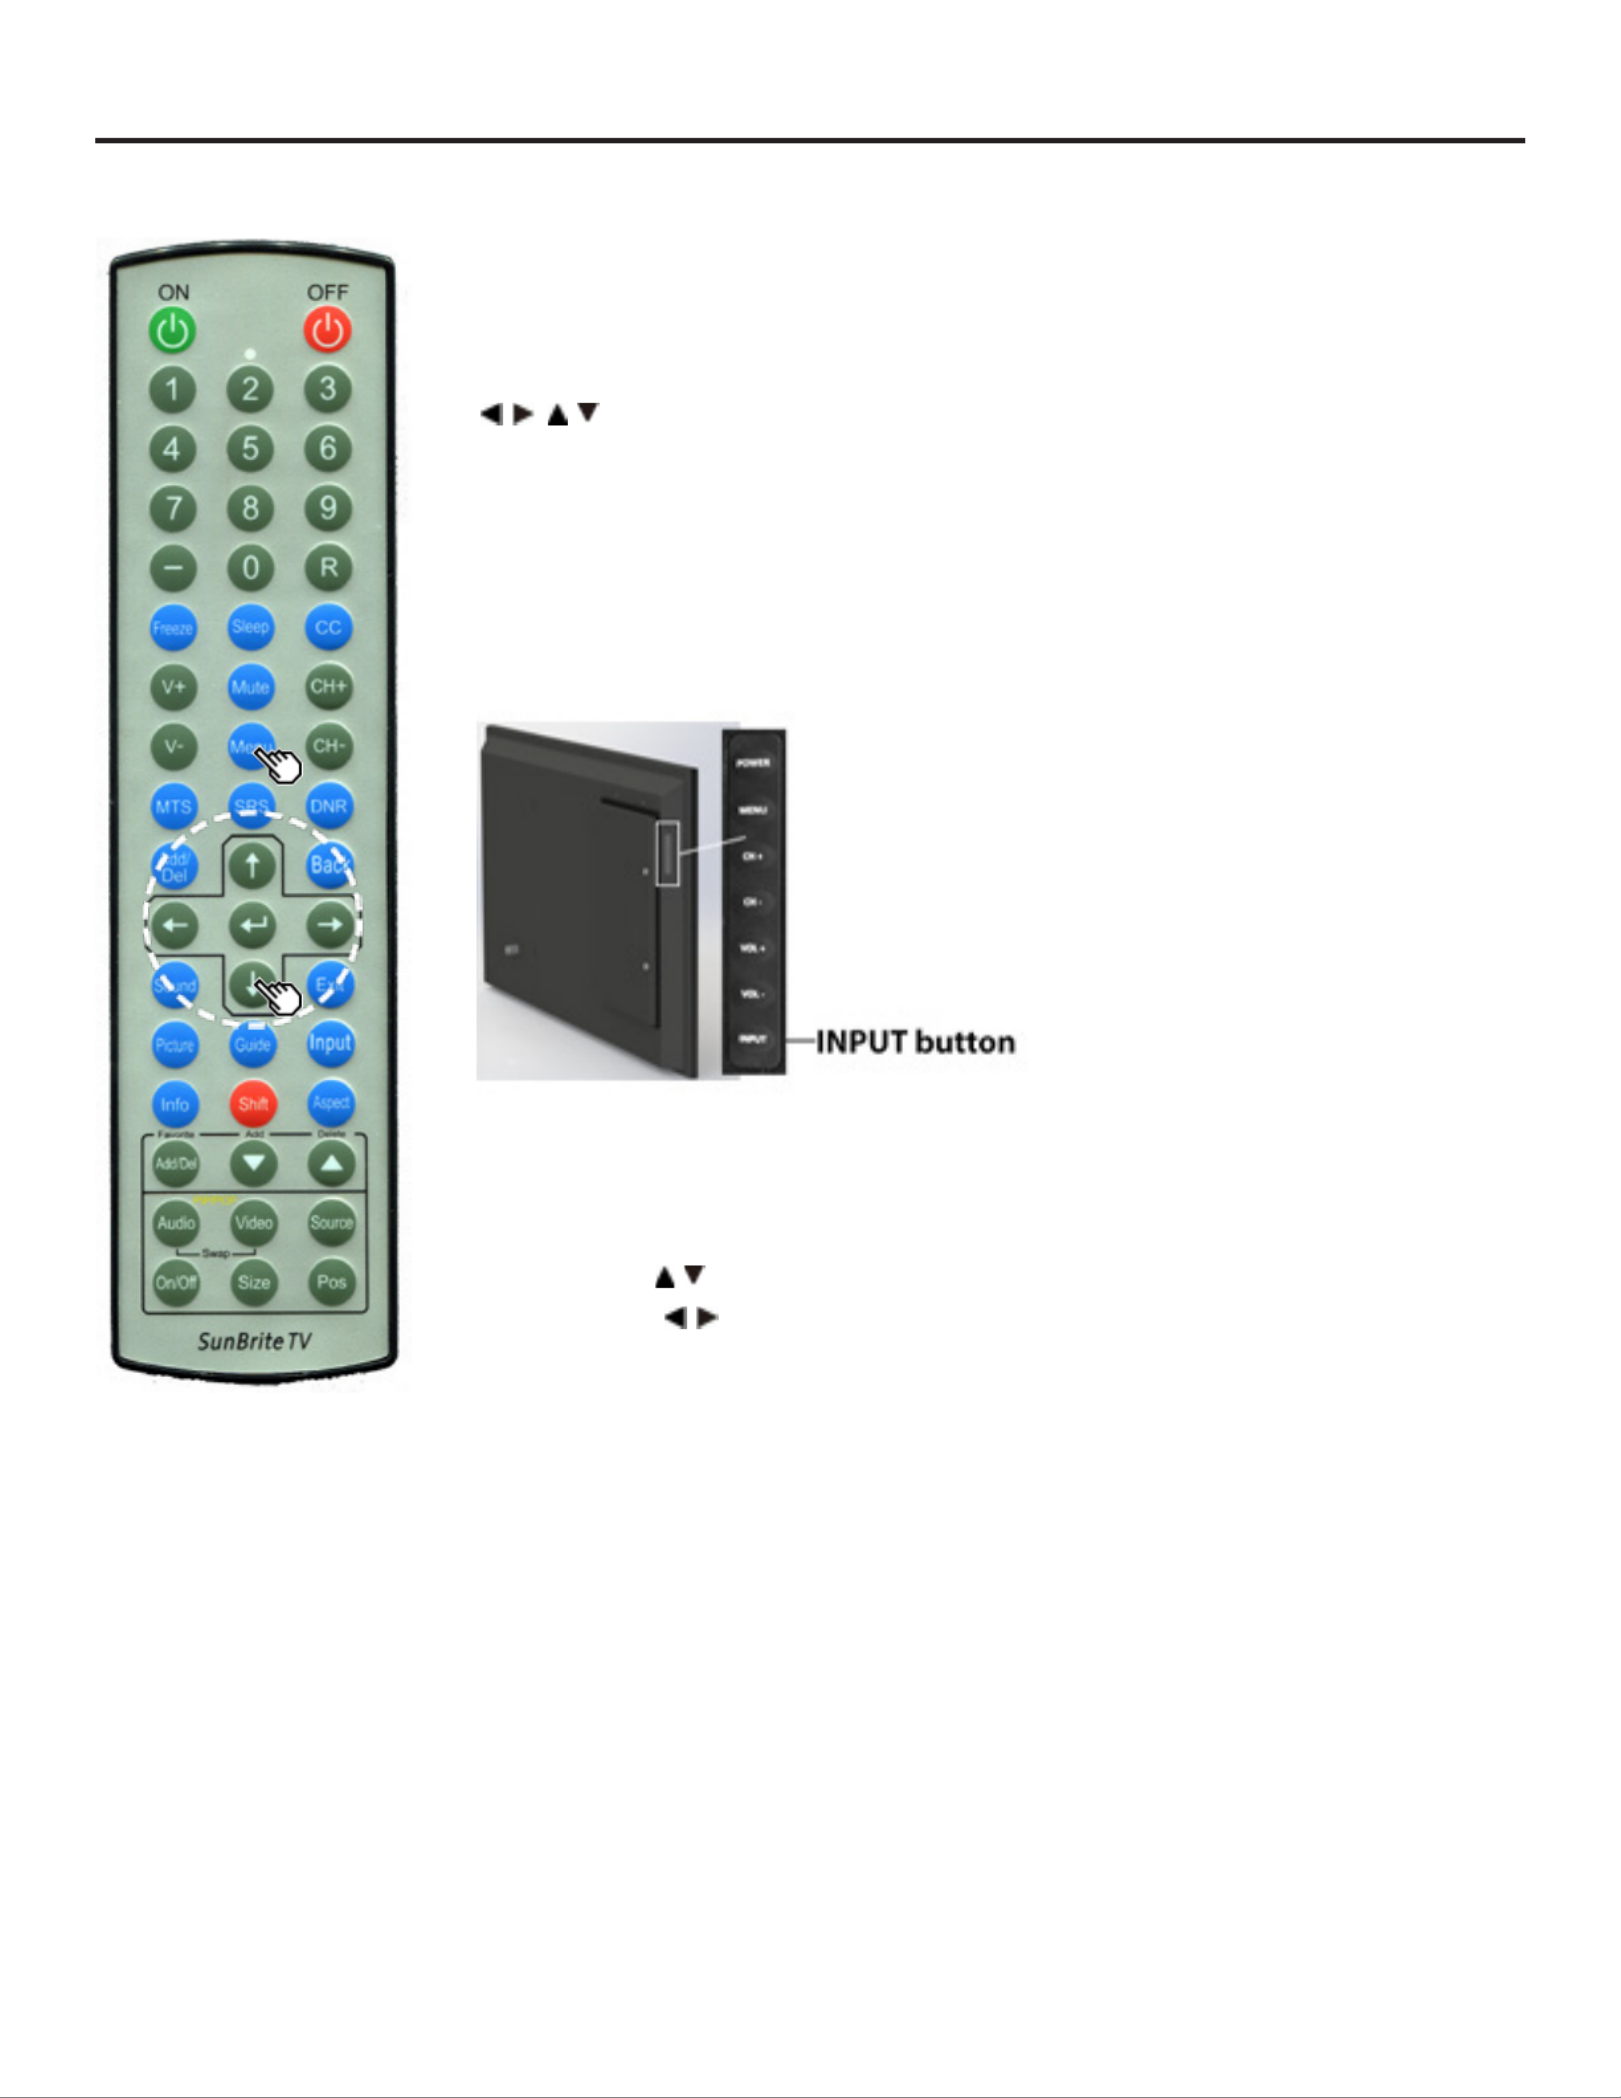
Displaying an External Equipment Image
To view external source images, select the input source by
pressing INPUT on the remote control unit or on the TV.
1. Press INPUT.
The INPUT list screen displays.
2. Press / to select the input source.
An image from the selected source automatically
displays.
You can also select the input source by pressing INPUT.
Each time INPUT is pressed, the input source toggles.
TV > HDMI1 > HDMI2 > HDMI3 > MMP(USB) > PC >
VIDEO > COMPONENT > TV
Note: Video and Component will only display when a
source signal is applied to the input

Page 10 All Rights Reserved. 2018 ©SunBrite® LLC
Watching TV
INITIAL INSTALLATION
Perform the following steps before you press POWER on the remote control unit.
1. Insert the batteries into the remote control unit.
2. Connect the antenna cable to the TV.
3. Plug in the AC cord to the AC outlet.
Select Antenna or Cable
1. Press / to select and then press ENTER.
2. Start SkipSelect if you will be using Antenna or Cable input, otherwise select .

4K HDR Veranda Operation Manual Page 11
Watching TV
3. The tuner will scan for available channels and store them into memory. This process
can take from 3-10 minutes.
4. When the scan process is complete, select exit setup.
INITIAL INSTALLATION (CONTINUED)

Page 12 All Rights Reserved. 2018 ©SunBrite® LLC
Direct Button Operation
CHANGING CHANNELS
You can change channels in several ways.
Method 1
Using CH +/- on the remote control unit or on the TV.
Method 2
Using remote control buttons 0-9, - (Dash).
Examples:
To select a 1 or 2-digit channel number (e. g., Channel 5):
Press 5 ENTER
To select a 3-digit channel number (e. g., Channel 115):
Press 1 1 5 ENTER
To select a 4-digit channel number (e. g., Channel 22.1):
Press 2 2 - (Dash) 1 ENTER
Method 3
Selecting the program from the Channel list.
1. Press INPUT on the remote control unit.
The INPUT list displays.
2. Press / to select AIR or CABLE.
The Channel list displays.
3. Press / to select the desired channel, and then press ENTER.
Note:
• When selecting a 1-digit channel number, it is not necessary to press 0 before the
number.
• When you enter 0-9 only, channel selection will be made if there is no operation
within a few seconds.
• If you push "0" by itself, nothing will happen.
• Complete the above steps within a few seconds.
• When you enter 0-9 and - (Dash), channel selection will be made if there is no
operation within a few seconds
CHANGING VOLUME
You can change the volume by pressing VOL+/- on the TV or on the remote control unit.
To increase the volume, press VOL +.
To decrease the volume, press VOL -.

4K HDR Veranda Operation Manual Page 13
Direct Button Operation
MUTE
Mutes the current sound output.
Press MUTE.
will be displayed on the screen, and the sound is silenced.

Page 14 All Rights Reserved. 2018 ©SunBrite® LLC
Direct Button Operation
CHANNEL RETURN
• Press R (Ch Return) to switch to the previously tuned channel.
• Press R (Ch Return) again to switch back to the currently tuned channel.
• Note: R (Ch Return) will not work if no channel has been changed after the TV is
turned on
4K HDR Veranda Operation Manual Page 15
Direct Button Operation
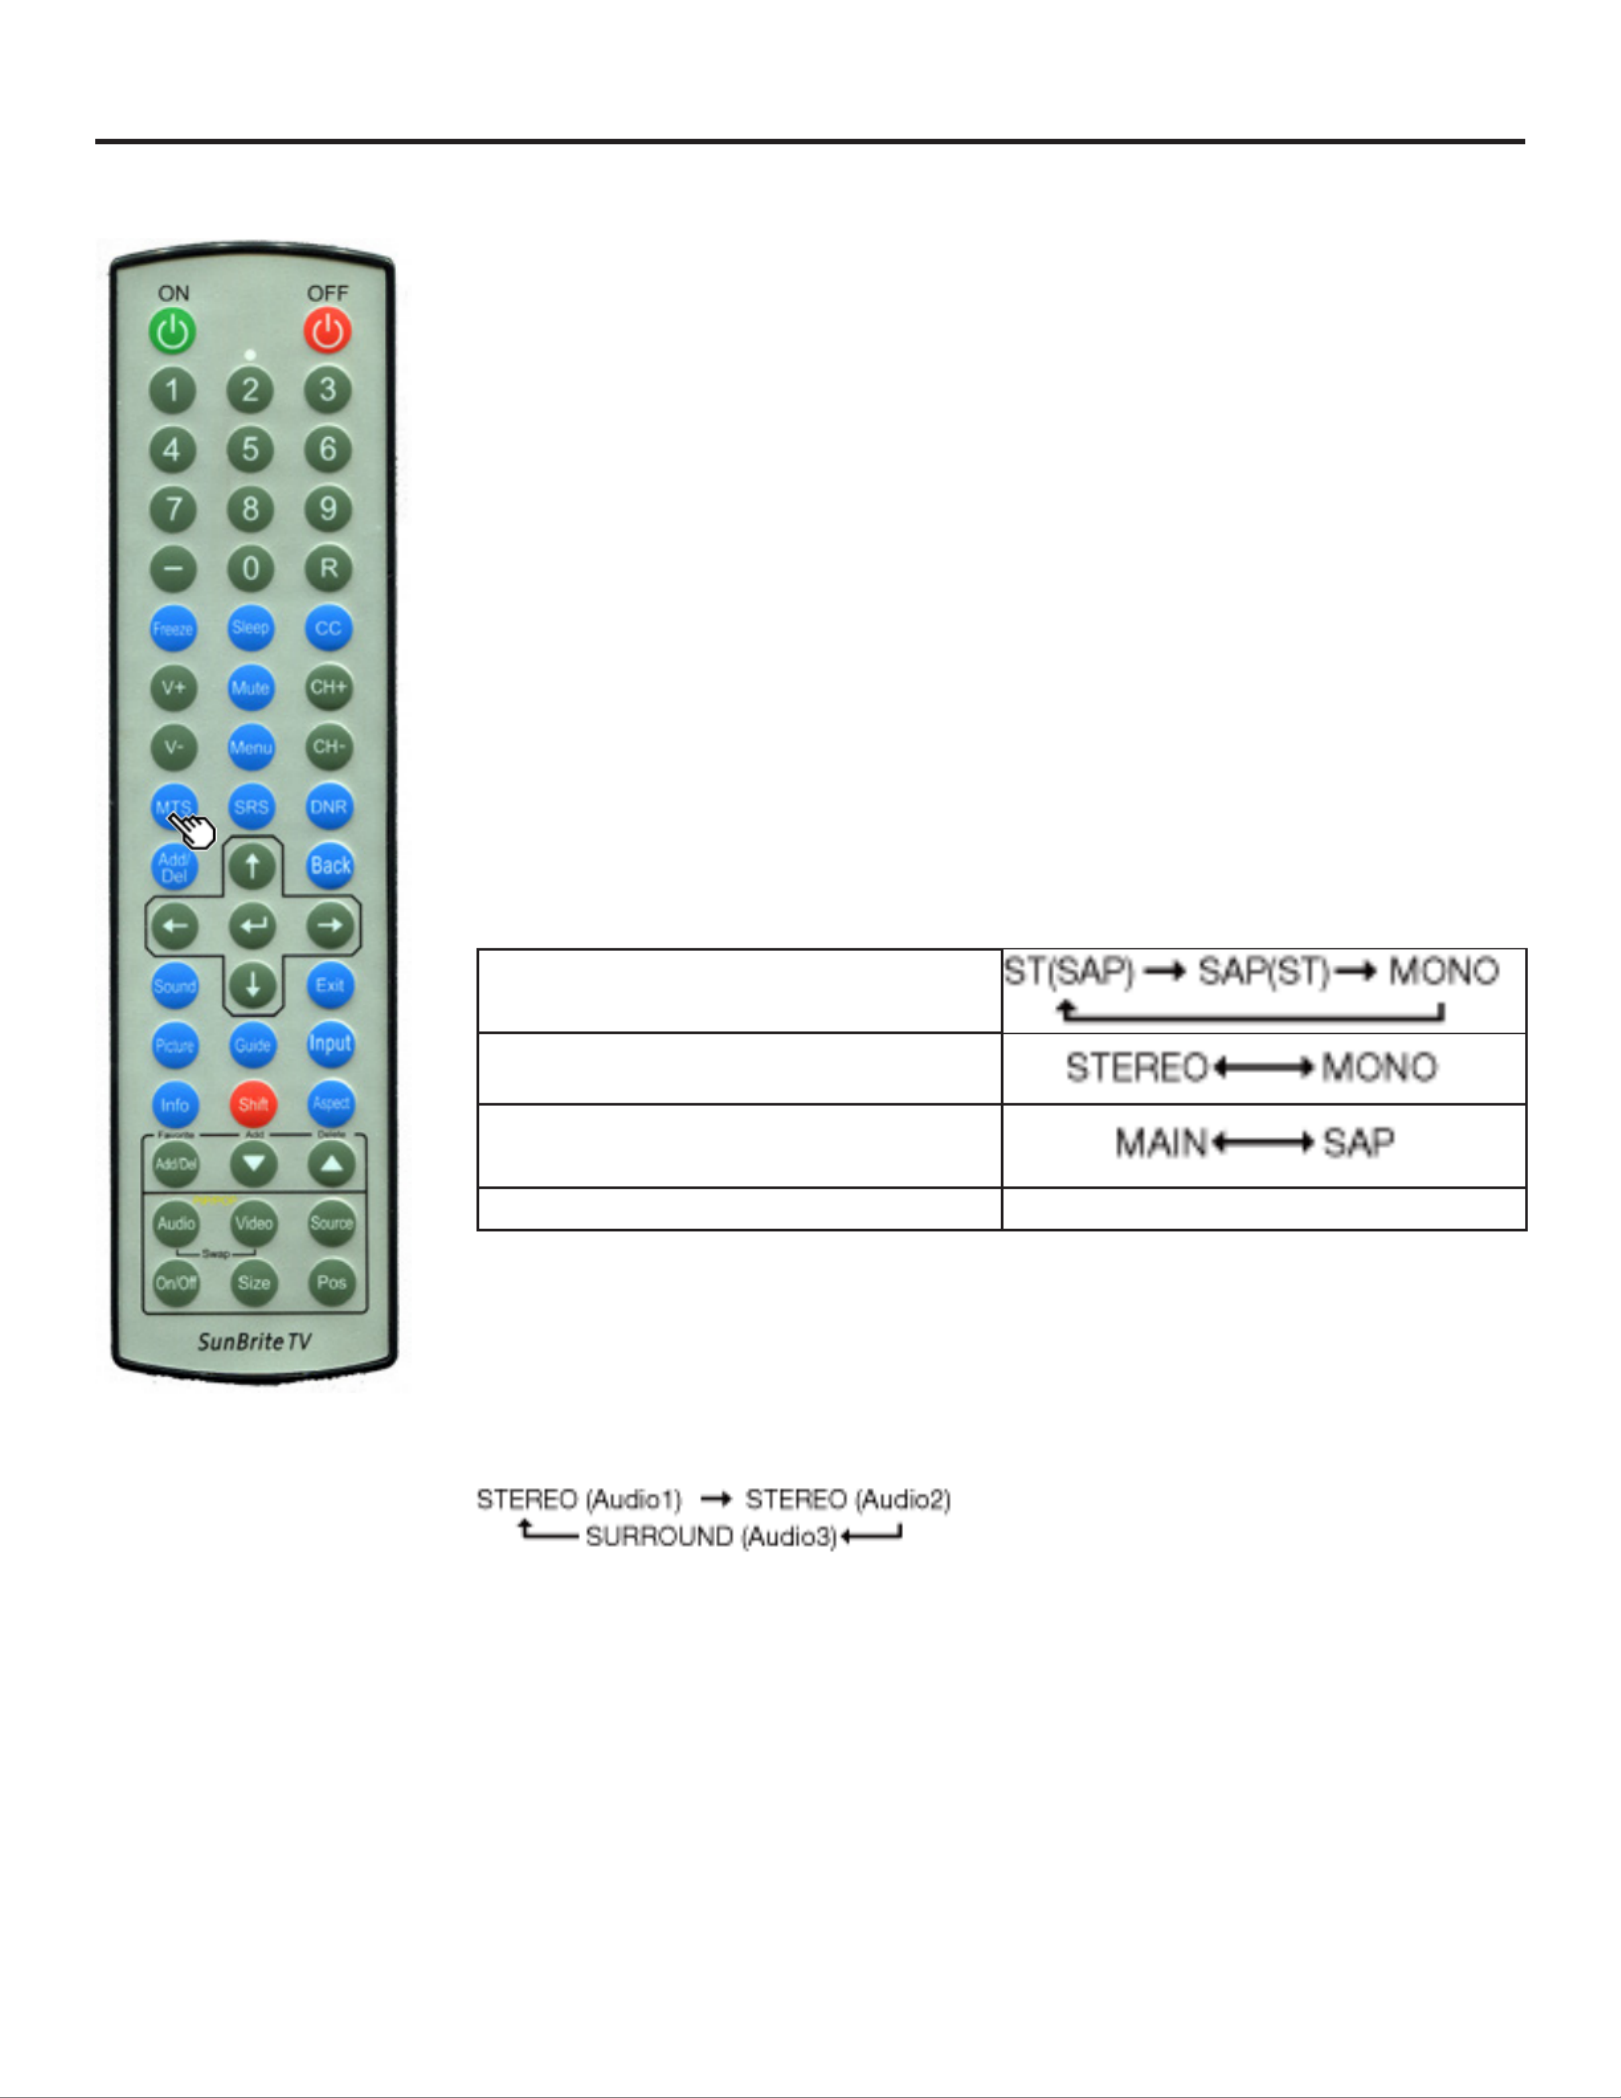
AUDIO
MTS/SAP stereo mode
The TV has a feature that allows reception of sound other than the main audio for the
program. This feature is called Multi-channel Television Sound (MTS). The TV with MTS
can receive mono sound, stereo sound and Secondary Audio Programs (SAP). The SAP
feature allows a TV station to broadcast other information, which could be audio in another
language or something completely different like weather information.
You can enjoy Hi-Fi stereo sound or SAP broadcasts where available.
• View programs like live sporting events, shows and concerts in Stereo broadcasts:
dynamic stereo sound.
• SAP broadcasts: Receive TV broadcasts in either MAIN or SAP sound.
• The normal program soundtrack (either in mono or stereo). MAIN sound:
• Listen to a second language, supplementary commentary or other SAP sound:
information. (SAP is mono sound.)
If stereo sound is difcult to hear:
• Obtain a clearer sound by manually switching to xed mono-sound mode.
You can change MTS as shown below to match the television broadcast signal.
Press AUDIO to toggle between audio modes.
Examples: when receiving MTS and SAP
STEREO mode:
STEREO + SAP mode:
MAIN + SAP mode:
MONO mode: MONO
Digital broadcasting audio mode
The types of audio transmitted in a digital broadcast include SURROUND MONO as well as
and . In addition, it is possible for multiple audio tracks to accompany a single video STEREO
track.
Press to toggle between audio modes.ENTER
Example: when receiving Digital broadcasting
Note: MTS only operates while in TV mode

Page 16 All Rights Reserved. 2018 ©SunBrite® LLC
Direct Button Operation
SLEEP TIMER
Allows you to set a time when the TV automatically switches to standby.
Press .SLEEP
• The remaining time displays when the sleep timer has been set.
• Each time you press SLEEP, the remaining time switches as shown below.
• Highlight the desired selection and press enter

4K HDR Veranda Operation Manual Page 17
Direct Button Operation
SOUND MODE
Sound MODE gives you several audio setting options to choose from to best match the
surrounding environment of the TV, which can vary due to factors like listening enviroment,
type of program watched or the type of device connected.
Press . Sound menu OSD displays.SOUND
• Press Sound again or use the up and down arrow keys to highlight the desired
selection
• Press enter to select the desired sound mode

Page 18 All Rights Reserved. 2018 ©SunBrite® LLC
On-Screen Display Menu
PICTURE MODE
Picture mode gives you several viewing options to choose from to best match the
surrounding environment of the TV, which can vary due to factors like ambient light, type of
program watched or the type of device connected.
Press button. Current picture mode displays.Picture
Standard: For a highly dened image in a normal lighting.
Movie: For a movie.
Vivid: For a clear-cut image emphasizing high contrast, useful for sports viewing.
Game: Gaming.
User: Custom user prole settings.
PC: For PC.
4K HDR Veranda Operation Manual Page 19
Direct Button Operation
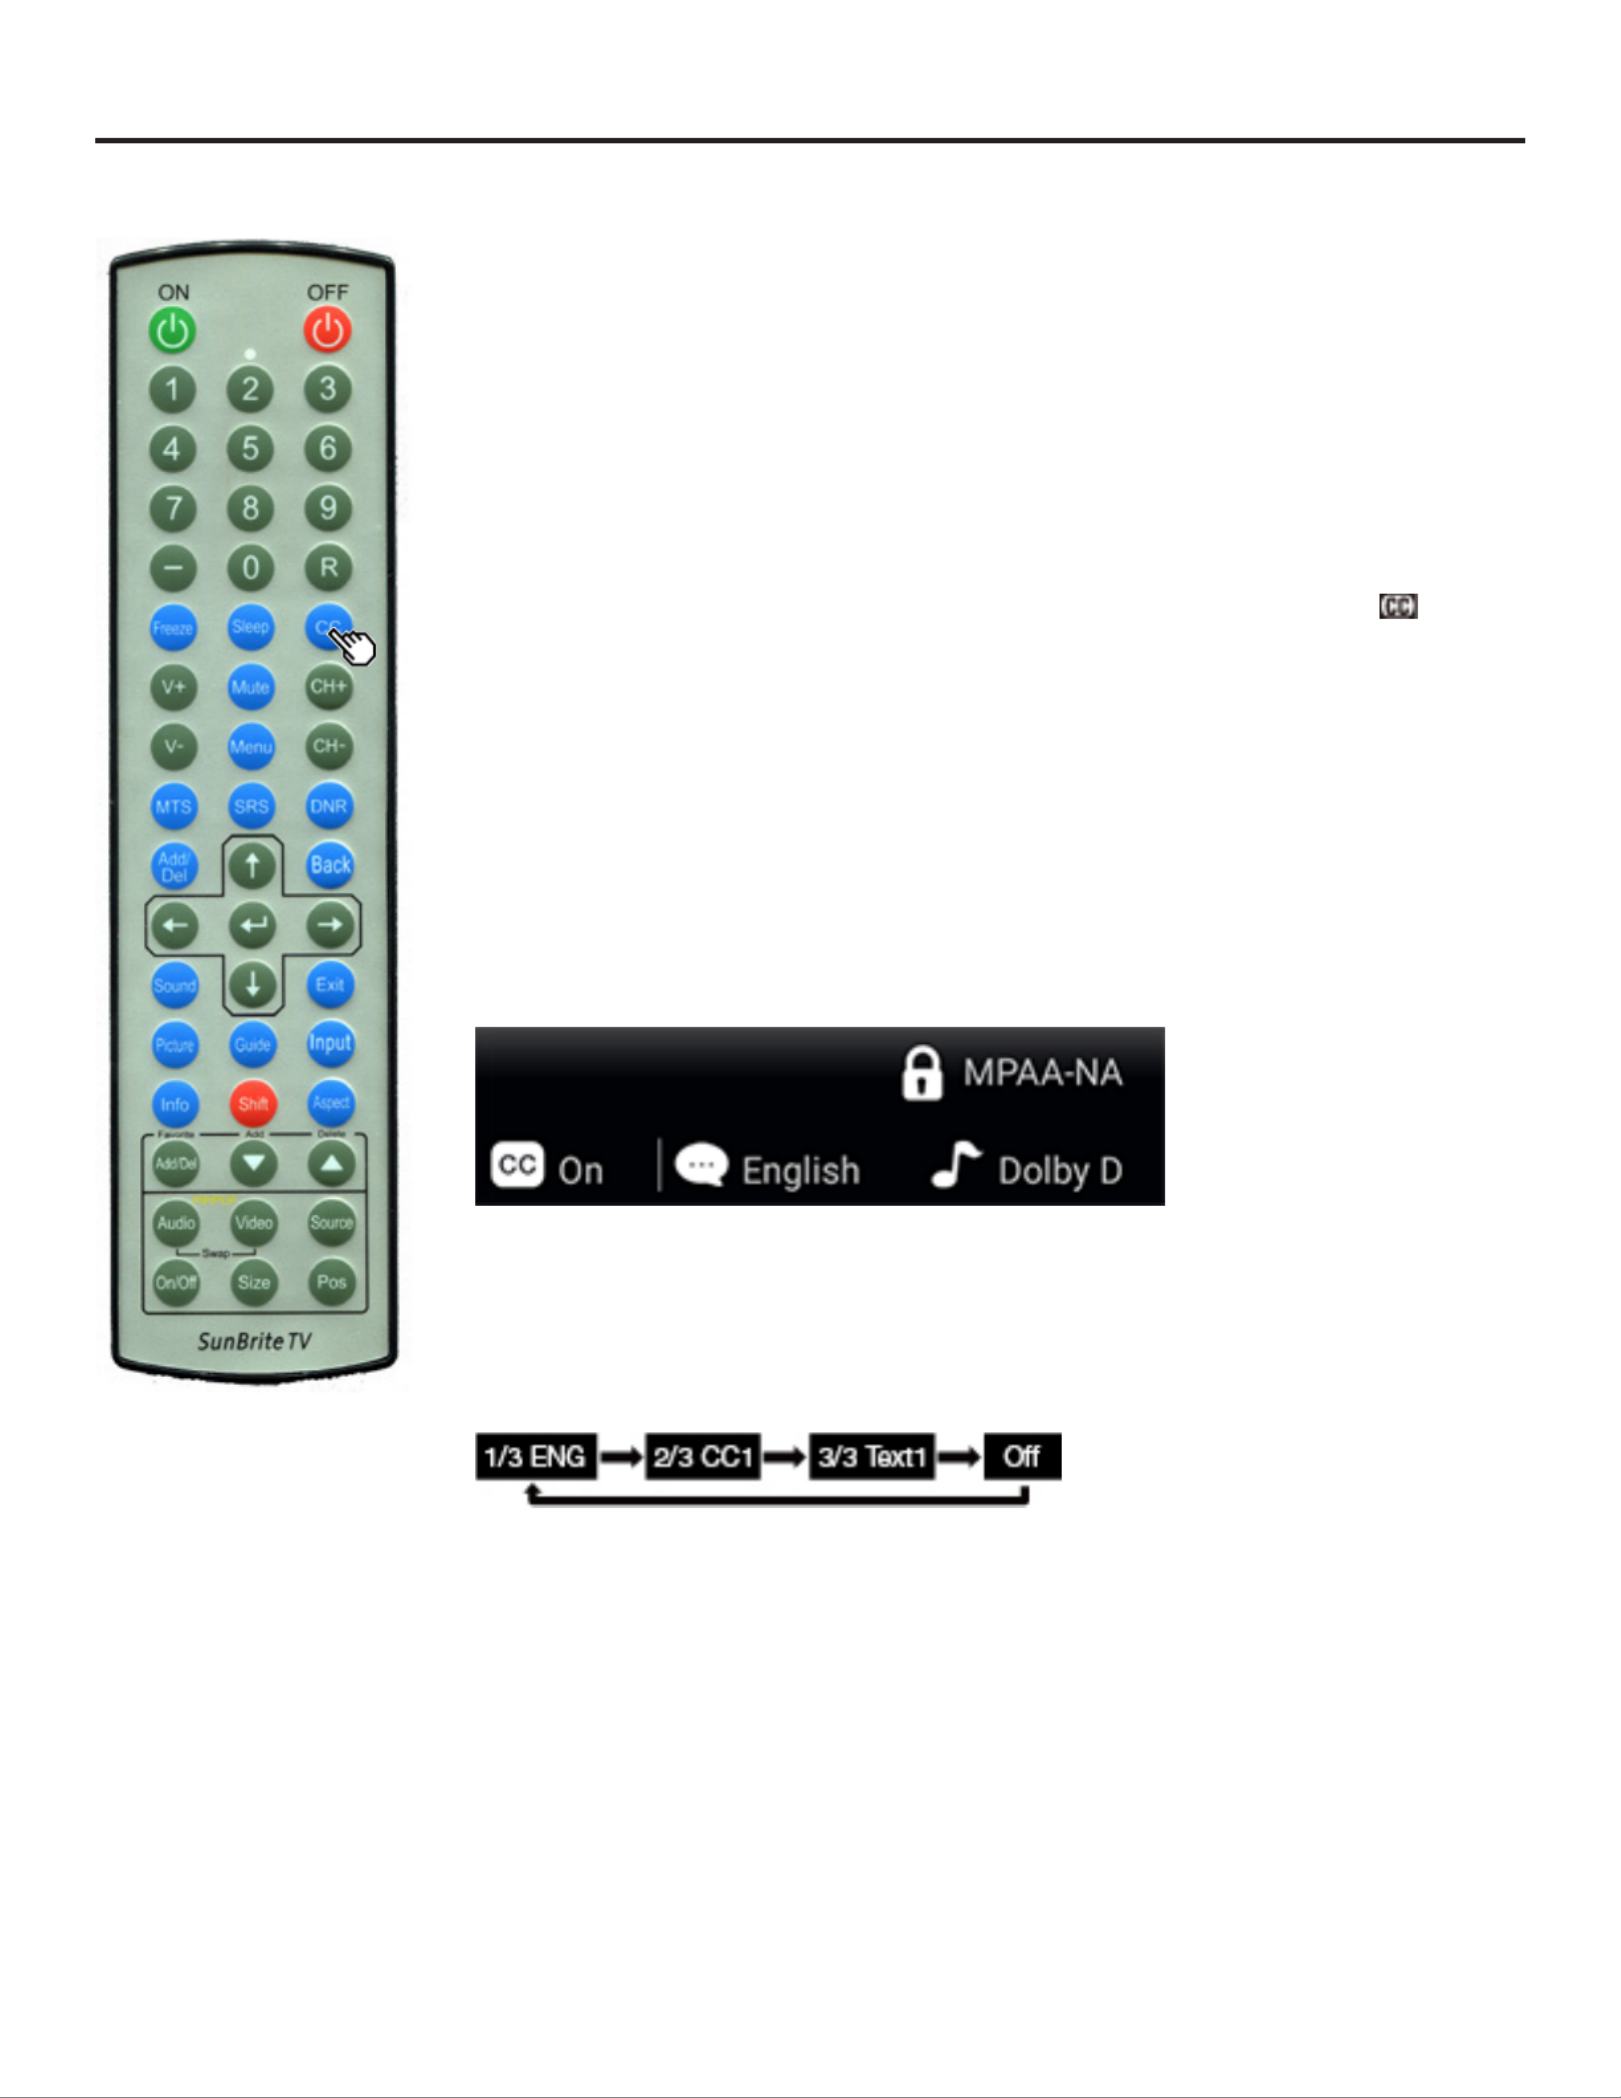
CLOSED CAPTIONS AND DIGITAL CLOSED CAPTIONS
Your TV is equipped with an internal Closed Caption decoder. It allows you to view
conversations, narration and sound effects as subtitles on your TV. Closed Captions are
available on some TV programs and on some VHS home video tapes at the discretion of the
program provider.
Digital Closed Caption service is a new caption service available only on digital TV
programs (also at the discretion of the service provider). It is a more exible system than
the original Closed Caption system, because it allows for a variety of caption sizes and
font styles. When the Digital Closed Caption service is in use, it will be indicated by the
appearance of a 3-letter abbreviation that also indicates the language of the Digital Closed
Captions: ENG (English), SPA (Spanish), FRA (French) or other language codes.
Not all programs and VHS videotapes offer closed captions. Please look for the symbol
to ensure that captions will be shown.
In the Closed Caption system, there can be more than one caption service provided. Each
is identied by its own number. The "CC1" and "CC2" services display subtitles of TV
programs superimposed over the program’s picture.
In the Closed Caption system, the "Text1" or "Text2" services display text that is unrelated
to the program being viewed (e.g., weather or news). These services are also superimposed
over the program currently being viewed.
1. Press CC.
• This will present the Closed Caption information display.
2. Press CC while the Closed Caption information is still on the screen.
• Press repeatedly until you select the desired closed caption service.
• Depending on the number of caption services in the signal being received, you will
see information such as 1/2 or 1/4 displayed.
1/2 means "the rst of two services".
Example:
If a program has three services (Digital CC(ENG), CC1 and Text1), the closed caption display
will toggle in this sequence:

Page 20 All Rights Reserved. 2018 ©SunBrite® LLC
Direct Button Operation
CLOSED CAPTIONS AND DIGITAL CLOSED CAPTIONS (CONTINUE)
Examples:
In a case where there are two closed caption services provided (for instance, Digital
CC(ENG) and CC1), and Digital CC(ENG) is displayed as your current selection, if Digital
CC(ENG) is not broadcast for the next program, the other closed caption service, CC1, will
be displayed in parentheses.
A closed caption service appears in parentheses because the service you selected is not
available and a different service is displayed on your screen. is displayed instead 1/1(CC1)
of .1/2/ENG
Note:
• When the program contains no closed caption, displays in the closed caption --
information.
• If the language code, e.g. , is not found on Digital TV programs, will be shown.ENG --
• Four kinds of closed caption service (CC1, CC2, Text1, Text2) are potentially
available, but a broadcast may contain none or only some of these services at the
discretion of the program provider.
• When a web page is displayed, Closed Captions are not available.
• You can have the same settings by choosing on the menu items. Change CC

4K HDR Veranda Operation Manual Page 21
Direct Button Operation
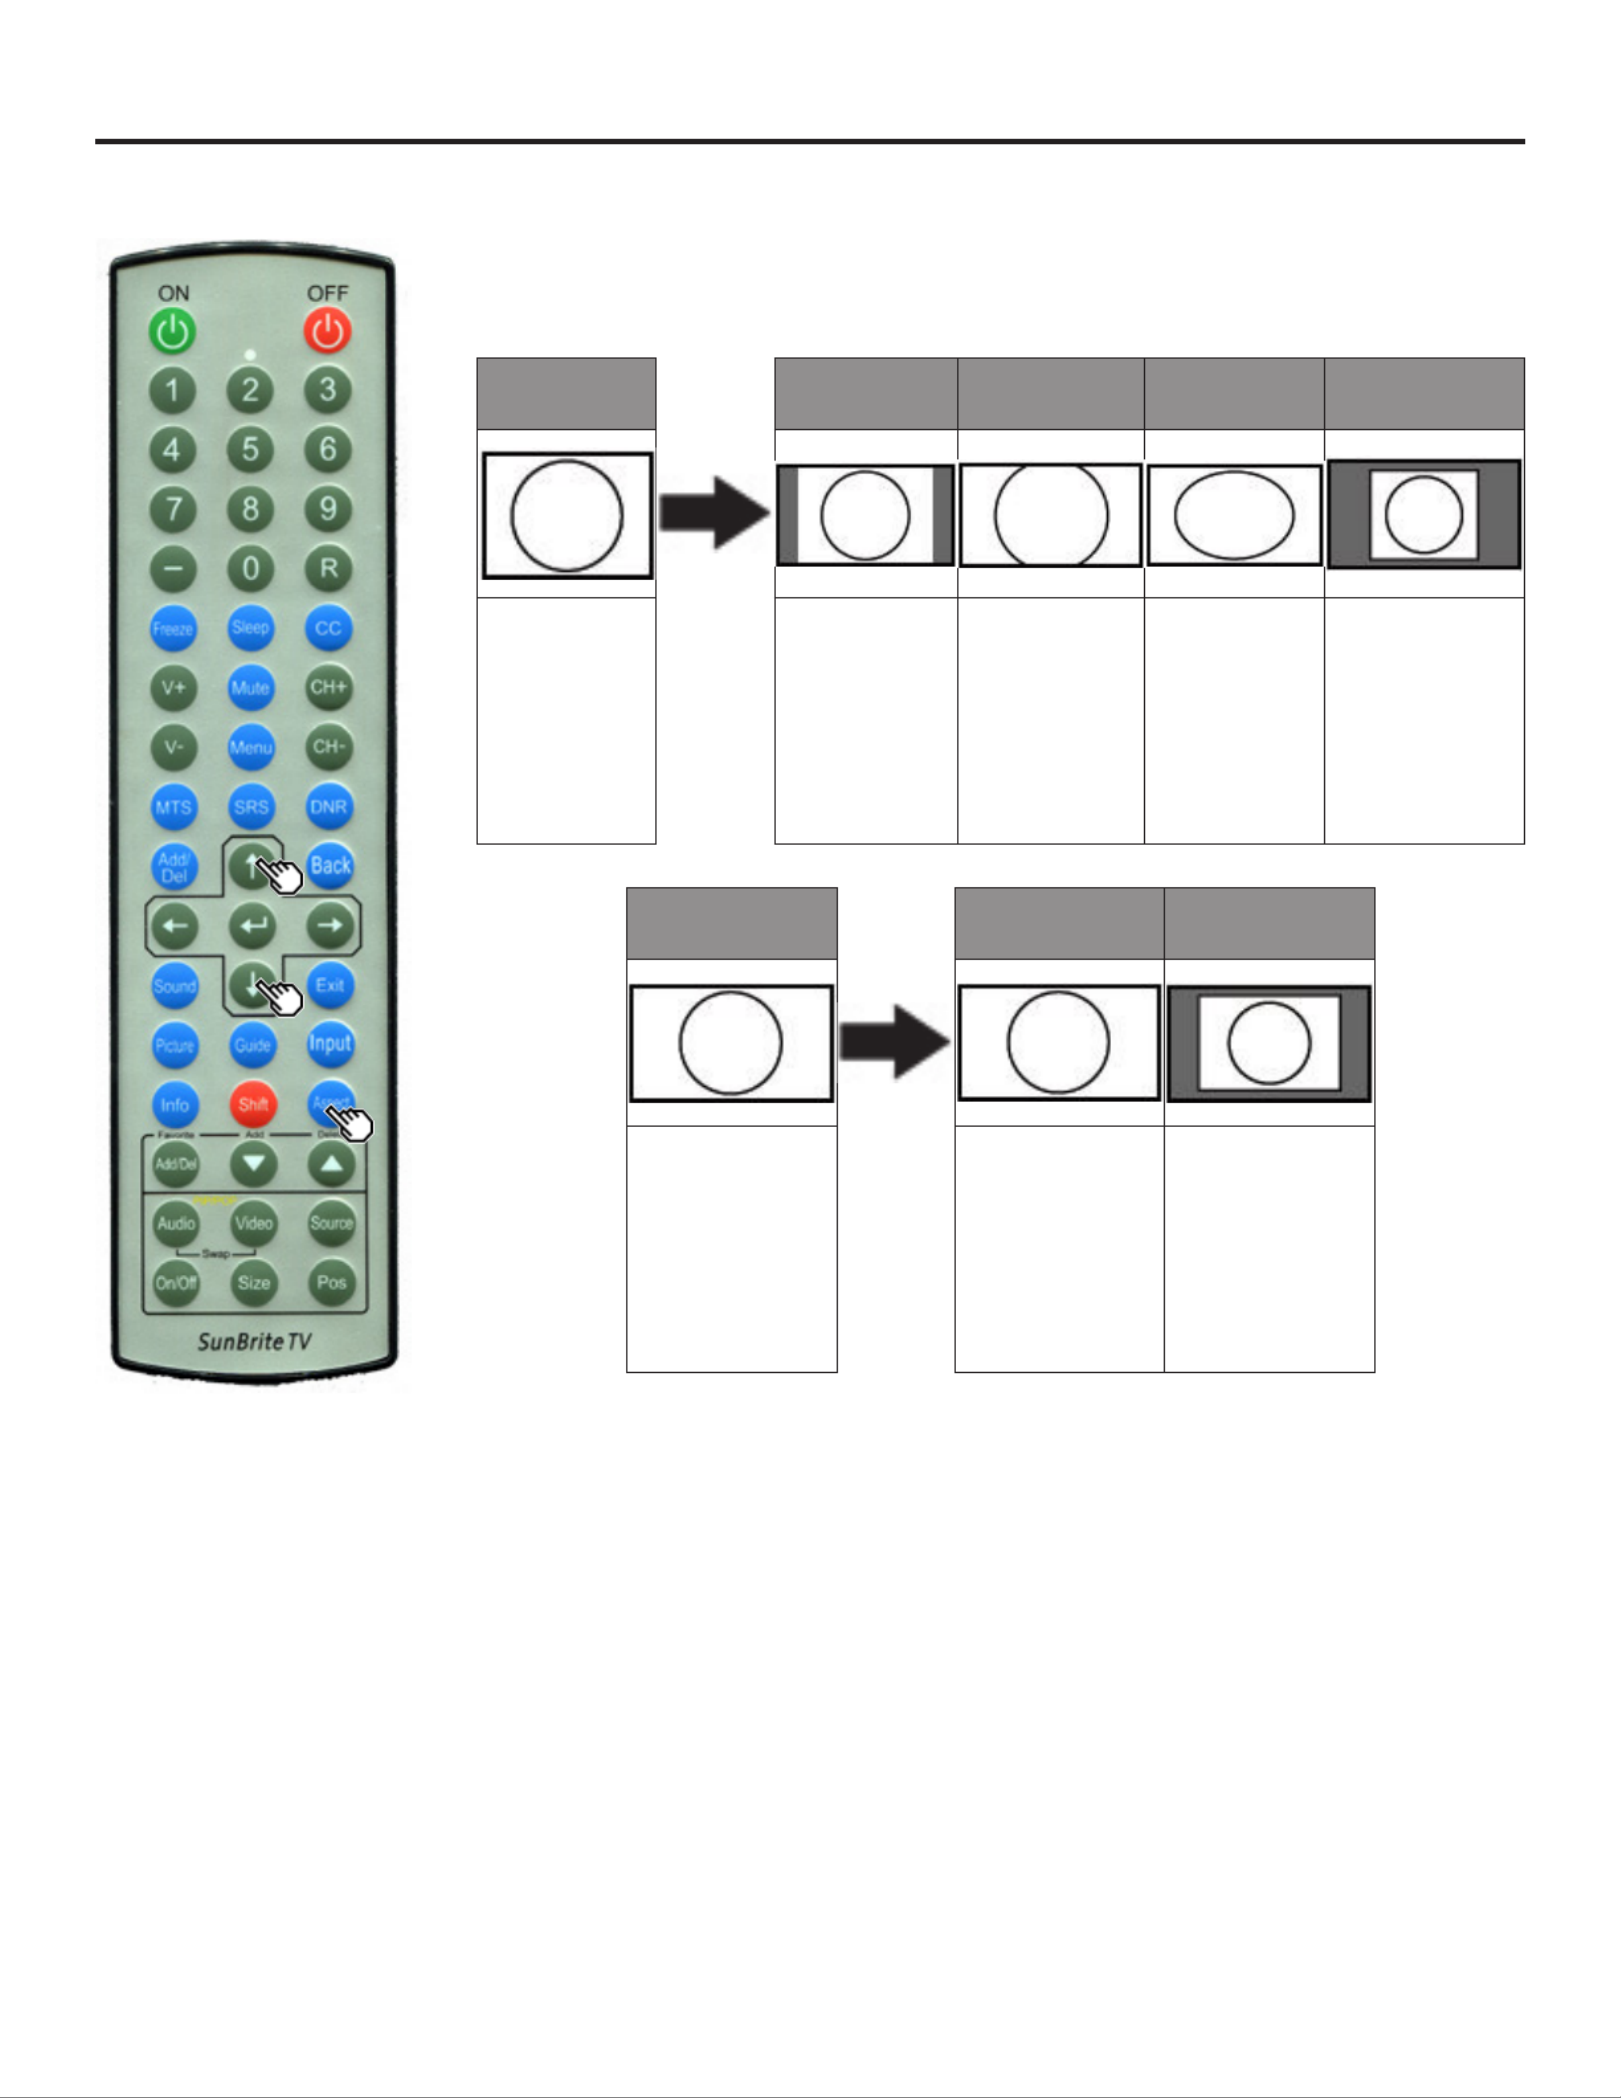
ASPECT MODE
You can select the screen size.
1. Press ASPECT.
• The Aspect Mode menu displays.
• The menu lists the Aspect Mode options selectable for the type of video signal
currently being received.
2. Press ASPECT or GKProjA_a/GKProjA_b while the View Mode menu is displayed to
select a desired item on the menu.
• You can sequentially select an Aspect Mode that has its own aspect ratio.
FOR HD PROGRAMS
Stretch Full Screen (Dot By
Dot)
S. Stretch (Smart
Stretch)
Zoom
Suitable for viewing
wide-screen
1.78:1 aspect ratio
program, stretch
mode will still show
very thin black
bands at the top
and bottom of the
screen.
"Dot by Dot" when
the number of pixels
on the screen and
the resolution of the
signal are the same.
"Full Screen" when
the number of pixels
on the screen and
the resolution of the
signal are different.
In either case, the
image fully lls the
screen.
Suitable for
stretching 4:3
programs to ll the
screen.
Suitable for viewing
wide-screen
2.35:1 aspect-ratio
programs in full
screen.
Note: When using Dot by Dot or Full Screen, it is possible to see noise or bars around
different outer portions of the screen. Please change view mode to correct this.

Page 22 All Rights Reserved. 2018 ©SunBrite® LLC
Direct Button Operation
ASPECT MODE (CONTINUED)
For 4:3 programs
Example: Screen size images
Side Bar S. Stretch (Smart
Sketch)
Zoom Stretch
Suitable for viewing
conventional 4:3
programs in their
normal format.
Suitable for
stretching 4:3
programs to ll the
screen.
Suitable for viewing
wide-screen 2.35:1
anamorphic DVDs in
full screen.
This mode is useful
for 1.78:1 DVDs.
When viewing
1.85:1 DVDs, stretch
mode will still show
very thin black
bands at the top
and bottom of the
screen.
For USB-Video and images
Example: Screen size images
Input Signal Auto Original Stretch
Keeps the
original aspect
ratio in a full
screen display.
Displays an
image by an
original size.
An image fully
lls the screen.
4K HDR Veranda Operation Manual Page 23
ASPECT MODE (CONTINUE)
For PC
Example: Screen Size Images
Input Signal Auto Zoom Stretch Full Screen
(Dot by Dot)
4:3 Keeps the
original
aspect ratio in
a full screen
display.
For viewing
widescreen
programs.
The top and
bottom of
the image is
cropped.
An image
fully lls the
screen.
Detects the
resolution of
the signal and
displays an
image with the
same number
of pixels on the
screen.
Input Signal Stretch Full Screen (Dot
by Dot)
16:9 An image fully
lls the screen.
Detects the
resolution of
the signal and
displays an
image with the
same number
of pixels on the
screen.
Note: Connect the PC before making adjustments. See the Setup Guide.
Selectable screen size may vary with input signal type
Direct Button Operation

Page 24 All Rights Reserved. 2018 ©SunBrite® LLC
Introduction
1. User Menu Option Title
• This indicates the item currently selected.
• Press to go to the adjustment screen for this item.ENTER
2. Hightlighted Menu Option
• This indicates the currently selected item.
3. Item displayed in white
• This indicates that the item can be selected.
4. Item displayed in gray
• This indicates that the item cannot be selected.
• There are various reasons why the items cannot be selected, but the main reasons
are as follows:
— Nothing is connected to the selected input terminal.
— The function is not compatible with the current input signal.
— When this conicts with other functions, you must change the settings for the other
functions.
About Menu Items
• Some menu items may not be displayed depending on the selected input source.
Note:
• The screens in the operation manual are for explanation purposes (some are
enlarged, others cropped) and may vary slightly from the actual screens.
• The order of explanations for each menu item in the following pages is not necessarily
in accordance with the alignment of the items on the screen.
On-Screen Display Menu

4K HDR Veranda Operation Manual Page 25
ON-SCREEN DISPLAY MENU OPERATION
1. Press MENU to display the MENU screen.
2. Press / to select the desired menu.
Press / to select a specic adjustment item, and then press ENTER.
• Additional related adjustment items may be displayed. Press / to select the
desired item.
3. MENUPress to Exit
On-Screen Display Menu
Page 26 All Rights Reserved. 2018 ©SunBrite® LLC
MENU OPERATION BUTTONS
Using the Remote Control
Use the following buttons on the remote control to operate the menu.
MENU: Press to open or close the menu screen.
/ / / : Press to select a desired item on the screen or adjust a selected item.
ENTER: Press to go to the next step or complete the setting.
BACK: Press to return to the previous step.
Using the Control Panel Of The Tv
You can also operate the menu with the control panel of the TV.
Button operations on the control panel correspond to the ones on the remote control as
shown below.
MENU: MENU on the remote control.
INPUT: ENTER on the remote control.
CH +/- : Cursor / on the remote control.
VOL+/-: Cursor / on the remote control.
On-Screen Display Menu

4K HDR Veranda Operation Manual Page 27
AUDIO
Note: For operating the on-screen display menu. See pages 24-26.
Sound Mode
Enter to select various sound mode presets
Movie/Music/Sport/User
Speakers
Turn the TV internal speakers on or off
Analog Audio Out
Set the output of the 3.5mm Analog Audio output. Fixed/Variable
Digital Audio Out
Set the output mode of the TosLink digital audio (Off/Dolby Digital/PCM)
Balance
Set the balance to the Left and Right speaker, default is 0 left and right equal
output.
Lip Sync
Set this to adjust the audio delay related to video
Note: Bass and Treble adjustments available in User Audio preset only.
Bass
Adjust the low end audio frequency output (-12/+12) default 0
Treble
Adjust the high end audio frequency output (-12/+12) default 0
Audio

Page 28 All Rights Reserved. 2018 ©SunBrite® LLC
PICTURE
Note: For operating the on-screen display menu. See pages 24-26.
Picture Mode
Select Picture Mode Preset Settings (Standard/Movie/Vivid/Game/User/
PC)
Aspect
Select the aspect mode used when displaying various content (Normal/
Wide/Zoom/Stretch)
Color Temperature
Select the color temperature of the white areas in the video content
(Natural/Warm/Computer/Cool)
Backlight
Set the backlight brightness (0-20)
Advanced Picture
Select this option to adjust various picture quality settings
On-Screen DIsplay Menu

4K HDR Veranda Operation Manual Page 29
ADVANCED PICTURE
Note: For operating the on-screen display menu. See pages 24-26.
Contrast
Adjust the picture contrast
Brightness
Adjust the picture brightness
Color
Adjust the color saturation of the picture
Tint
Adjust the tint of the picture
Sharpness
Adjust the sharpness of the picture, useful when source is high resolution
PC or graphics
Motion Enhancer
Adjust the sharpness of the picture displaying high motion video content
Color Enhancement
Adjust the enhancement of overall picture color
Dynamic Contrast
Contrast is adjusted automatically based on content (Off/Low/Medium/
High)
Noise Reduction
Feature to remove digital artifacts contained in some video content (Off/
Low/Medium/High)
Local Dimming
Backlight is dimmed in zones based on content (Off/Low/Medium/High)
Low Latency
Select On to reduce video delay when gaming.
Gamma Adjustment
Adjust the correction to the light and dark areas of the picture (Default 2.2)
(Range from 1.8 to 2.4)
Film Mode
When lm content is detected, picture will be optimized. For best picture,
set to Auto
On-Screen DIsplay Menu
Page 30 All Rights Reserved. 2018 ©SunBrite® LLC
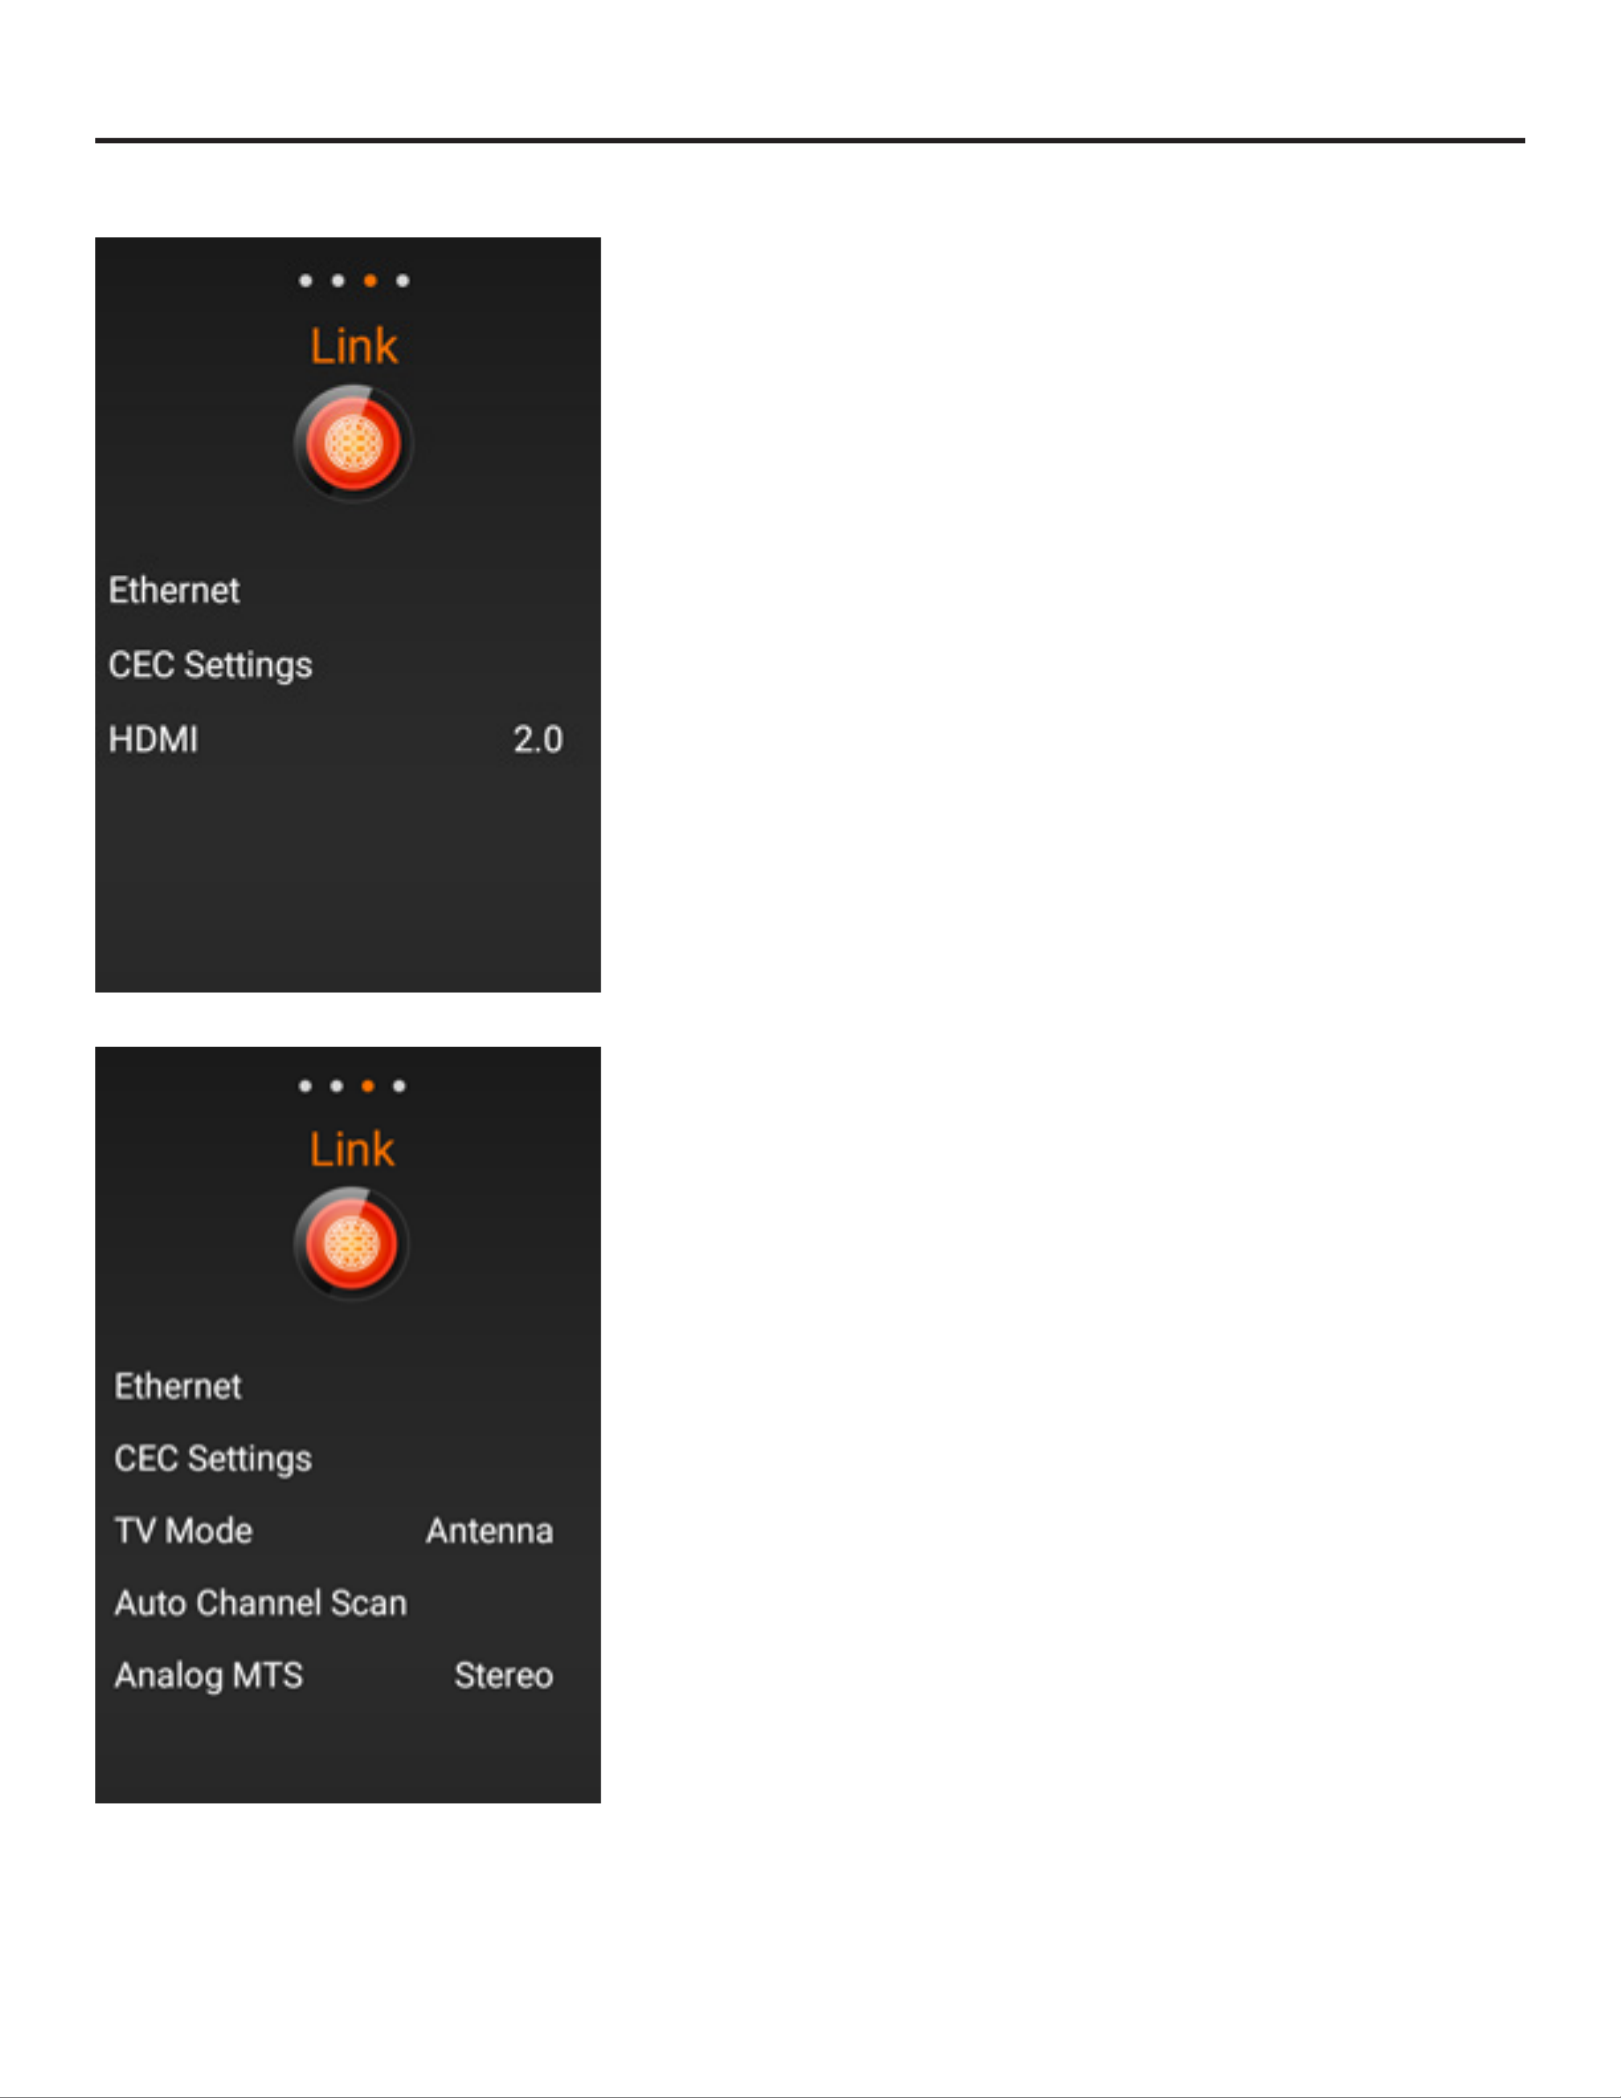
LINK
Note: For operating the on-screen display menu. See pages 24-26.
Ethernet
Select to change the ethernet network type from DHCP(Dynamic) or Static
CEC Settings
Select to change Link CEC Control settings
HDMI (Mode)
Select 2.0 for EDID 2.0 full 4k, Select 1.4 for legacy EDID 1.4 4k/30 support
Available only when HDMI input is selected
TV Mode
Select to change the tuner mode type (Antenna/Cable)
Auto Channel Scan
Select to scan and learn channels from the cable or antenna signal input.
Analog MTS
Select the default multichannel television sound used during a cable or
antenna broadcast, Stereo, SAP or Mono. (default Stereo)
On-Screen Display Menu

4K HDR Veranda Operation Manual Page 31
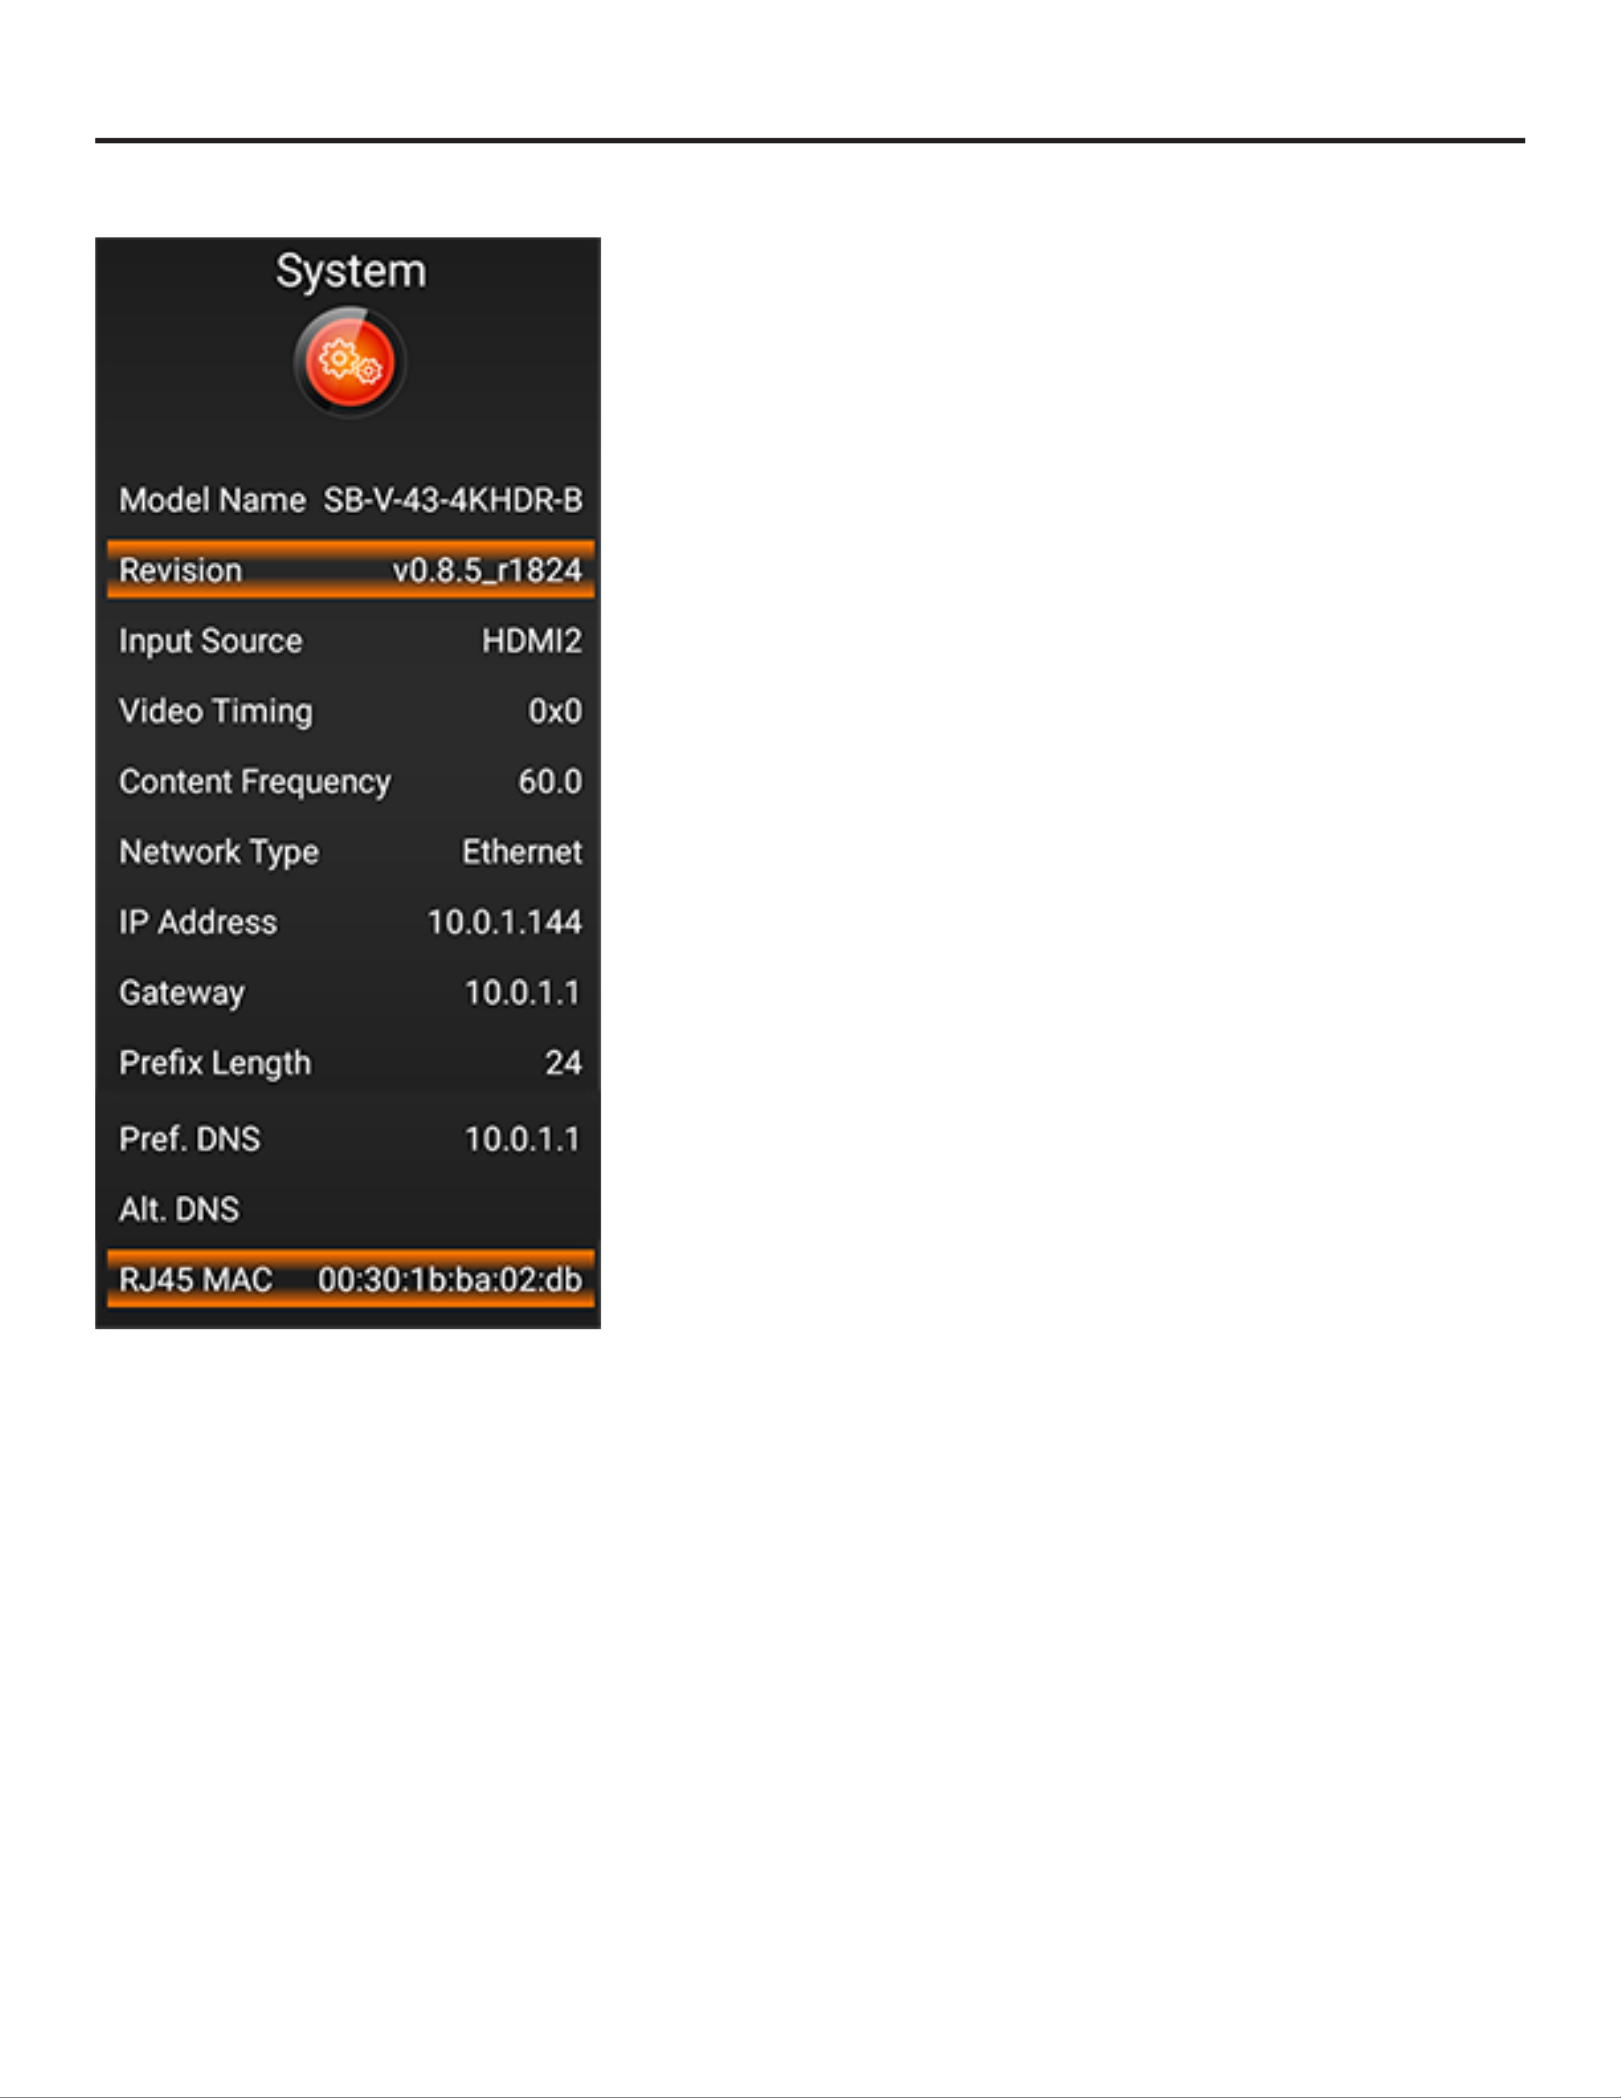
SYSTEM
Note: For operating the on-screen display menu. See pages 24-26.
Sleep Timer
Set the time for auto turn off of the TV
(30/60/90/120/180 minutes)
Same function as remote sleep button.
Parental Controls
Available only when TV(Tuner) input is selected.
Default password is 0000
Select parental controls on TV channels based on the contents rating.
Closed Caption
Available only when TV(Tuner) input is selected.
Select options for displaying closed caption text on the content.
Quick Start
Enable allows the TV to start faster when the power on button is pressed.
TV will use more power in this mode.
Must be enabled to fully enable IP control.
User Manual
Select this option to display the manual you are currently reading.
System Information
Displays detailed TV information, see page 4-21 for more details
Reset All Settings
Restore all TV settings to factory default
On-Screen Display Menu
Page 32 All Rights Reserved. 2018 ©SunBrite® LLC
SYSTEM
Note: For operating the on-screen display menu. See pages 24-26.
Model Name
SunBriteTV model number of your outdoor TV
Revision
Current rmware version
Input Source
Current source input selected
Video Timing
TBD
Content Frequency
Input source frame rate, 60(hz) is typical
Network Type
Ethernet - wired network connection to the rear RJ45 jack
IP Address
IPV4 network address assigned to the TV
Gateway
IPV4 network address of the local network gateway
Prex Length
Number of bits in the subnet (24=255.255.255.0)
Pref. DNS
Preferred network name server
Alt. DNS
Alternate network name server
RJ45 MAC
Hardware address of the TV network adapter
On-Screen Display Menu

4K HDR Veranda Operation Manual Page 33
PREPARATION
You can connect the TV to a USB memory device to view pictures, listen to music, and watch videos.
Note:
• Depending on the USB memory device, the TV may not be able to recognize the recorded data.
• It may take time to read the recorded data if the USB memory device contains many les or folders.
• Use only alphanumeric characters for naming les.
• File names over 80 characters (may vary depending on character set) may not be displayed.
Connecting a USB Memory Device/USB Hard Drive
Insert the USB memory device with recorded photos, music or videos into the USB terminal on the TV.
• When connecting a USB hard drive, be sure to use a hard drive with an AC adapter.
• Do not remove a USB memory device or memory card from the TV while transferring les, using the slide show
function, or switching screens, or before you exit "USB" from the INPUT list.
• Do not insert and remove a USB memory device/USB hard drive to and from the TV repeatedly.
• When using a card reader, be sure to insert a USB memory device rst.
CAUTION:
• Do not use a USB extension cable when connecting a USB memory device to the USB terminal on the TV.
• Using a USB extension cable with the USB memory device may prevent the TV from performing correctly.
USB Photo/Music/Video Playback

Page 34 All Rights Reserved. 2018 ©SunBrite® LLC
SELECTING THE FOLDERS TO PLAY BACK
• To play back data on a USB memory device, insert the USB memory device on the TV.
• Use the following procedure to switch back to USB mode after switching from USB
mode to another mode.
1. MMP(USB) INPUTSelect from list screen.
2. ENTERPress / to select Video, Music or Photo, and then press .
3. Press / / to select the desired folder, and then press ENTER.
USB Device Compatibility
USB device USB Memory, USB card reader (Mass Storage class), USB hard drive
File system FAT/FAT32/NTFS (USB hard drive only)
Photo le format JPEG (.jpg) (DCF2.0 compliant)
Music le format MP3 (.mp3)
Bitrate: 32k, 40k, 48k, 56k, 64k, 80k, 96k, 112k, 128k, 160k, 192k,
224k, 256k, 320kbps
Sampling frequency: 32k, 44.1k, 48kHz
USB Photo/Music/Video Playback
4K HDR Veranda Operation Manual Page 35
SELECTING THE FOLDERS TO PLAY BACK
Video File Format
File Extension Container Video Video
.avi AVI MPEG-1
MPEG-4 SP/
ASP(XviD)
MPEG-4 AVC
(H.264)
Motion JPEG
MPEG-Audio
LPCM
MS-ADPCM
AC3
.mkv MKV MPEG-1
MPEG-2
MPEG-4 SP/
ASP(XviD)
MPEG-4 AVC
(H.264)
MPEG-Audio
LPCM
MS-ADPCM
AC3
.asf
.wmv
ASF
WMV
MPEG-4
SP/ASP(XviD)
WMV 7/8/9
LPCM
WMA
.mp4 MP4 MPEG-4 SP/
ASP(XviD)
MPEG-4 AVC
(H.264)
Motion JPEG
MPEG-Audio
LPCM
MS-ADPCM
AC3
.mpg
.mpeg
MPG MPEG-1
MPEG-2
MPEG-Audio
LPCM
MS-ADPCM
AC3
Note:
• Progressive format jpeg les are not supported.
• USB 1.1 devices may not be played properly.
• Operation using USB hubs is not guaranteed.
• Some video le formats may not be played depending on the le.
• Some images may not be displayed in the appropriate aspect ratio depending on the
le format.
File Format Compatibility
Photo File Format JPEG
Music File Format LPCM, MP3
Video File Format AVI, MKV, ASF, MP4, WMV, MPG
Note:
• Progressive format jpeg les are not supported.
• Some video le formats may not be played depending on the le or the server.
• WMV, ASF, MP4, MOV and AVI are not Home Network contents.
USB Photo/Music/Video Playback

Page 36 All Rights Reserved. 2018 ©SunBrite® LLC
PLAYING BACK FILES ON A USB MEMORY DEVICE
Note:
• The screen images in this section are for the USB mode.
Photo Mode
Viewing Thumbnails
Buttons for Thumbnail Operations
Buttons Description
/ / / Select a desired item.
Setup options for photo viewing; file sort and slideshow interval time
ENTER When selecting a folder icon:
Enter this directory.
When selecting a photo thumbnail:
Start the slide show.
BACK Return to the previous process.
USB Photo/Music/Video Playback

4K HDR Veranda Operation Manual Page 37
PLAYING BACK FILES ON A USB MEMORY DEVICE (CONTINUE)
Slide Show
The photos displayed on the thumbnail selection screen are displayed as a slide show.
Buttons for slide show operation
Buttons Description
BACK Return to the thumbnail selection screen
Left Arrow Previous le
Down Arrow Displaying/hiding operation guidance.
Right Arrow Next le
Note:
• Rotating photos only applies to the temporarily selected item and this setting is not
saved.
USB Photo/Music/Video Playback
Page 38 All Rights Reserved. 2018 ©SunBrite® LLC
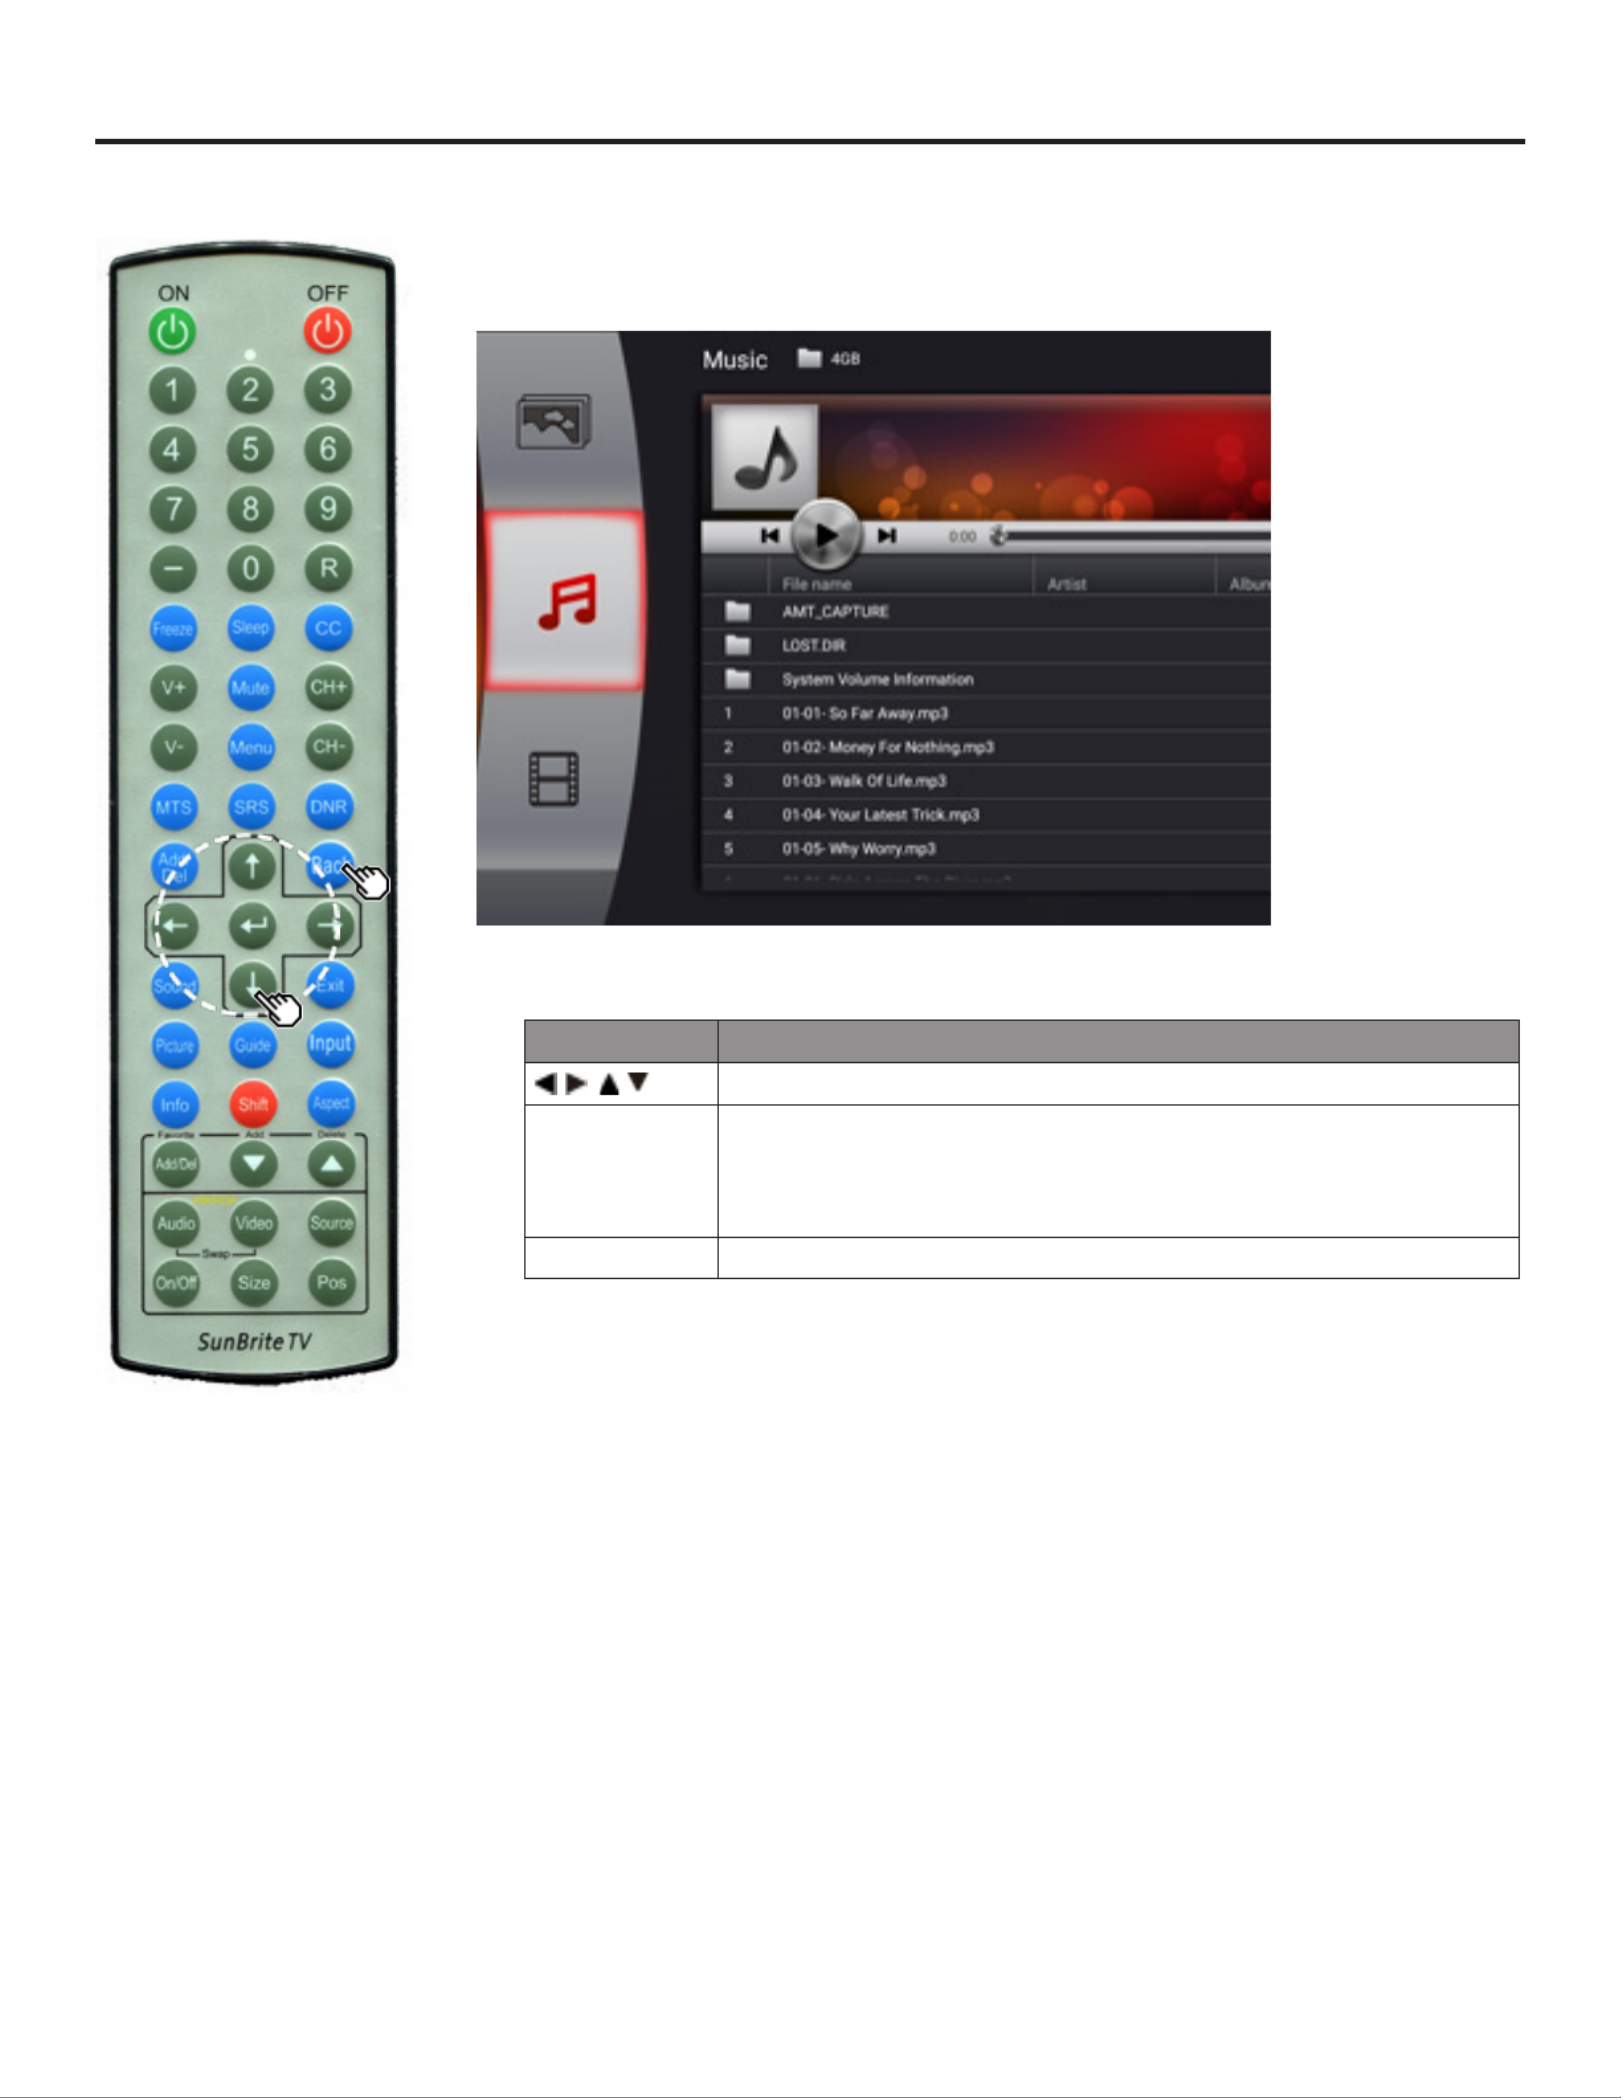
PLAYING BACK FILES ON A USB MEMORY DEVICE (CONTINUE)
MUSIC MODE
Buttons for Music Mode
Buttons Description
/ / / Select a desired item.
ENTER When selecting a folder icon:
Enter this directory.
When selecting a photo thumbnail:
Start the slide show.
BACK Return to the previous process.
USB Photo/Music/Video Playback

4K HDR Veranda Operation Manual Page 39
PLAYING BACK FILES ON A USB MEMORY DEVICE (CONTINUE)
VIDEO MODE
Buttons for File Selecting Operations
Buttons Description
/ / / Select a desired item.
ENTER When selecting a folder icon:
Enter this directory.
When selecting a photo thumbnail:
When selecting a video file: Play the video.
BACK End playback and return to the previous process.
USB Photo/Music/Video Playback
Page 40 All Rights Reserved. 2018 ©SunBrite® LLC
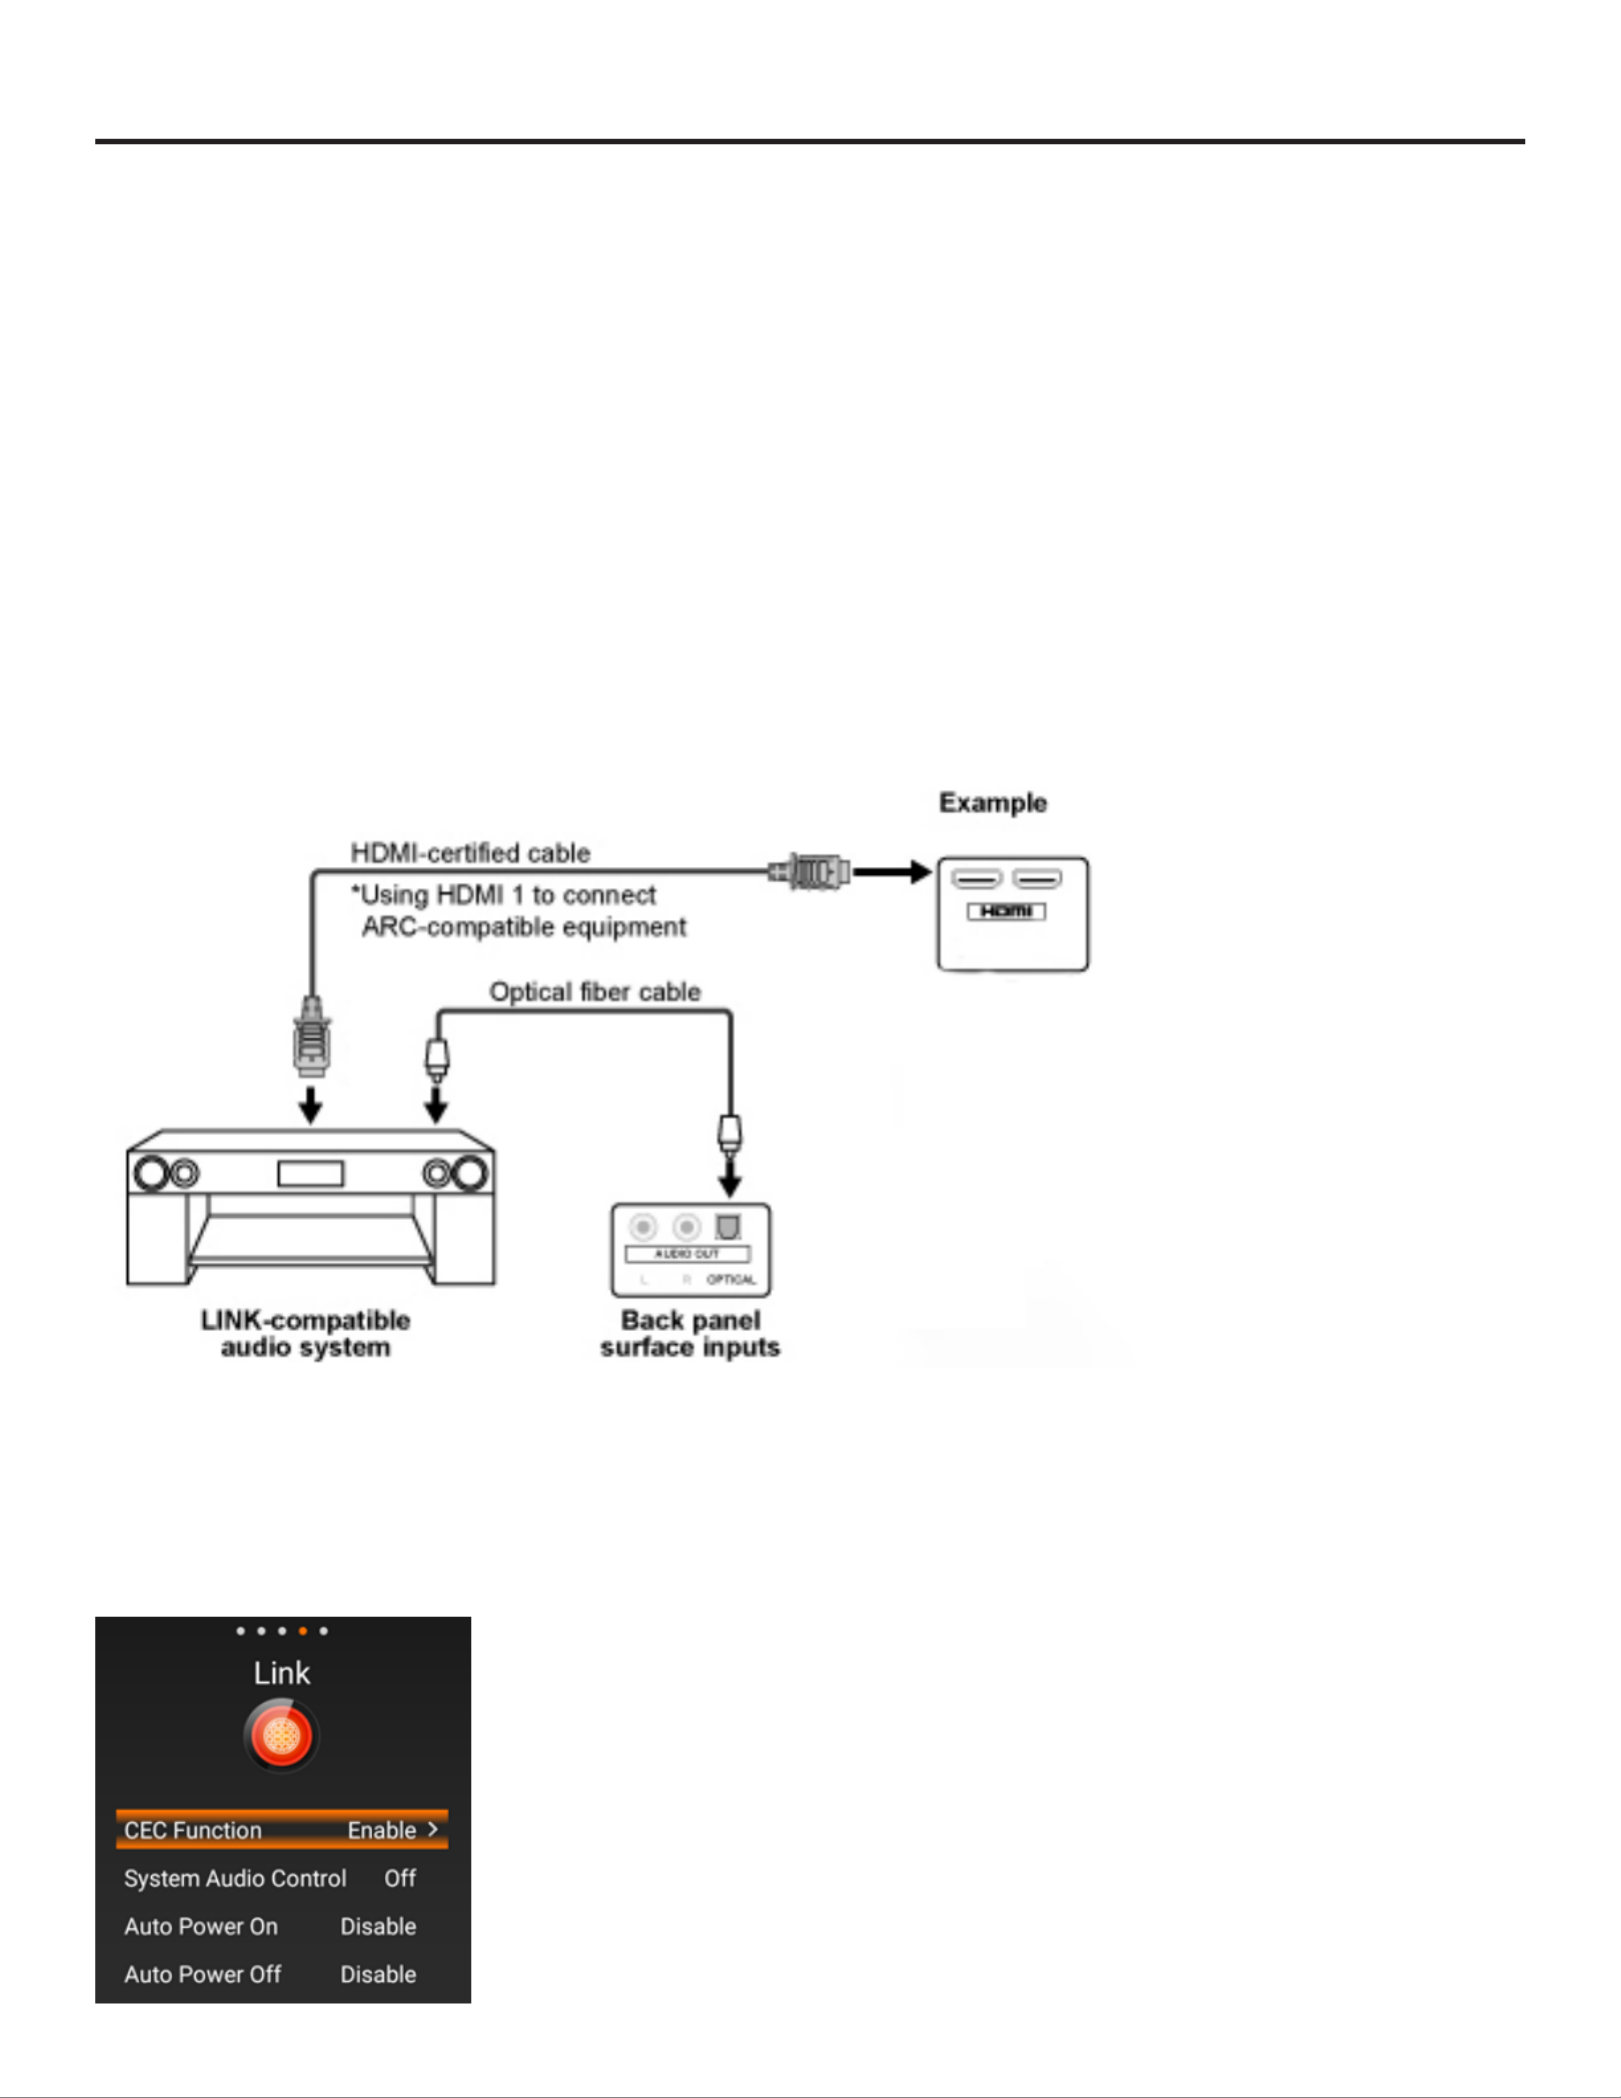
CONTROLLING HDMI EQUIPMENT USING LINK CEC OPERATION
What’s LINK Operation?
• Using the HDMI CEC (Consumer Electronics Control) protocol, with LINK Operation you can interactively operate
compatible system equipment (Blu-ray disc equipment, AV amplier, DVD).
• To access this function: System Operation > Initial Setup > Input Settings > Link Setup > Link Operation.
Note:
• For connecting the TV to LINK-compatible equipment, use commercially available cables.
• Point the remote control toward the TV, not to connected HDMI equipment.
• Video noise may occur depending on the type of HDMI cable used. Make sure to use an HDMI-certied cable.
• Up to 3 pieces of HDMI recording equipment and one AV amplier can be connected using this system.
• These operations affect the HDMI equipment selected as the current input source. If the equipment does not operate,
turn on the equipment and select the appropriate input source using INPUT.
• The LINK feature may not operate properly when an HDMI splitter or AV selector unit is used. These devices may
cause interruptions to the image and/or sound.
Connected LINK-compatible devices can be operated without changing the settings of the remote control unit.
Control the Link-Compatible Audio System
Set the volume of LINK-compatible audio system.
Note:
• The steps in "LINK Setup" on page 41 need to be completed beforehand.
• Refer to this operation manual and the operation manual of the LINK device to be used with this TV.
Using LINK Operation

4K HDR Veranda Operation Manual Page 41
CONTROLLING HDMI EQUIPMENT USING LINK CEC OPERATION (CONTINUE)
LINK Setup
Make the settings to use LINK Operation. Set the settings with "Menu" > "Link" > "CEC
Settings".
CEC Function
Select CEC Function to disable the LINK function even when a LINK-compatible HDMI
device is connected to the TV. This function prevents the device from turning on or off
unexpectedly due to a CEC command from the source device.
System Audio Control(ARC)
This function allows you to listen to the TV audio via audio equipment without using an
optical ber cable, which conventionally is required.
Requirements for using an ARC-compatible AV amplier:
• ARC-compatible AV amplier connected to the ARC-compatible HDMI terminal.
(HDMI 2) (Refer to the operation manual of the ARC-compatible equipment for
details.)
• Use of an ARC-compatible cable.
Note:
• If the TV audio cannot be output from the AV amplier even after making the
necessary settings, connect the TV to the AV amplier with an optical ber cable and
select "Off".
Auto Power On
If this is enabled and the source device has CEC enabled the TV will automatically turn on
and plays back the content from the HDMI source.
Auto Power Off
If this is enabled and the source device has CEC enabled the TV will automatically turn on
and plays back the content from the HDMI source.
Using LINK Operation

Page 42 All Rights Reserved. 2018 ©SunBrite® LLC
Appendix
TV STAND
• Before detaching (or attaching) the stand, make sure to turn off the TV and unplug the AC cord.
1. Unfasten the four screws used to secure the stand in place.
Example:
2. Attach the stand to the TV.
If necessary secure the stand to the table surface before attaching to the TV.
Secure the stand to the TV using all 4 screws as shown.
Note:
• Be sure to always carry the TV by two people holding it with two hands.
4K HDR Veranda Operation Manual Page 43
Appendix
OPTIONAL SPEAKER BAR
The optional speaker bar and required adapter cable is not included in the purchase of a SunBrite TV. These accessories are
available at SunBriteTV.com, local dealer or reseller. Before detaching (or attaching) the speaker, make sure to turn off the TV
and unplug the AC cord.
1. Mount the speaker bar to the bottom of the Veranda Outdoor TV.
2. Attach the 4 conductor Din adapter to the speaker bar connector and then plug the 3.5mm plug inside the cable bay into
the speaker bar output.

Page 44 All Rights Reserved. 2018 ©SunBrite® LLC
Appendix
MOUNTING THE TV ON THE WALL
Standard dimensions for wall mount kits are shown below. Visit www.SunBriteTV.com for information on all available
mounts.
43"
55"
• The mounting means should be strong enough to bear the weight of the display.
• The wall mounting bracket should have UL or related approval

4K HDR Veranda Operation Manual Page 45
Appendix
65"
75"
Wallmount Dimensions
(A x B)
SB-V-43-4KHDR
200mm x 200mm
SB-V-55-4KHDR
SB-V-65-4KHDR
SB-V-75-4KHDR
400mm x 400mm
Wallmount Screws M6
Cautions Regarding use in High and Low Temperature Environments
When the unit is used in a low temperature space (e.g. room, ofce), the picture may leave trails or appear slightly delayed. This is not a
malfunction, and the unit will recover when the temperature returns to normal.
Do not leave the unit in a hot or cold location. Also, do not leave the unit in a location exposed to direct sunlight or near a heater, as this
may cause the cabinet to deform and the front panel to malfunction.
Storage temperature: -24°F to +140°F (-31°C to +60°C)

Page 46 All Rights Reserved. 2018 ©SunBrite® LLC
CARING FOR THE LCD PANEL:
1. To clean the LCD Panel, turn the TV off and gently wipe the surface of the display panel with a water damp
microber, cotton or annel cloth. (Do not use tissues, rags, sponges or paper towels which may damage the screen
or leave behind lint).
2. If the LCD panel is very dirty, mix equal parts of isopropyl alcohol and distilled water in a clean spray bottle, and
spray the mixture onto a microber, cotton or annel cloth (do not spray the solution directly on the panel) and
gently wipe the panel clean.
3. Keep the TV covered with the optional SunBriteTV Outdoor Dust Cover when not in use.
• The tted dust cover is designed to protect the LCD panel from harmful UV rays from direct sunlight, and keeps
wind-blown objects from scratching the surface of the panel.
• To order a Dust Cover, contact your Authorized SunBrite dealer, SunBrite Customer Care at 866.357.8688, or
visit www.sunbritetv.com.
The example of an error message
displayed on a screen
Error code Possible Solution
An incompatible audio signal has been
received. Check the output device settings
— This message is displayed when an audio format other than PCM, DTS or
Dolby Digital is input.
- Set the audio output format of connected external HDMI equipment to
PCM or Dolby Digital.
- Refer to the operation manual of the external equipment for setting
details.
Appendix

4K HDR Veranda Operation Manual Page 47
Troubleshooting
TROUBLESHOOTING
Problem Possible Solution
No power • Check if you pressed POWER on the remote control unit.
• Is the AC cord disconnected?
• Has the power been turned on?
Unit cannot be operated. External inuences such as lightning, static electricity, may cause
improper operation. In this case, operate the unit after rst turning off
the power of the TV or unplugging the AC cord and replugging it in after
1 or 2 minutes.
Remote control unit does not operate. • Is the equipment to be operated by the remote control unit set
correctly? Press TV to set the remote control unit to the setting
for operating the TV.
• Are batteries inserted with polarity (+, -) aligned?
• Are batteries worn out? (Replace with new batteries.)
• Are you using it under strong or uorescent lighting?
• Is a uorescent light illuminated near the remote control sensor?
Picture is cut off/with sidebar screen. Are screen mode adjustments such as picture size made correctly?
Pages 21 to 23.
Strange color, light color, or color
misalignment
• Adjust the picture tone
Pages 28-29.
• Is the room too bright? The picture may look dark in a room that is
too bright.
Power is suddenly turned off. • Is the sleep timer set?
Page 16
• Check the power control settings.
Page 31
No picture • Is connection to other components correct?
• Is the correct input selected?
Page 9
• If the PC image is not displayed, check the following:
When connecting a laptop PC to the TV, check that display output
mode of the PC is set to external monitor.
Picture quality of HD programs is poor. • To enjoy HD images from external equipment, you are required to
set up HDMI connection or component connection.
• If the program content is not of HD quality, HD images cannot be
displayed. Check that the program you are viewing provides HD
images.
• The HD cable/satellite set-top box may need to be congured to
output HD images via cable/satellite.
• The cable/satellite broadcast may not be in full 1080 HD or 4K
The TV sometimes makes a cracking sound. This is not a malfunction. This happens when the cabinet slightly expands
and contracts according to change in temperature. This does not affect
the TV's performance.

Page 48 All Rights Reserved. 2018 ©SunBrite® LLC
Troubleshooting
Problem Possible Solution
No sound • Is connection to other components correct?
• Is the volume too low?
• Is "Variable" selected in "Output Select"?
• Have you pressed MUTE on the remote control
unit?
• Check the audio output of the connected external
equipment. Is the volume too low or muted?
• When external equipment is connected via an
HDMI cable, you may need to congure the audio to
be output through the HDMI cable.
• When audio is not output from external equipment
connected to the HDMI 2 terminal, check the
Digital Audio Out setting.
• When connecting a PC via an HDMI-certied cable,
check the following:
• Is the audio output of the PC congured correctly?
Check the audio output settings and output audio
format in Sound Properties on the PC.
• The audio formats compatible with this TV are PCM
and Dolby Digital. With other formats, audio cannot
be output.
Cautions Regarding Use In High And Low Temperature Environments
• When the unit is used in a low temperature space, the picture may leave trails or appear slightly delayed. This is not a
malfunction, and the unit will recover when the temperature returns to normal.
• Do not leave the unit in a hot or cold location. Also, do not leave the unit in a location exposed to direct sunlight or near
a heater, as this may cause the cabinet to deform and the front panel to malfunction.
• Storage temperature: -4°F to +140°F (-20°C to +60°C)
TROUBLESHOOTING - ERROR MESSAGE
The Example of an Error Message
Displayed on a Screen
Error Code Possible Solution
An incompatible audio signal has been
received. Check the output device
settings.
— This message is displayed when an audio format other than PCM,
DTS or Dolby Digital is input.
• Set the audio output format of connected external HDMI
equipment to PCM or Dolby Digital.
• Refer to the operation manual of the external equipment
for setting details.

4K HDR Veranda Operation Manual Page 49
Specications
SunBriteTV Model SB-V-43-4KHDR
Side View Front View
Specications are subject to change.
LCD Screen 43-inch diagonal Color Active Matrix TFT LED LCD
Resolution 3840 x 2160 UHD 4k HDR
Aspect Ratio 16:9
Blacklight Brightness
- Surface Luminance,
white
400 nits (cd/m2)
Contrast Ratio 4000:1
Frame Rate 60hz
H/V Viewing Angle 178o by 178o
Response Time 8 milliseconds
TV formats 2160p*,1080p, 1080i, 720p, 720i, 480p, 480i
* using HDMI only
Input Connectors:
RF
HDMI
Video Composite
Video Component
RGB
Antenna/CATV (NTSC/ATSC/QAM) x1
HDMI Input p49-x3 (Supports HDMI 1.4, HDMI 2.0, HDCP 1.4 &
HDCP 2.2) (ARC on HDMI2)
Composite Video x1, L/R Audio Inputs x1
YPbPr plus Stereo Audio x1
VGA DB15hd (up to 1920 x 1080)
Control Set Discrete IR Control, Concealed rear IR receiver, IP Control
Audio Out Tos-Link Optical audio (Fixed)
Analog 3.5mm (variable)
Speakers 20 Watt downring internal speakers (included) or optional
speaker bar (not included)
Exterior Powder-coated aluminum
Colors Black only
Input Power 100-240 VAC, 50-60 Hz 2.8A Max (75 watts/.7a@120v)
Operating Temp. -24o to 104o F. (-31o to 40o C.)
Non-op. Temp. -24o to 140o F. (-31o to 60o C.)
Accessories Included Weatherproof remote control with battery
TV Dimensions 39” W x 23” H x 3.4” D
991mm W x 584mm H x 86mm D
TV Weight 30 lbs.(13.6 kgs)
Shipping Weight 40 lbs. (18.14 kgs)
Residential Warranty 1 year
Commercial Warranty 1 year
Vesa Mount Pattern 200mm x 200mm
All dimensions are in inches, dimensions in [ ] are [metric]
Page 50 All Rights Reserved. 2018 ©SunBrite® LLC
Specications
SunBriteTV Model SB-V-55-4KHDR
Front View Side View
All measurements are in inches, except those in [ ] are [metric]
Specications are subject to change.
LCD Screen 55-inch diagonal Color Active Matrix TFT LED LCD
Resolution 3840 x 2160 UHD 4k HDR
Aspect Ratio 16:9
Blacklight Brightness
- Surface Luminance,
white
400 nits (cd/m2)
Contrast Ratio 4000:1
Frame Rate 60hz
H/V Viewing Angle 178o by 178o
Response Time 8 milliseconds
TV formats 2160p*,1080p, 1080i, 720p, 720i, 480p, 480i
* using HDMI only
Input Connectors:
RF
HDMI
Video Composite
Video Component
RGB
Antenna/CATV (NTSC/ATSC/QAM) x1
HDMI Input p50-x3 (Supports HDMI 1.4, HDMI 2.0, HDCP 1.4 &
HDCP 2.2) (ARC on HDMI2)
Composite Video x1, L/R Audio Inputs x1
YPbPr plus Stereo Audio x1
VGA DB15hd (up to 1920 x 1080)
Control Set Discrete IR Control, Concealed rear IR receiver, IP Control
Audio Out Tos-Link Optical audio (Fixed)
Analog 3.5mm (variable)
Speakers 20 Watt downring internal speakers (included) or optional
speaker bar (not included)
Exterior Powder-coated aluminum
Colors Black only
Input Power 100-240 VAC, 50-60 Hz 2.8A Max (125 watts/1.0a@120v)
Operating Temp. -24o to 104o F. (-31o to 40o C.)
Non-op. Temp. -24o to 140o F. (-31o to 60o C.)
Accessories Included Weatherproof remote control with battery
TV Dimensions 49.4” W x 28.6” H x 3.4” D
1254mm W x 726mm H x 86mm D
TV Weight 47 lbs.(21.3 kgs)
Shipping Weight 63 lbs. (28.5 kgs)
Residential Warranty 1 year
Commercial Warranty 1 year
Vesa Mount Pattern 400mm x 400mm

4K HDR Veranda Operation Manual Page 51
Specications
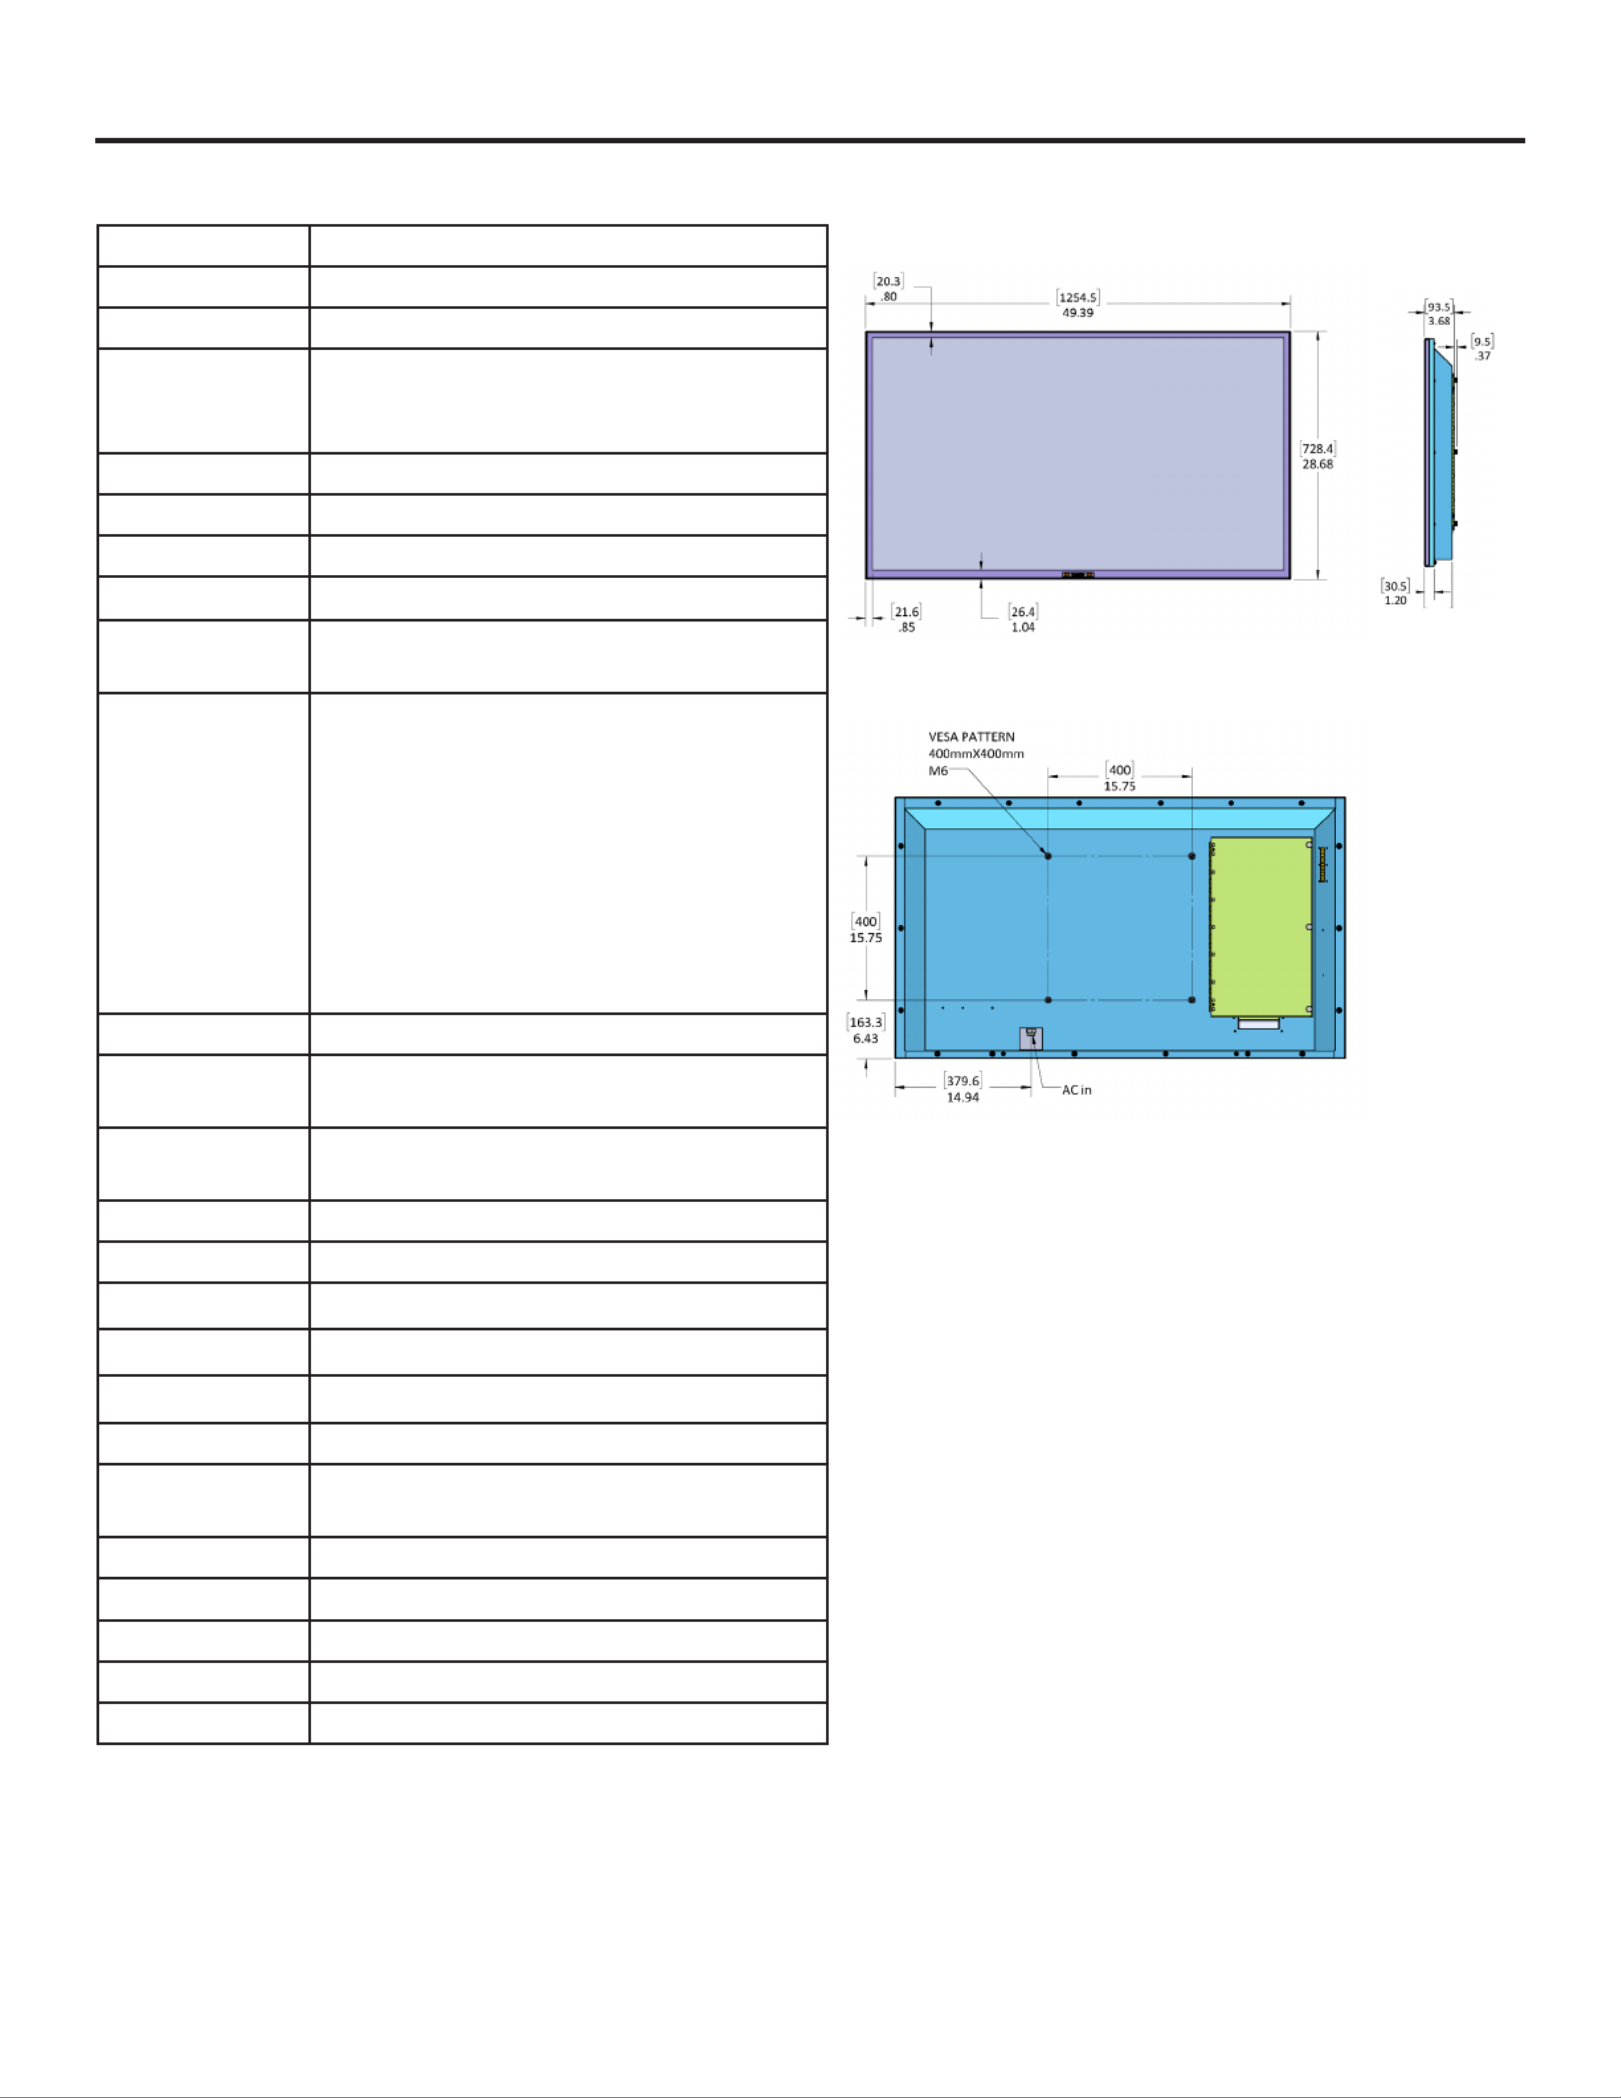
SunBriteTV Model SB-V-65-4KHDR
Front View
All dimensions are in inches, dimensions in [ ] are [metric]
LCD Screen 65-inch diagonal Color Active Matrix TFT LED LCD
Resolution 3840 x 2160 UHD 4k HDR
Aspect Ratio 16:9
Blacklight Brightness
- Surface Luminance,
white
400 nits (cd/m2)
Contrast Ratio 4000:1
Frame Rate 60hz
H/V Viewing Angle 178o by 178o
Response Time 8 milliseconds
TV formats 2160p*,1080p, 1080i, 720p, 720i, 480p, 480i
* using HDMI only
Input Connectors:
RF
HDMI
Video Composite
Video Component
RGB
Antenna/CATV (NTSC/ATSC/QAM) x1
HDMI Input p51-x3 (Supports HDMI 1.4, HDMI 2.0, HDCP 1.4 &
HDCP 2.2) (ARC on HDMI2)
Composite Video x1, L/R Audio Inputs x1
YPbPr plus Stereo Audio x1
VGA DB15hd (up to 1920 x 1080)
Control Set Discrete IR Control, Concealed rear IR receiver, IP Control
Audio Out Tos-Link Optical audio (Fixed)
Analog 3.5mm (variable)
Speakers 20 Watt downring internal speakers (included) or optional
speaker bar (not included)
Exterior Powder-coated aluminum
Colors Black only
Input Power 100-240 VAC, 50-60 Hz 2.8A Max (205 watts/1.8a@120v)
Operating Temp. -24o to 104o F. (-31o to 40o C.)
Non-op. Temp. -24o to 140o F. (-31o to 60o C.)
Accessories Included Weatherproof remote control with battery
TV Dimensions 58” W x 33.6” H x 3.5” D
1473mm W x 838mm H x 89mm D
TV Weight 69 lbs.(31.3 kgs)
Shipping Weight 90 lbs. (40.8 kgs)
Residential Warranty 1 year
Commercial Warranty 1 year
Vesa Mount Pattern 400mm x 400mm
Specications are subject to change.
Side View

Page 52 All Rights Reserved. 2018 ©SunBrite® LLC
Specications
SunBriteTV Model SB-V-75-4KHDR
LCD Screen 75-inch diagonal Color Active Matrix TFT LED LCD
Resolution 3840 x 2160 UHD 4k HDR
Aspect Ratio 16:9
Blacklight Brightness
- Surface Luminance,
white
400 nits (cd/m2)
Contrast Ratio 4000:1
Frame Rate 60hz
H/V Viewing Angle 178o by 178o
Response Time 8 milliseconds
TV formats 2160p*,1080p, 1080i, 720p, 720i, 480p, 480i
* using HDMI only
Input Connectors:
RF
HDMI
Video Composite
Video Component
RGB
Antenna/CATV (NTSC/ATSC/QAM) x1
HDMI Input p52-x3 (Supports HDMI 1.4, HDMI 2.0, HDCP 1.4 &
HDCP 2.2) (ARC on HDMI2)
Composite Video x1, L/R Audio Inputs x1
YPbPr plus Stereo Audio x1
VGA DB15hd (up to 1920 x 1080)
Control Set Discrete IR Control, Concealed rear IR receiver, IP Control
Audio Out Tos-Link Optical audio (Fixed)
Analog 3.5mm (variable)
Speakers 20 Watt downring internal speakers (included) or optional
speaker bar (not included)
Exterior Powder-coated aluminum
Colors Black only
Input Power 100-240 VAC, 50-60 Hz 2.8A Max (266 watts/2.3a@120v)
Operating Temp. -24o to 104o F. (-31o to 40o C.)
Non-op. Temp. -24o to 140o F. (-31o to 60o C.)
Accessories Included Weatherproof remote control with battery
TV Dimensions 66.8” W x 38.7” H x 3.3” D
1698mm W x 984mm H x 85mm D
TV Weight 96 lbs.(43.5 kgs)
Shipping Weight 185 lbs (84 kgs)
Residential Warranty 1 year
Commercial Warranty 1 year
Vesa Mount Pattern 400mm x 400mm
Specications are subject to change.
Front View
All dimensions are in inches, dimensions in [ ] are [metric]
Side View
Especificaciones del producto
| Marca: | SunBriteTV |
| Categoría: | Television |
| Modelo: | SB-V-65-4KHDR-BL |
¿Necesitas ayuda?
Si necesitas ayuda con SunBriteTV SB-V-65-4KHDR-BL haz una pregunta a continuación y otros usuarios te responderán
Television SunBriteTV Manuales

11 Septiembre 2024
11 Septiembre 2024
11 Septiembre 2024
11 Septiembre 2024
11 Septiembre 2024
11 Septiembre 2024
11 Septiembre 2024
11 Septiembre 2024
11 Septiembre 2024
11 Septiembre 2024
Television Manuales
- Television Sony
- Television Samsung
- Television Xiaomi
- Television Casio
- Television LG
- Television AEG
- Television Philips
- Television Panasonic
- Television BEKO
- Television Daewoo
- Television Grundig
- Television JVC
- Television Medion
- Television Nokia
- Television Pioneer
- Television Siemens
- Television Toshiba
- Television Xiron
- Television Ag Neovo
- Television Acer
- Television Aiwa
- Television AOC
- Television Akai
- Television Alden
- Television Alphatronics
- Television Aldi
- Television Allview
- Television Airis
- Television Arcelik
- Television Aristona
- Television Apex
- Television Strong
- Television Icy Box
- Television BenQ
- Television Lexibook
- Television Sharp
- Television Techwood
- Television Loewe
- Television Brandt
- Television Telefunken
- Television Palsonic
- Television Silvercrest
- Television Walker
- Television Funai
- Television Hitachi
- Television Thomson
- Television Saba
- Television Antarion
- Television Lenco
- Television Pyle
- Television Kernau
- Television Manta
- Television Tevion
- Television SereneLife
- Television OK
- Television Hisense
- Television Hyundai
- Television Vox
- Television Proscan
- Television Westinghouse
- Television Vestel
- Television ECG
- Television Bush
- Television RCA
- Television Clatronic
- Television Tucson
- Television Sencor
- Television GPX
- Television Blaupunkt
- Television Megasat
- Television Lenovo
- Television Manhattan
- Television Svan
- Television Logik
- Television Polaroid
- Television Sagem
- Television Salora
- Television Denver
- Television Optoma
- Television Finlux
- Television Schneider
- Television Sanyo
- Television Sunstech
- Television Bang And Olufsen
- Television Philco
- Television TCL
- Television Nabo
- Television Infiniton
- Television Sylvania
- Television Mitsubishi
- Television Aspes
- Television Schaub Lorenz
- Television Nec
- Television Emerson
- Television Sunny
- Television Technisat
- Television GoGEN
- Television Marquant
- Television Orima
- Television Luxor
- Television Nordmende
- Television AudioAffairs
- Television Magnum
- Television Haier
- Television Krüger And Matz
- Television Iiyama
- Television Oki
- Television Kubo
- Television Proline
- Television Coby
- Television Muse
- Television Marantz
- Television Seg
- Television Metz
- Television Vivo
- Television Element
- Television Qilive
- Television Continental Edison
- Television Uniden
- Television Insignia
- Television Daitsu
- Television Peerless-AV
- Television Dual
- Television Terris
- Television AYA
- Television Changhong
- Television Planar
- Television Alba
- Television Naxa
- Television Technika
- Television Chiq
- Television Star-Light
- Television Fantec
- Television Nextbase
- Television Zenith
- Television Teac
- Television Mpman
- Television Sweex
- Television Trevi
- Television Vizio
- Television Tesla
- Television Cello
- Television Sogo
- Television Mx Onda
- Television Orion
- Television Wharfedale
- Television Viewsonic
- Television Peaq
- Television Vivax
- Television Hannspree
- Television Nevir
- Television Yasin
- Television Roadstar
- Television Humax
- Television Newstar
- Television XD Enjoy
- Television MT Logic
- Television Superior
- Television Kunft
- Television ITT
- Television Grunkel
- Television Avtex
- Television ILive
- Television Intenso
- Television Odys
- Television NPG
- Television Furrion
- Television Cecotec
- Television Bluesky
- Television Videocon
- Television Xoro
- Television Durabase
- Television HKC
- Television Edenwood
- Television Monster
- Television Woxter
- Television Premier
- Television Onn
- Television Packard Bell
- Television Opera
- Television LTC
- Television JTC
- Television Zalman
- Television Orava
- Television Horizon
- Television Ferguson
- Television Reflexion
- Television Viewpia
- Television JGC
- Television Dyon
- Television DirecTV
- Television Tele 2
- Television Graetz
- Television Kogan
- Television Telesystem
- Television Kemo
- Television Jay-tech
- Television Doffler
- Television EKO
- Television E-motion
- Television Mitsai
- Television Selfsat
- Television High One
- Television V7
- Television Tve
- Television ISymphony
- Television Pantel
- Television ATYME
- Television HCI
- Television Inno-Hit
- Television Lin
- Television Engel
- Television TechLine
- Television Elements
- Television Digihome
- Television Englaon
- Television Reflex
- Television Astar
- Television Visco
- Television Tivax
- Television H&B
- Television Norcent
- Television TELE System
- Television United
- Television TIM
- Television Oyster
- Television Belson
- Television Vision Plus
- Television Sbr
- Television Bauhn
- Television Voxx
- Television Rm 2000
- Television Hoher
- Television Majestic
- Television Felson
- Television SEIKI
- Television Mach Power
- Television Elbe
- Television MBM
- Television Axing
- Television FFalcon
- Television CGV
- Television Smart Tech
- Television Séura
- Television Mitzu
- Television Caratec
- Television JTC24
- Television Coocaa
- Television SYLVOX
- Television Kivi
- Television Smart Brand
- Television RevolutionHD
- Television Voxicon
- Television QBell Technology
- Television Aconatic
- Television Mitchell & Brown
- Television FOX Electronics
- Television Mystery
Últimos Television Manuales
27 Octubre 2024
27 Octubre 2024
27 Octubre 2024
27 Octubre 2024
27 Octubre 2024
27 Octubre 2024
27 Octubre 2024
27 Octubre 2024
27 Octubre 2024
27 Octubre 2024