Artillery Sidewinder X1 Manual de Usario
Artillery
Impresora 3D
Sidewinder X1
Lee a continuación 📖 el manual en español para Artillery Sidewinder X1 (2 páginas) en la categoría Impresora 3D. Esta guía fue útil para 7 personas y fue valorada con 4.5 estrellas en promedio por 2 usuarios
Página 1/2
Arllery 3D Printer
Sidewinder X1
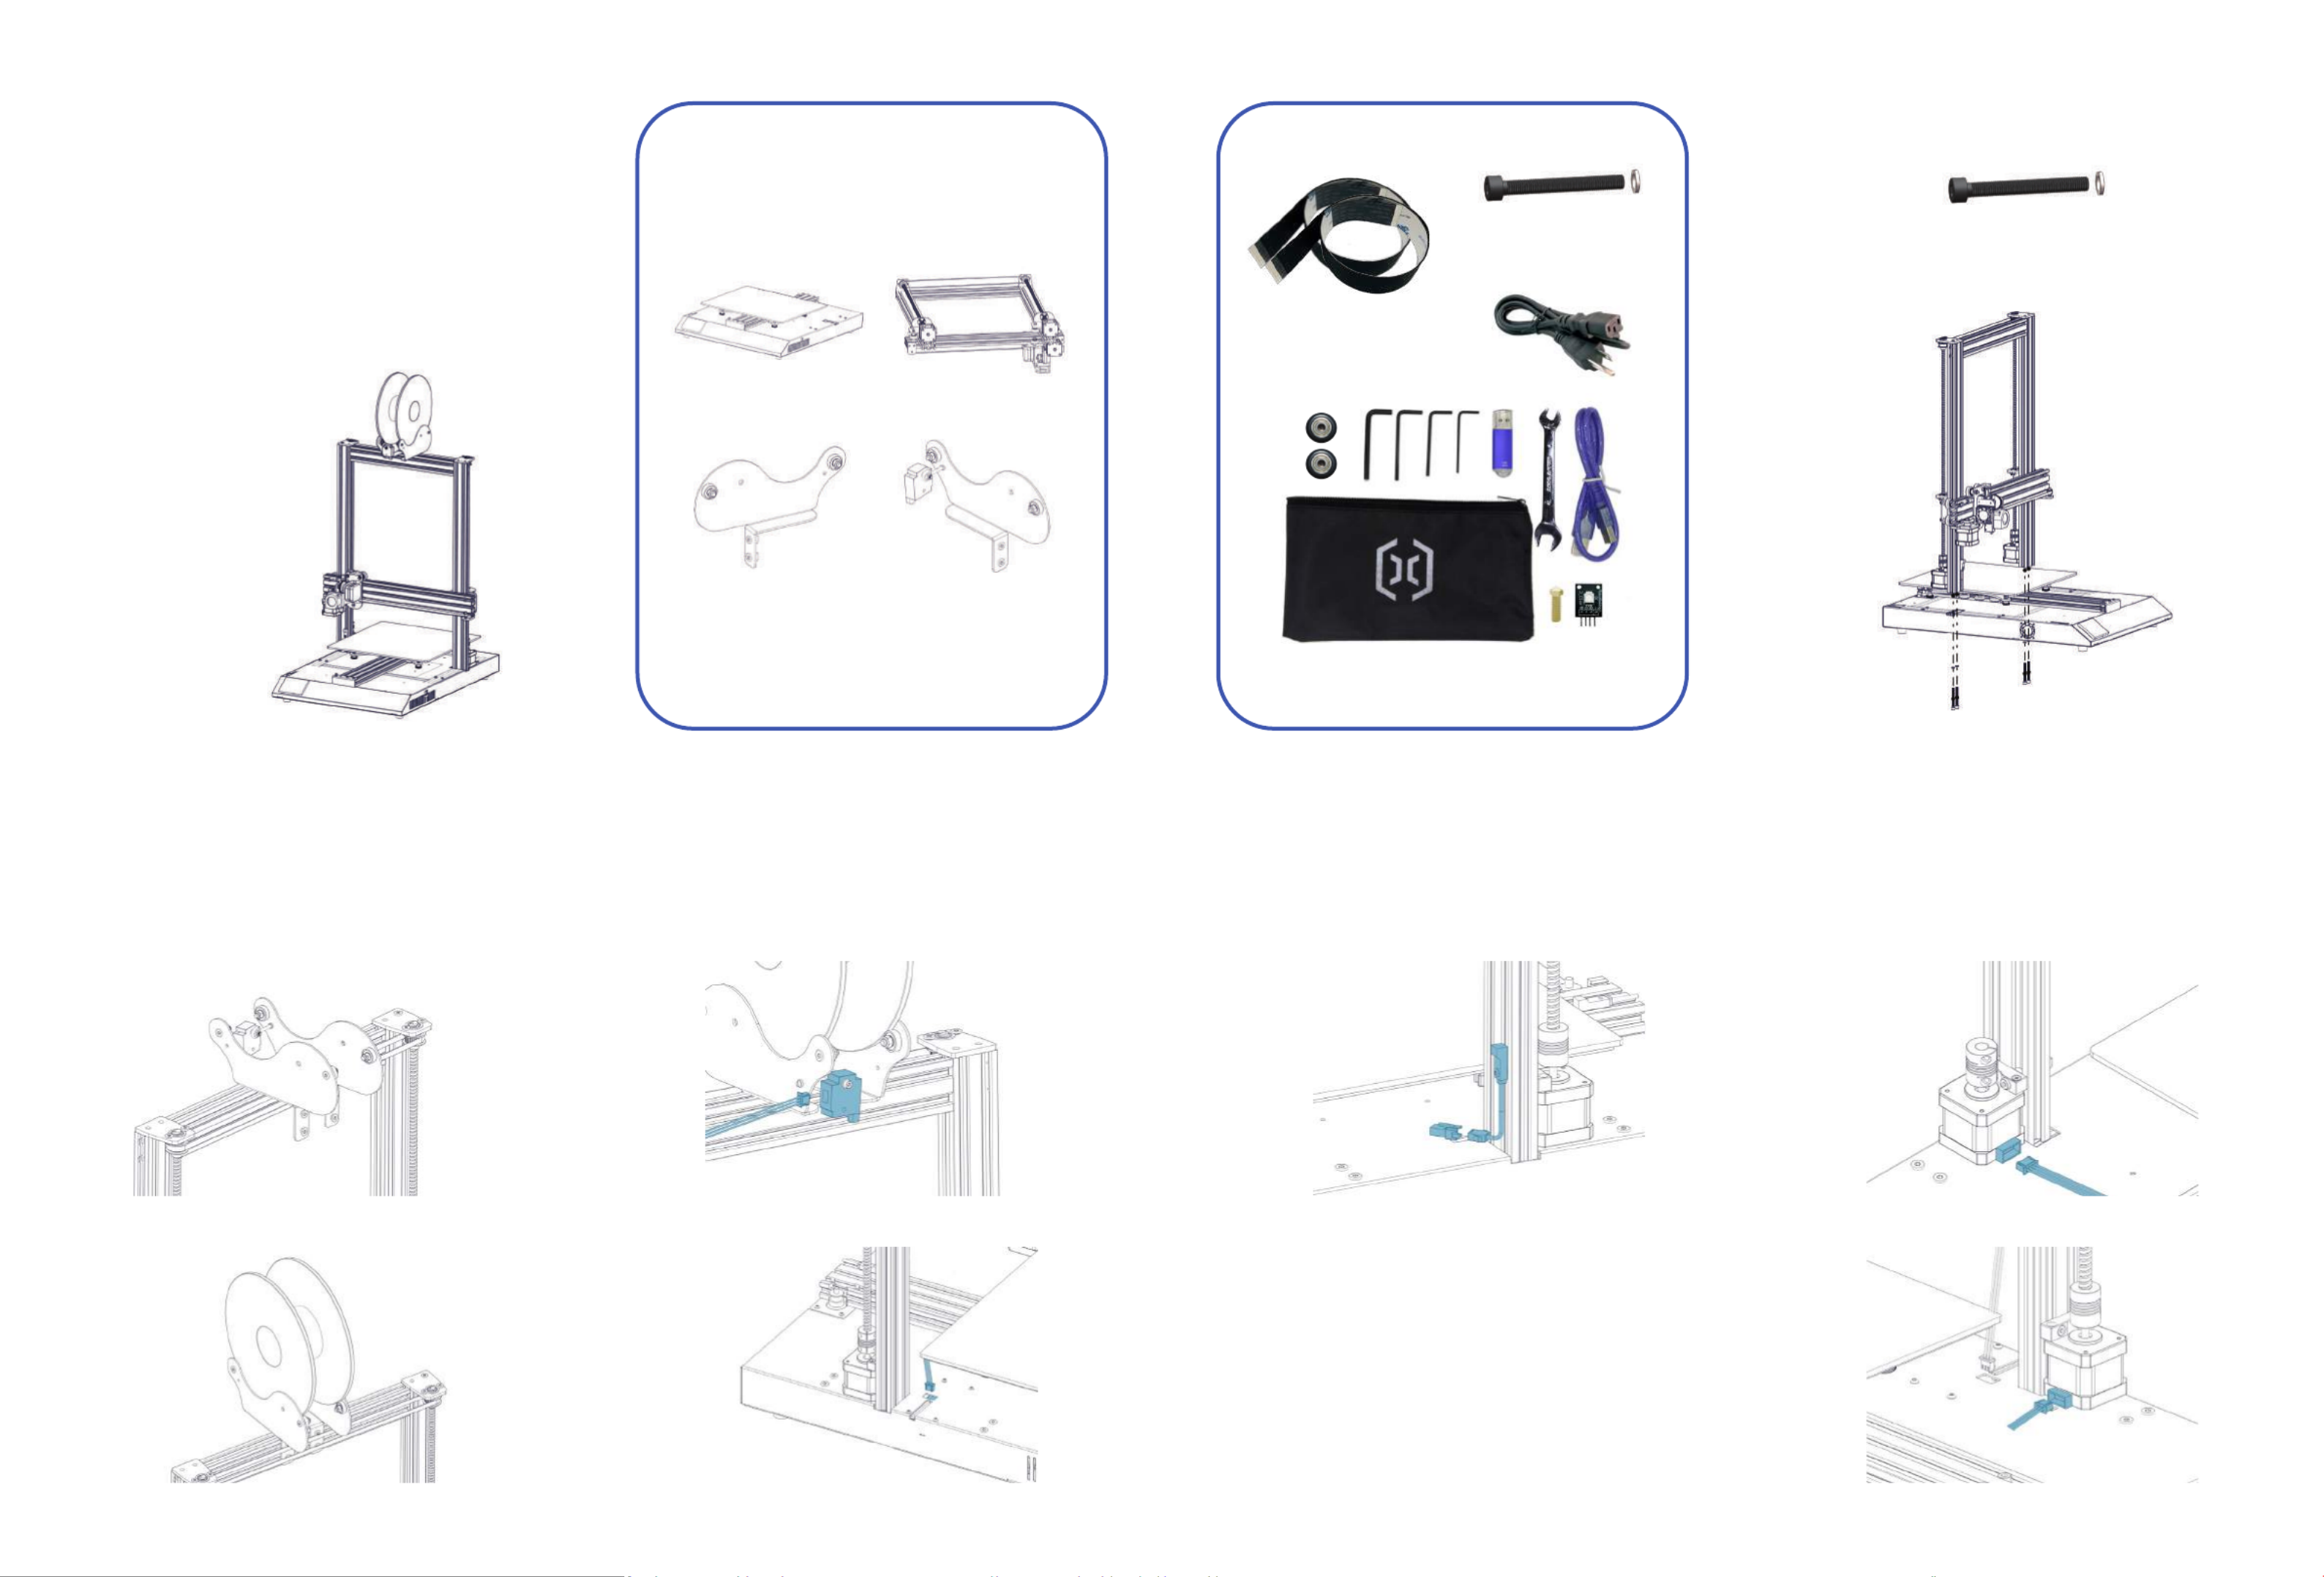
List 1 - Main Modules List 2 - Tools & Spares
M4x45 (5pcs)
Step 1
M4x45 (4pcs)
Fix the XZ gantry to the base with 4pcs of M4x45
screws as shown in the picture below.
Step 2
Fix the spool holder to the top of the printer, adjust
the width to fit the size of your filament spool. Make
sure the filament sensor is facing forward.
Step 3
Connect the filament runout sensor as shown in
pictures below:
Step 4
Connect the Z endstop to the cable.
Step 5
Connect the Z Stepper Motors as shown in the
pictures below:
Front
30pin (1pc)
20pin (1pc)

With this reset buon, it will reset the machine and
cannot resume prinng aer pressed, so be careful
not to press it accidentally.
TipsReset Buon
During prinng, the LED near the nozzle shows the
current prinng status:
- gradually change from blue to violet as the heated
bed gets to target temp.
- gradually change from violet to red as the hotend
gets to temperature.
- change to white to illuminate work surface.
- change to green once print has finished.
- turn off aer the print has finished.
Also, you can change the LED color or turn it off
through the TFT touch screen.
Step 6
Connect the X carriage and filament runout sensor as
shown in picture to the base. Cauon: Please handle
the flexible flat cable (FFC) with care, make sure it
goes straight in when plugging them in, and make
sure they’re sing flush inside the connectors.
Step 7
Connect the FFC to the board on X gantry.
Step 8
Adjust the tension of all the wheels on the machine. Try
to turn the wheels without forcing them. If the wheel
turns freely or without much effort, then it is too loose.
To ghten the wheels, rotate the eccentric nuts slightly
unl the wheel is snug against the frame.
Step 8
For wheels under build plate, push the wheels (on the
non-eccentric nut side) ght against the aluminum
extrusion, then adjust the front and rear wheels by
turning the eccentric nuts, adjust the middle one at
last.
Step 9
Now you can connect power and turn on the machine.
On the touch screen, go to Tools -> Heat to pre-heat
the nozzle and bed. Wait ll both heated up and
stead, go to Tools -> Level:
Move the nozzle to all four corners, adjust the height
by turning the knob below the bed. Slide an A4 paper
between the nozzle and the bed, adjust the height so
that the piece of paper slides, with just a bit of drag,
in all locaons of the bed.
You may need to do the same process twice because
an adjustment in one corner will affect others.
Last update date: 6 September, 2019
This manual is updated to the date of prinng.
Please refer to the electronic version if in doubt.
Artillery 3D Technology Co., Ltd.
For detailed warranty policy, please visit
Customer SupportFacebook Page
Especificaciones del producto
| Marca: | Artillery |
| Categoría: | Impresora 3D |
| Modelo: | Sidewinder X1 |
¿Necesitas ayuda?
Si necesitas ayuda con Artillery Sidewinder X1 haz una pregunta a continuación y otros usuarios te responderán
Impresora 3D Artillery Manuales

28 Agosto 2024
Impresora 3D Manuales
- Impresora 3D Anker
- Impresora 3D Renkforce
- Impresora 3D Kodak
- Impresora 3D Exibel
- Impresora 3D BQ
- Impresora 3D Monoprice
- Impresora 3D Flashforge
- Impresora 3D XYZprinting
- Impresora 3D MakerBot
- Impresora 3D Leap Frog
- Impresora 3D Snapmaker
- Impresora 3D Anycubic
- Impresora 3D German RepRap
- Impresora 3D Creality3D
- Impresora 3D Wanhao
- Impresora 3D GooVer
- Impresora 3D Easy Threed
- Impresora 3D Zortrax
- Impresora 3D LulzBot
- Impresora 3D SINDOH
- Impresora 3D PP3DP
- Impresora 3D Wasp
- Impresora 3D 3D Systems
- Impresora 3D Creality
- Impresora 3D Raise3D
- Impresora 3D Craftbot
Últimos Impresora 3D Manuales
27 Septiembre 2024
17 Septiembre 2024
17 Septiembre 2024
16 Septiembre 2024
16 Septiembre 2024
16 Septiembre 2024
14 Septiembre 2024
14 Septiembre 2024
14 Septiembre 2024
14 Septiembre 2024