Nec UM301Xi Manual de Usario
Lee a continuación 📖 el manual en español para Nec UM301Xi (151 páginas) en la categoría proyector. Esta guía fue útil para 2 personas y fue valorada con 4.5 estrellas en promedio por 2 usuarios
Página 1/151

Portable Projector
UM351W/UM301W/
UM361X/UM301X
User’s Manual
The UM301W and UM301X are not distributed in North America.
Model No.
NP-UM351W, NP-UM301W, NP-UM361X, NP-UM301X

Ver. 1 10/14
• Apple,Mac,MacOS,MacBook,andiMacaretrademarksofAppleInc.registeredintheU.S.andothercountries.
• Microsoft,Windows,WindowsVista, Internet Explorer,.NET Framework andPowerPointare eithera registered
trademarkortrademarkofMicrosoftCorporationintheUnitedStatesand/orothercountries.
• IntelandIntelCorearetrademarksofIntelCorporationintheU.S.and/orothercountries.
• PowerPCisaregisteredtrademarkoftheInternationalBusinessMachinesCorporation.
• MicroSaverisaregisteredtrademarkofKensingtonComputerProductsGroup,adivisionofACCOBrands.
• VirtualRemoteToolusesWinI2C/DDClibrary,©NicomsoftLtd.
• HDMI,theHDMILogoandHigh-DenitionMultimediaInterfacearetrademarksorregisteredtrademarksofHDMI
LicensingLLC.
• MHLandtheMHLlogoareatrademark,registeredtrademarkorservicemarkofMHL,LLCintheUnitedStates
and/or other countries.
• TrademarkPJLinkisatrademarkappliedfortrademarkrightsinJapan,theUnitedStatesofAmericaandother
countries and areas.
• Wi-Fi®,Wi-Fi Alliance®,and Wi-FiProtected Access (WPA,WPA2)®are registered trademarks of theWi-Fi Alli-
ance.
• Blu-rayisatrademarkofBlu-rayDiscAssociation
• CRESTRONandROOMVIEWareregisteredtrademarksofCrestronElectronics,Inc.intheUnitedStatesandother
countries.
• EthernetiseitheraregisteredtrademarkortrademarkofFujiXeroxCo.,Ltd.
• Otherproductandcompanynamesmentionedinthisuser’smanualmaybethetrademarksorregisteredtrademarks
oftheirrespectiveholders.
• GPL/LGPLSoftwareLicenses
TheproductincludessoftwarelicensedunderGNUGeneralPublicLicense(GPL),GNULesserGeneralPublic
License(LGPL),andothers.
Formoreinformationoneachsoftware,see“readme.pdf”insidethe“aboutGPL&LGPL”folderonthesuppliedCD-
ROM.
NOTES
(1)Thecontentsofthisuser’smanualmaynotbereprintedinpartorwholewithoutpermission.
(2)Thecontentsofthisuser’smanualaresubjecttochangewithoutnotice.
(3)Greatcarehasbeentakeninthepreparationofthisuser’smanual;however,shouldyounoticeanyquestionable
points,errorsoromissions,pleasecontactus.
(4)Notwithstandingarticle(3),NECwillnotberesponsibleforanyclaimsonlossofprotorothermattersdeemed
toresultfromusingtheProjector.

i
Important Information
Safety Cautions
Precautions
PleasereadthismanualcarefullybeforeusingyourNECprojectorandkeepthemanualhandyforfuturereference.
CAUTION
Toturnoffmainpower,besuretoremovetheplugfrompoweroutlet.
Thepoweroutletsocketshouldbeinstalledasneartotheequipmentaspossible,andshouldbeeasily
accessible.
CAUTION
TOPREVENTSHOCK,DONOTOPENTHECABINET.
THEREAREHIGH-VOLTAGECOMPONENTSINSIDE.
REFERSERVICINGTOQUALIFIEDSERVICEPERSONNEL.
Thissymbolwarnstheuserthatuninsulatedvoltagewithintheunitmaybesufcienttocauseelectrical
shock.Therefore,itisdangeroustomakeanykindofcontactwithanypartinsideoftheunit.
Thissymbolalertstheuserthatimportantinformationconcerningtheoperationandmaintenanceofthis
unithasbeenprovided.
Theinformationshouldbereadcarefullytoavoidproblems.
WARNING:TOPREVENTFIREORSHOCK,DONOTEXPOSETHISUNITTORAINORMOISTURE.
DONOTUSETHISUNIT’SPLUGWITHANEXTENSIONCORDORINANOUTLETUNLESSALLTHEPRONGS
CANBEFULLYINSERTED.
DOC Compliance Notice (for Canada only)
This Class B digital apparatus meets all requirements of the Canadian Interference-Causing Equipment Regula-
tions.
Machine Noise Information Regulation - 3. GPSGV,
Thehighestsoundpressurelevelislessthan70dB(A)inaccordancewithENISO7779.
CAUTION
Avoiddisplayingstationaryimagesforaprolongedperiodoftime.
DoingsocanresultintheseimagesbeingtemporarilysustainedonthesurfaceoftheLCDpanel.
Ifthisshouldhappen,continuetouseyourprojector.Thestaticbackgroundfrompreviousimageswill
disappear.
Disposing of your used product
EU-widelegislationasimplementedineachMemberStaterequiresthatusedelectricalandelectronicprod-
uctscarryingthemark(left)mustbedisposedofseparatelyfromnormalhouseholdwaste.Thisincludes
projectorsandtheirelectricalaccessoriesorlamps.Whenyoudisposeofsuchproducts,pleasefollowthe
guidanceofyourlocalauthorityand/orasktheshopwhereyoupurchasedtheproduct.
Aftercollectingtheusedproducts,theyarereusedandrecycledinaproperway.Thiseffortwillhelpus
reducethewastesaswellasthenegativeimpactsuchasmercurycontainedinalamptothehumanhealth
andtheenvironmentattheminimumlevel.
ThemarkontheelectricalandelectronicproductsonlyappliestothecurrentEuropeanUnionMember
States.

ii
Important Information
WARNING TO CALIFORNIA RESIDENTS:
Handlingthecablessuppliedwiththisproductwillexposeyoutolead,achemicalknowntotheStateofCalifornia
tocausebirthdefectsorotherreproductiveharm.WASHHANDSAFTERHANDLING.
RF Interference (for USA only)
WARNING
TheFederalCommunicationsCommissiondoesnotallowanymodicationsorchangestotheunitEXCEPTthose
speciedbyNECDisplaySolutionsofAmerica,Inc.inthismanual.Failuretocomplywiththisgovernmentregu-
lationcouldvoidyourrighttooperatethisequipment.Thisequipmenthasbeentestedandfoundtocomplywith
thelimitsforaClassBdigitaldevice,pursuanttoPart15oftheFCCRules.Theselimitsaredesignedtoprovide
reasonableprotectionagainstharmfulinterferenceinaresidentialinstallation.Thisequipmentgenerates,uses,and
canradiateradiofrequencyenergyand,ifnotinstalledandusedinaccordancewiththeinstructions,maycause
harmfulinterferencetoradiocommunications.However,thereisnoguaranteethatinterferencewillnotoccurina
particularinstallation.
Ifthisequipmentdoescauseharmfulinterferencetoradioortelevisionreception,whichcanbedeterminedby
turningtheequipmentoffandon,theuserisencouragedtotrytocorrecttheinterferencebyoneormoreofthe
followingmeasures:
• Reorientorrelocatethereceivingantenna.
• Increasetheseparationbetweentheequipmentandreceiver.
• Connecttheequipmentintoanoutletonacircuitdifferentfromthattowhichthereceiverisconnected.
• Consultthedealeroranexperiencedradio/TVtechnicianforhelp.
ForUKonly:InUK,aBSapprovedpowercordwithmouldedplughasaBlack(veAmps)fuseinstalledforusewith
thisequipment.Ifapowercordisnotsuppliedwiththisequipmentpleasecontactyoursupplier.
Important Safeguards
Thesesafetyinstructionsaretoensurethelonglifeofyourprojectorandtopreventreandshock.Pleasereadthem
carefullyandheedallwarnings.
Installation
• Donotplacetheprojectorinthefollowingconditions:
- on an unstable cart, stand, or table.
- nearwater,baths,ordamprooms.
- indirectsunlight,nearheaters,orheatradiatingappliances.
- inadusty,smokyorsteamyenvironment.
- onasheetofpaperorcloth,rugsorcarpets.
• Ifyouwishtohavetheprojectorinstalledontheceiling:
- Donotattempttoinstalltheprojectoryourself.
- Theprojectormustbeinstalledbyqualiedtechniciansinordertoensureproperoperationandreducetherisk
ofbodilyinjury.
- Inaddition,theceilingmustbestrongenoughtosupporttheprojectorandtheinstallationmustbeinaccordance
withanylocalbuildingcodes.
- Pleaseconsultyourdealerformoreinformation.

iii
Important Information
WARNING
• Donotplaceanyobjects,whichareeasilyaffectedbyheat,infrontoftheprojectionwindow.Doingsocould
leadtotheobjectmeltingfromtheheatthatisemittedfromthelightoutput.
• Donotuseaspraycontainingammablegastogetridofaccumulateddustanddirtontheltersandtheprojection
window.Itmaycauseofre.
Place the projector in a horizontal position
Thetiltangleoftheprojectorshouldnotexceed10degrees,norshouldtheprojectorbeinstalledinanywayother
thanthedesktopandceilingmount,otherwiselamplifecoulddecreasedramatically.
+10˚
10˚
Fire and Shock Precautions
• Ensurethatthereissufcientventilationandthatventsareunobstructedtopreventthebuild-upofheatinsideyour
projector.Allowatleast4inches(10cm)ofspacebetweenyourprojectorandawall.
• Donottrytotouchtheexhaustventasitcanbecomeheatedwhiletheprojectoristurnedonandimmediatelyafter
theprojectoristurnedoff.Partsoftheprojectormaybecometemporarilyheatediftheprojectoristurnedoffwith
thePOWERbuttonoriftheACpowersupplyisdisconnectedduringnormalprojectoroperation.
Usecautionwhenpickinguptheprojector.
• Preventforeignobjectssuchaspaperclipsandbitsofpaperfromfallingintoyourprojector.Donotattempttoretrieve
anyobjectsthatmightfallintoyourprojector.Donotinsertanymetalobjectssuchasawireorscrewdriverintoyour
projector.Ifsomethingshouldfallintoyourprojector,disconnectitimmediatelyandhavetheobjectremovedbya
qualiedservicepersonnel.
• Donotplaceanyobjectsontopoftheprojector.
• Donottouchthepowerplugduringathunderstorm.Doingsocancauseelectricalshockorre.
• Theprojectorisdesignedtooperateonapowersupplyof100-240VAC50/60Hz.Ensurethatyourpowersupply
tsthisrequirementbeforeattemptingtouseyourprojector.
• Donotlookintotheprojectionwindowwhiletheprojectorison.Seriousdamagetoyoureyescouldresult.
• Keepanyitemssuchasmagnifyingglassoutofthelightpathoftheprojector.Thelightbeingprojectedfromthe
projectionwindowisextensive,thereforeanykindof abnormalobjects thatcan redirectlightcoming outof the
projectionwindow,cancauseunpredictableoutcomesuchasreorinjurytotheeyes.
• Donotplaceanyobjects,whichareeasilyaffectedbyheat,infrontofaprojectorexhaustvent.
Doingsocouldleadtotheobjectmeltingorgettingyourhandsburnedfromtheheatthatisemittedfromtheex-
haust.
• Donotsplashwaterovertheprojector.Doingsocancauseelectricalshockorre.Iftheprojectorgetswet,turnoff

iv
Important Information
theprojector,unplugthepowercordandhavetheprojectorservicedbyaqualiedservicepersonnel.
• Handlethepowercordcarefully.Adamagedorfrayedpowercordcancauseelectricshockorre.
- Donotuseanypowercordotherthantheonesuppliedwiththeprojector.
- Donotbendortugthepowercordexcessively.
- Donotplacethepowercordundertheprojector,oranyheavyobject.
- Donotcoverthepowercordwithothersoftmaterialssuchasrugs.
- Donotheatthepowercord.
- Donothandlethepowerplugwithwethands.
• Turnofftheprojector,unplugthepowercordandhavetheprojectorservicedbyaqualiedservicepersonnelunder
thefollowingconditions:
- Whenthepowercordorplugisdamagedorfrayed.
- Ifliquidhasbeenspilledintotheprojector,orifithasbeenexposedtorainorwater.
- Iftheprojectordoesnotoperatenormallywhenyoufollowtheinstructionsdescribedinthisuser’smanual.
- Iftheprojectorhasbeendroppedorthecabinethasbeendamaged.
- Iftheprojectorexhibitsadistinctchangeinperformance,indicatinganeedforservice.
• Disconnectthepowercordandanyothercablesbeforecarryingtheprojector.
• Turnofftheprojectorandunplugthepowercordbeforecleaningthecabinetorreplacingthelamp.
• Turnofftheprojectorandunplugthepowercordiftheprojectorisnottobeusedforanextendedperiodoftime.
• WhenusingaLANcable(onlymodelswiththeRJ-45LANport):
Forsafety,donotconnecttotheterminalforperipheraldevicewiringthatmighthaveexcessivevoltage.
CAUTION
• Besuretotightenthescrewsafterattachingthecablecover.Failuretodosomaycausethecablecovertocome
offandfall,resultingininjuryordamagetothecablecover.
• Donotputbundledcablesinthecablecover.Doingsomaydamagethepowercord,resultinginare.
• Donotholdthecablecoverwhilemovingtheprojectorordonotapplyexcessiveforcetothecablecover.Doing
somaydamagethecablecover,resultingininjury.
• Donotusethefeetforpurposesotherthanoriginallyintended.Misusessuchasgrippingthetilt-footorhanging
onthewallcancausedamagetotheprojector.
• Donotsendtheprojectorinthesoftcasebyparceldeliveryserviceorcargoshipment.Theprojectorinsidethe
softcasecouldbedamaged.
• Select[HIGH]inFanmodeifyoucontinuetousetheprojectorforconsecutivedays.(Fromthemenu,select
[SETUP] [OPTIONS(1)] [FANMODE] [HIGH].)→ → →
• DonotturnofftheACpowerfor60secondsafterthelampisturnedonandwhilethePOWERindicatorisblink-
ingblue.Doingsocouldcauseprematurelampfailure.
Remote Control Precautions
• Handletheremotecontrolcarefully.
• Iftheremotecontrolgetswet,wipeitdryimmediately.
• Avoidexcessiveheatandhumidity.
• Donotshort,heat,ortakeapartbatteries.
• Donotthrowbatteriesintore.
• Ifyouwillnotbeusingtheremotecontrolforalongtime,removethebatteries.
• Ensurethatyouhavethebatteries’polarity(+/−)alignedcorrectly.
• Donotusenewandoldbatteriestogether,orusedifferenttypesofbatteriestogether.
• Disposeofusedbatteriesaccordingtoyourlocalregulations.

v
Important Information
Note for US Residents
Thelampinthisproductcontainsmercury.PleasedisposeaccordingtoLocal,StateorFederalLaws.
Lamp Replacement
• Usethespeciedlampforsafetyandperformance.
• Toreplacethelamp,followallinstructionsprovidedonpage122.
• Besuretoreplacethelampandlterwhenthemessage[THE LAMP HAS REACHED THE END OF ITS USABLE
LIFE. PLEASE REPLACE THE LAMP AND FILTER.]appears.Ifyoucontinuetousethelampafterthelamphas
reachedtheendofitsusablelife,thelampbulbmayshatter,andpiecesofglassmaybescatteredinthelampcase.
Donottouchthemasthepiecesofglassmaycauseinjury.
Ifthishappens,contactyourdealerforlampreplacement.
A Lamp Characteristic
Theprojectorhasadischargelampasspecialpurposesasalightsource.
Alamphasacharacteristicthatitsbrightnessgraduallydecreaseswithage.Alsorepeatedlyturningthelampon
andoffwillincreasethepossibilityofitslowerbrightness.
Theactuallamplifemayvarydependingupontheindividuallamp,theenvironmentalconditionsandusage.
CAUTION:
• DONOTTOUCHTHELAMPimmediatelyafterithasbeenused.Itwillbeextremelyhot.Turntheprojectoroff
andthendisconnectthepowercord.Allowatleastonehourforthelamptocoolbeforehandling.
• Whenremovingthelampfromaceiling-mountedprojector,makesurethatnooneisundertheprojector.Glass
fragmentscouldfallifthelamphasbeenburnedout.
About High Altitude mode
• Set[FANMODE]to[HIGHALTITUDE]whenusingtheprojectorataltitudesapproximately5500feet/1700meters
orhigher.
Usingtheprojectorataltitudesapproximately5500feet/1700metersorhigherwithoutsettingto[HIGHALTITUDE]
cancausetheprojectortooverheatandtheprotectorcouldshutdown.Ifthishappens,waitacoupleminutesand
turnontheprojector.
• Usingtheprojectorataltitudeslessthanapproximately5500feet/1700metersandsettingto[HIGHALTITUDE]
cancausethelamptoovercool,causingtheimagetoicker.Switch[FANMODE]to[AUTO].
• Usingtheprojectorataltitudesapproximately5500feet/1700metersorhighercanshortenthelifeofopticalcom-
ponentssuchasthelamp.
About Copyright of original projected pictures:
Pleasenotethatusingthisprojectorforthepurposeofcommercialgainortheattractionofpublicattentioninavenue
suchasacoffeeshoporhotelandemployingcompressionorexpansionofthescreenimagewiththefollowingfunc-
tionsmayraiseconcernabouttheinfringementofcopyrightswhichareprotectedbycopyrightlaw.
[ASPECTRATIO],[KEYSTONE],Magnifyingfeatureandothersimilarfeatures.
Turkish RoHS information relevant for Turkish market
EEE Yonetmeliğine Uygundur.
Thisdeviceisnotintendedforuseinthedirecteldofviewatvisualdisplayworkplaces.Toavoidincommodingreec-
tionsatvisualdisplayworkplacesthisdevicemustnotbeplacedinthedirecteldofview.

vii
Table of Contents
Important Information ............................................................................................i
1. Introduction .......................................................................................................... 1
1What’sintheBox? ......................................................................................................... 1
IntroductiontotheProjector .......................................................................................... 2
Featuresyou’llenjoy: ............................................................................................... 2
Aboutthisuser’smanual .......................................................................................... 3
PartNamesoftheProjector .......................................................................................... 4
TopandScreenSideofProjector ............................................................................ 4
TerminalPanelSideofProjector .............................................................................. 4
RemovingandAttachingtheCableCover ............................................................... 5
TopFeatures ............................................................................................................ 7
TerminalPanelFeatures .......................................................................................... 8
PartNamesoftheRemoteControl ............................................................................... 9
BatteryInstallation ................................................................................................. 10
RemoteControlPrecautions .................................................................................. 10
OperatingRangeforWirelessRemoteControl ...................................................... 10
SoftwareIncludedonCD-ROM ................................................................................... 11
2. Projecting an Image (Basic Operation) .............................................. 12
1FlowofProjectinganImage ........................................................................................ 12
ConnectingYourComputer/ConnectingthePowerCord ............................................. 13
TurningontheProjector .............................................................................................. 14
NoteonStartupscreen(MenuLanguageSelectscreen) ...................................... 15
SelectingaSource ...................................................................................................... 16
Selectingthecomputerorvideosource................................................................. 16
AdjustingthePictureSizeandPosition ....................................................................... 17
Adjustinghorizontal/verticalposition ...................................................................... 18
Adjustingthefocus(Focusring) ............................................................................ 18
Adjustingthetilt(Tiltfoot) 9 ...................................................................................... 1
Adjustingthesize[DigitalZoom] ............................................................................ 02
❻CorrectingKeystoneDistortion[KEYSTONE] ............................................................. 12
OptimizingComputerSignalAutomatically 2 ................................................................. 3
AdjustingtheImageUsingAutoAdjust .................................................................. 32
TurningUporDownVolume ........................................................................................ 32
TurningofftheProjector 2 .............................................................................................. 4
WhenMovingtheProjector ......................................................................................... 52
3. Convenient Features ..................................................................................... 62
1TurningofftheImageandSound 2 ................................................................................ 6
FreezingaPicture 2 ....................................................................................................... 6
MagnifyingaPicture .................................................................................................... 62
ChangingEcoMode/CheckingEnergy-SavingEffect ................................................ 27
UsingEcoMode[ECOMODE] .............................................................................. 27
CheckingEnergy-SavingEffect[CARBONMETER] ............................................. 82
❺Using4-PointCornertoCorrectKeystoneDistortion[CORNERSTONE] ................... 29
Cornerstone ........................................................................................................... 29

viii
Table of Contents
Pincushion ............................................................................................................. 31
PreventingtheUnauthorizedUseoftheProjector[SECURITY] ...................................... 33
UsingtheComputerCable(VGA)toOperatetheProjector(VirtualRemoteTool) ..... 36
OperatingYourComputer’sMouseFunctionsfromtheProjector’sRemoteControl
viatheUSBCable(RemoteMouseFunction) ..........................................................42
ProjectingYourComputer’sScreenImagefromtheProjectorviatheUSBCable
(USBDisplay) ........................................................................................................ 43
ControllingtheProjectorbyUsinganHTTPBrowser ................................................. 45
ControllingtheProjectoroveraLAN(PCControlUtilityPro4/Pro5) .............................52
ProjectingYourComputer’sScreenImagefromtheProjectoroveraLAN(Image
ExpressUtilityLite) ................................................................................................ 56
StartingImageExpressUtilityLitefromaUSBMemoryorSDCard .................... 59
ProjectinganImagefromanAngle(GeometricCorrectionToolinImageExpress
UtilityLite) .............................................................................................................. 61
WhatyoucandowithGCT .................................................................................... 61
ProjectinganImagefromanAngle(GCT) ............................................................. 61
ConnectingYourMicrophone ....................................................................................... 63
4. Using the Viewer ............................................................................................. 64
❶WhatyoucandowiththeViewer ................................................................................. 64
❷ProjectingimagesstoredinaUSBmemorydevice .................................................... 66
5. Using On-Screen Menu ................................................................................ 72
1UsingtheMenus .......................................................................................................... 72
MenuElements ............................................................................................................ 37
ListofMenuItems ....................................................................................................... 47
MenuDescriptions&Functions[SOURCE] ................................................................ 77
COMPUTER .......................................................................................................... 77
HDMI1/MHLandHDMI2 ........................................................................................ 77
VIDEO .................................................................................................................... 77
USB-A .................................................................................................................... 77
LAN ........................................................................................................................ 77
USB-B .................................................................................................................... 77
MenuDescriptions&Functions[ADJUST] .................................................................. 87
[PICTURE] ............................................................................................................. 87
[IMAGEOPTIONS] ................................................................................................ 81
[AUDIO] .................................................................................................................. 85
MenuDescriptions&Functions[SETUP] .................................................................... 86
[GENERAL] ............................................................................................................ 86
[MENU] .................................................................................................................. 88
[INSTALLATION] .................................................................................................... 09
[OPTIONS(1)] ........................................................................................................ 92
[OPTIONS(2)] ........................................................................................................ 49
SettinguptheProjectorforaWiredLANConnection[WIREDLAN] ..................... 69
SettinguptheProjectorforaWirelessLANConnection(withtheoptionalUSB
WirelessLANUnitequipped)[WIRLESSLAN] ...................................................... 97
MenuDescriptions&Functions[INFO.] ...................................................................... 99
[USAGETIME] ....................................................................................................... 99

1
Projector
Cable cover (24FU2001)
(attached to the projector
at the time of shipment →
page )5
1. Introduction
1 What’s in the Box?
Makesureyourboxcontainseverythinglisted.Ifanypiecesaremissing,contactyourdealer.
Pleasesavetheoriginalboxandpackingmaterialsifyoueverneedtoshipyourprojector.
Power cord
(US: 7N080240/7N080243)
(EU: 7N080027/7N080029)
Computer cable (VGA)
(7N520089)
Wireless receiver strap
NEC Projector CD-ROM
User’s manual (PDF) and the utility
software
(7N952071)
For North America only
Limited warranty
For customers in Europe:
You will nd our current valid
Guarantee Policy on our Web
Site:
www.nec-display-solutions.com
• ImportantInfomation(ForNorth
America: 7N8N5231) (For Other
countries than North America:
7N8N5231 and 7N8N5241)
• QuickSetupGuide(7N8N5251)/
(7N8N5261)
Remote control
(7N901051)
Batteries (AAA × 2)
Unless otherwise described in the user’s manual, the drawings for the projector cabinet show examples of the
UM351W.

3
1. Introduction
• Correspondtovariousinstallation
Besidesinstallationonthewall,itcancorrespondvariousinstallationasprojectingimageupontotheceiling,onto
thetable,andontotheoor,etc.
• ThesuppliedremotecontrolallowsyoutoassignaCONTROLIDtotheprojector
Multipleprojectorscanbeoperatedseparatelyandindependentlywiththesamesingleremotecontrolbyassigning
anIDnumbertoeachprojector.
• USBDisplay
UsingacommerciallyavailableUSBcable(compatiblewithUSB2.0specications)toconnectthecomputerwith
theprojectorallowsyoutosendyourcomputerscreenimagetotheprojectorwithouttheneedofatraditional
computercable(VGA).
• IntegratedRJ-45terminalforwirednetworkingcapabilityalongwithwirelessnetworkingcapabilities
AnRJ-45terminalisstandard.AnoptionalUSBWirelessLANUnitisrequiredforwirelessLANconnection.
• Softwareprograms(UserSupportware)containedinthesuppliedCD-ROM
ThesuppliedNECProjectorincludesthreeprograms:VirtualRemoteTool,ImageExpressUtilityLite(forWindows/
MacOS),andPCControlUtilityPro4(forWindows)/5(forMacOS).
ImageExpressUtilityLite(forWindows)canbestartedfromacommerciallyavailableUSBmemoryorSDcard
withouttheneedofinstallingonyourcomputer.
• AUTOPOWERONandAUTOPOWEROFFfeatures
TheDIRECTPOWERON,AUTOPOWERON,AUTOPOWEROFF,andOFFTIMERfeatureseliminatetheneed
toalwaysusethePOWERbuttonontheremotecontrolorprojectorcabinet.
• Preventingunauthorizeduseoftheprojector
Enhancedsmartsecuritysettingsforkeywordprotection,cabinetcontrolpanellock,securityslot,andsecurity
chainopeningtohelppreventunauthorizedaccess,adjustmentsandtheftdeterrence.
• HighresolutionuptoWUXGA* 3
Highresolutiondisplay-uptoWUXGAcompatible,XGA(UM361X/UM301X)/WXGA(UM351W/UM301W)native
resolution.
*
3 WhenWXGAMODEissettoON.
• CRESTRONROOMVIEWcompatibility
TheprojectorsupportsCRESTRONROOMVIEW,allowingmultipledevicesconnectedinthenetworktobeman-
agedandcontrolledfromacomputerorcontroller.
About this user’s manual
Thefastestwaytogetstartedistotakeyourtimeanddoeverythingrightthersttime.Takeafewminutesnowto
reviewtheuser’smanual.Thismaysaveyoutimelateron.Atthebeginningofeachsectionofthemanualyou’llnd
anoverview.Ifthesectiondoesn’tapply,youcanskipit.
4
1. Introduction
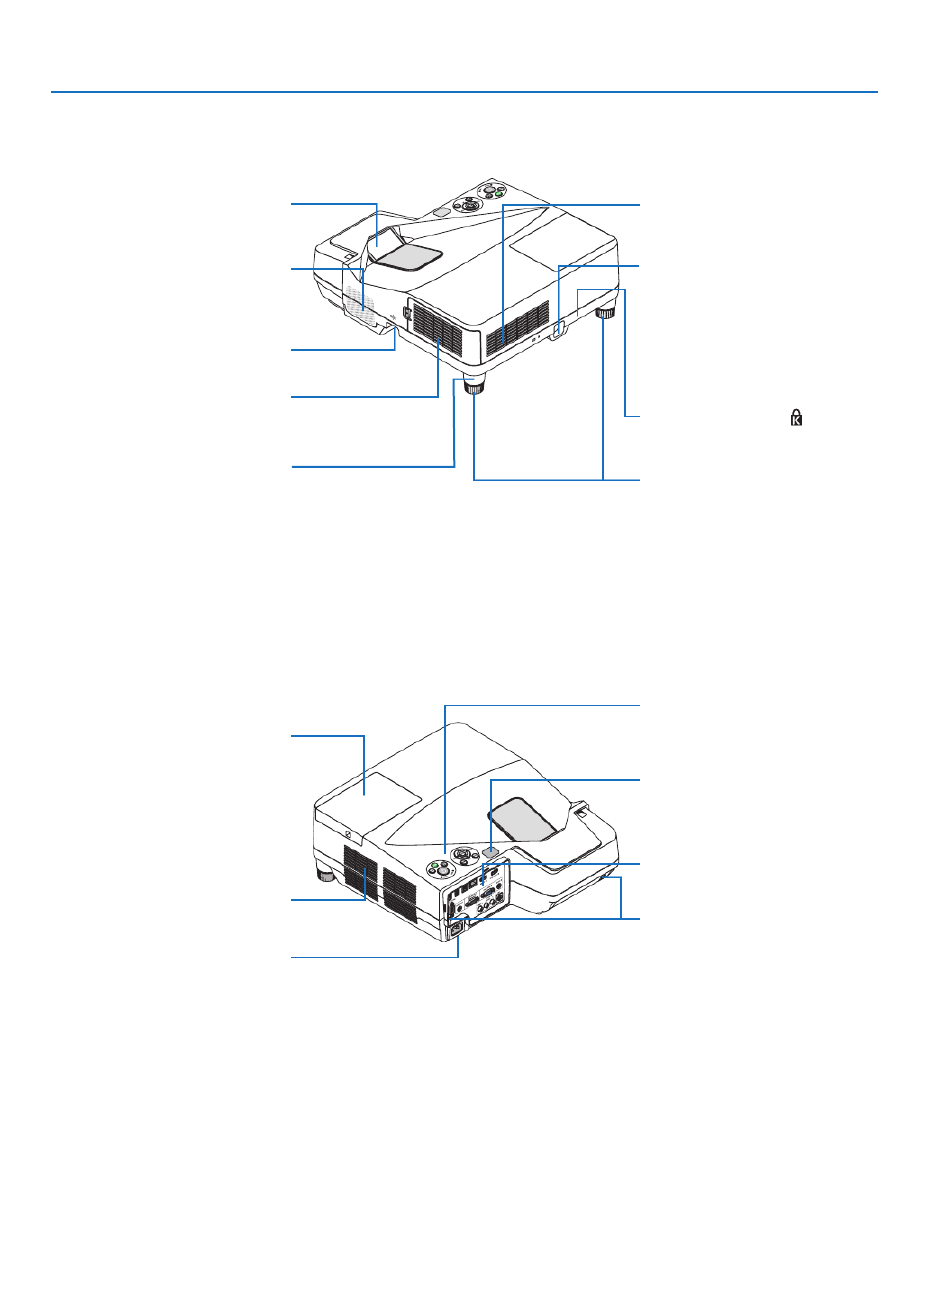
Part Names of the Projector
Top and Screen Side of Projector
Controls
( page )→ 7
FilterCover/IntakeVent/Filter
( page , )→ 118 125
Spacer (Left/Right)
To ne-adjust the height of the rear
foot, remove the spacer and rotate
the rear foot to the desired height.
( page )→ 19
Projection Window
Focus Ring
( page )→ 18
Tilt Foot
( page )→ 19
Built-in Security Slot ( )*
Lamp Cover
( page )→ 123
Security chain opening
Attach an anti-theft device.
The security chain opening accepts
security wires or chains up to 0.18
inch/4.6 mm in diameter.
* ThissecurityslotsupportstheMicroSaver ®SecuritySystem.
MonauralSpeaker(20W)
Terminal Panel ( page )→ 8
ACInput
Connect the supplied power cord’s
three-pin plug here, and plug the
other end into an active wall outlet.
( page )→ 13
Remote Sensor
( page )→ 10
Screw Hole for Cable Cover (Left/
Right)
( page )→ 6
Terminal Panel Side of Projector
IntakeVent/Filter
( page , )→ 118 125
Exhaust Vent

10
1. Introduction
Remote Control Precautions
• Handletheremotecontrolcarefully.
• Iftheremotecontrolgetswet,wipeitdryimmediately.
• Avoidexcessiveheatandhumidity.
• Donotshort,heat,ortakeapartbatteries.
• Donotthrowbatteriesintore.
• Ifyouwillnotbeusingtheremotecontrolforalongtime,removethebatteries.
• Ensurethatyouhavethebatteries’polarity(+/−)alignedcorrectly.
• Donotusenewandoldbatteriestogether,orusedifferenttypesofbatteriestogether.
• Disposeofusedbatteriesaccordingtoyourlocalregulations.
Operating Range for Wireless Remote Control
30°
30°
30°
30°
60°
22 feet/7 m
19.7 feet/6 m
Remote sensor on projector cabinet
Remote sensor on projector cabinet
Remote control
Remote control
• Theinfraredsignaloperatesbyline-of-sightuptoadistanceofabout22feet/7mandwithina60-degreeangleof
theremotesensorontheprojectorcabinet.
• Theprojectorwillnotrespondifthereareobjectsbetweentheremotecontrolandthesensor,orifstronglightfalls
onthesensor.Weakbatterieswillalsopreventtheremotecontrolfromproperlyoperatingtheprojector.
1Pressrmlyandslidethebattery
coveroff.
2Installnewbatteries(AAA).Ensure
thatyouhavethebatteries’polarity
(+/−)alignedcorrectly.
Battery Installation
3
Slip the cover back over the bat-
teriesuntilitsnapsintoplace.Do
notmixdifferenttypesofbatteries
ornewandoldbatteries.
OPEN
OPEN
Especificaciones del producto
| Marca: | Nec |
| Categoría: | proyector |
| Modelo: | UM301Xi |
¿Necesitas ayuda?
Si necesitas ayuda con Nec UM301Xi haz una pregunta a continuación y otros usuarios te responderán
proyector Nec Manuales

14 Octubre 2024
10 Octubre 2024
5 Octubre 2024
22 Septiembre 2024
15 Septiembre 2024
14 Septiembre 2024
14 Septiembre 2024
13 Septiembre 2024
7 Septiembre 2024
1 Septiembre 2024
proyector Manuales
- proyector Sony
- proyector Samsung
- proyector Xiaomi
- proyector Casio
- proyector LG
- proyector HP
- proyector Philips
- proyector Panasonic
- proyector Epson
- proyector JVC
- proyector Toshiba
- proyector Canon
- proyector Acer
- proyector Aiptek
- proyector Anker
- proyector ASK Proxima
- proyector Reflecta
- proyector BenQ
- proyector Sharp
- proyector Leica
- proyector Klarstein
- proyector Hitachi
- proyector Pyle
- proyector Livoo
- proyector Asus
- proyector OK
- proyector Hisense
- proyector Renkforce
- proyector Kodak
- proyector RCA
- proyector 3M
- proyector Overmax
- proyector GPX
- proyector Blaupunkt
- proyector Lenovo
- proyector Polaroid
- proyector Yaber
- proyector Salora
- proyector Optoma
- proyector Sanyo
- proyector Hama
- proyector Mitsubishi
- proyector Krüger And Matz
- proyector Steren
- proyector Oki
- proyector Steinel
- proyector Eiki
- proyector Marantz
- proyector Adj
- proyector Barco
- proyector Dahua Technology
- proyector Ion
- proyector Derksen
- proyector Ricoh
- proyector Dell
- proyector InFocus
- proyector Bauer
- proyector Auna
- proyector Planar
- proyector Naxa
- proyector Nebula
- proyector Viewsonic
- proyector Technaxx
- proyector D-Link
- proyector Vivitek
- proyector Emtec
- proyector Celly
- proyector Eurolite
- proyector Smart
- proyector Odys
- proyector Stairville
- proyector Laserworld
- proyector Ibm
- proyector Maxell
- proyector Elmo
- proyector XGIMI
- proyector La Vague
- proyector Speaka
- proyector Kogan
- proyector Cameo
- proyector Tzumi
- proyector EKO
- proyector MicroVision
- proyector Elite Screens
- proyector Celexon
- proyector Prixton
- proyector Fun Generation
- proyector Christie
- proyector PLUS
- proyector Futurelight
- proyector Varytec
- proyector Ultimea
- proyector Dukane
- proyector Dream Vision
- proyector Knoll
- proyector DTS
- proyector Touchjet
- proyector Boxlight
- proyector AAXA Technologies
- proyector Miroir
- proyector Vankyo
- proyector Mimio
- proyector AWOL Vision
- proyector Smart Tech
- proyector Atlantis Land
- proyector KickAss
- proyector Microtek
- proyector Beghelli
- proyector VAVA
- proyector Panamorph
Últimos proyector Manuales
26 Octubre 2024
24 Octubre 2024
24 Octubre 2024
24 Octubre 2024
24 Octubre 2024
24 Octubre 2024
24 Octubre 2024
24 Octubre 2024
24 Octubre 2024
24 Octubre 2024