Netgear D3600 Manual de Usario
Lee a continuación 📖 el manual en español para Netgear D3600 (200 páginas) en la categoría Enrutador. Esta guía fue útil para 15 personas y fue valorada con 4.5 estrellas en promedio por 2 usuarios
Página 1/200

350 East Plumeria Drive
San Jose, CA 95134
USA
December 2015
202-11386-02
N600 WiFi DSL Modem Router
Mod e l D 36 00
AC750 WiFi DSL Modem Router
Mod e l D 60 00
User Man ual

2
N600 and AC750 WiFi DSL Modem Routers
Support
Thank you for purchasing this NETGEAR product. You can visit www.netgear.com/support to register your product, get help,
access the latest downloads and user manuals, and join our community. We recommend that you use only official NETGEAR
support resources.
Conformity
For the current EU Declaration of Conformity, visit http://kb.netgear.com/app/answers/detail/a_id/11621.
Compliance
For regulatory compliance information, visit http://www.netgear.com/about/regulatory.
See the regulatory compliance document before connecting the power supply.
Trademarks
© NETGEAR, Inc., NETGEAR and the NETGEAR Logo are trademarks of NETGEAR, Inc. Any non-NETGEAR trademarks are
used for reference purposes only.

3
Contents
Chapter 1 Hardware Overview of the Modem Router
Unpack Your Modem Router . . . . . . . . . . . . . . . . . . . . . . . . . . . . . . . . . . . . . . . . . . . 9
Top Panel with LEDs . . . . . . . . . . . . . . . . . . . . . . . . . . . . . . . . . . . . . . . . . . . . . . . . . 10
Back Panel with Ports, Buttons, DC Connector, and Antennas. . . . . . . . . . . . . . 11
Bottom Panel Product Label . . . . . . . . . . . . . . . . . . . . . . . . . . . . . . . . . . . . . . . . . . 13
Chapter 2 Install and Access the Modem Router and Its Network
Position Your Modem Router. . . . . . . . . . . . . . . . . . . . . . . . . . . . . . . . . . . . . . . . . . 15
Before You Connect to the Modem Router . . . . . . . . . . . . . . . . . . . . . . . . . . . . . . 16
Wired Connection . . . . . . . . . . . . . . . . . . . . . . . . . . . . . . . . . . . . . . . . . . . . . . . . . 16
WiFi Connection . . . . . . . . . . . . . . . . . . . . . . . . . . . . . . . . . . . . . . . . . . . . . . . . . . 16
Types of Logins . . . . . . . . . . . . . . . . . . . . . . . . . . . . . . . . . . . . . . . . . . . . . . . . . . . 17
NETGEAR genie Setup Wizard. . . . . . . . . . . . . . . . . . . . . . . . . . . . . . . . . . . . . . . 17
Set Up Your Modem Router for DSL Service. . . . . . . . . . . . . . . . . . . . . . . . . . . . . 18
DSL Service . . . . . . . . . . . . . . . . . . . . . . . . . . . . . . . . . . . . . . . . . . . . . . . . . . . . . . 18
Cable the Modem Router for DSL Service and Access the Modem Router . 19
Set Up Your Modem Router for Cable or Fiber Service. . . . . . . . . . . . . . . . . . . . 26
Log In to the Modem Router After Setup to View or Change Settings. . . . . . . 33
Change the Language . . . . . . . . . . . . . . . . . . . . . . . . . . . . . . . . . . . . . . . . . . . . . . . . 34
Change the admin Password . . . . . . . . . . . . . . . . . . . . . . . . . . . . . . . . . . . . . . . . . . 35
Let the Modem Router Automatically Update Its Firmware . . . . . . . . . . . . . . . . 36
Access the Modem Router with the NETGEAR genie App. . . . . . . . . . . . . . . . . . 37
Chapter 3 Manage the Internet Settings Manually
Use the Setup Wizard After Initial Setup . . . . . . . . . . . . . . . . . . . . . . . . . . . . . . . . 39
Manually Set Up the Internet Connection . . . . . . . . . . . . . . . . . . . . . . . . . . . . . . . 44
Specify an Internet Connection Without a Login. . . . . . . . . . . . . . . . . . . . . . . 44
Specify an Internet Connection That Uses a Login and PPPoE Service . . . . 47
Specify an Internet Connection That Uses a Login and PPPoA Service . . . . 50
Manage the MTU Size. . . . . . . . . . . . . . . . . . . . . . . . . . . . . . . . . . . . . . . . . . . . . . . . 52
MTU Concepts. . . . . . . . . . . . . . . . . . . . . . . . . . . . . . . . . . . . . . . . . . . . . . . . . . . . 52
Change the MTU Size . . . . . . . . . . . . . . . . . . . . . . . . . . . . . . . . . . . . . . . . . . . . . . 53
Chapter 4 Manage the WiFi Network Settings
Manage the Basic WiFi Settings and WiFi Security of the Main Network. . . . . 56
View or Change the Basic WiFi Settings . . . . . . . . . . . . . . . . . . . . . . . . . . . . . . 56
Configure WEP Legacy WiFi Security . . . . . . . . . . . . . . . . . . . . . . . . . . . . . . . . 62
Use WPS to Add a Device to the WiFi Network . . . . . . . . . . . . . . . . . . . . . . . . . . 64

4
N600 and AC750 WiFi DSL Modem Routers
Use WPS with the Push Button Method . . . . . . . . . . . . . . . . . . . . . . . . . . . . . . 64
Use WPS with the PIN Method . . . . . . . . . . . . . . . . . . . . . . . . . . . . . . . . . . . . . . 66
Manage the WiFi Settings and WiFi Security of the Guest Network . . . . . . . . . 67
Set Up and Enable a Guest Network . . . . . . . . . . . . . . . . . . . . . . . . . . . . . . . . . 67
Configure WEP Legacy WiFi Security for the Guest WiFi Network. . . . . . . . 71
Control the WiFi Radios . . . . . . . . . . . . . . . . . . . . . . . . . . . . . . . . . . . . . . . . . . . . . . 73
Use the WiFi On/Off Button . . . . . . . . . . . . . . . . . . . . . . . . . . . . . . . . . . . . . . . . 73
Enable or Disable the WiFi Radios. . . . . . . . . . . . . . . . . . . . . . . . . . . . . . . . . . . . 74
Manage the WPS Settings . . . . . . . . . . . . . . . . . . . . . . . . . . . . . . . . . . . . . . . . . . . . 75
Manage Advanced WiFi Features . . . . . . . . . . . . . . . . . . . . . . . . . . . . . . . . . . . . . . 76
Manage Wi-Fi Multimedia Quality of Service. . . . . . . . . . . . . . . . . . . . . . . . . . . . 78
Chapter 5 Control Access to the Internet
Set Up Parental Controls . . . . . . . . . . . . . . . . . . . . . . . . . . . . . . . . . . . . . . . . . . . . . 81
Use Keywords to Block Internet Sites . . . . . . . . . . . . . . . . . . . . . . . . . . . . . . . . . . 85
Set Up Blocking . . . . . . . . . . . . . . . . . . . . . . . . . . . . . . . . . . . . . . . . . . . . . . . . . . . 85
Remove a Keyword or Domain from the Blocked List. . . . . . . . . . . . . . . . . . . 86
Remove All Keywords and Domains from the Blocked List . . . . . . . . . . . . . . 87
Specify a Trusted Computer . . . . . . . . . . . . . . . . . . . . . . . . . . . . . . . . . . . . . . . . 87
Manage Simple Outbound Firewall Rules for Services and Applications. . . . . . 89
Add an Outbound Firewall Rule. . . . . . . . . . . . . . . . . . . . . . . . . . . . . . . . . . . . . . 89
Add an Outbound Firewall Rule for a Custom Service or Application . . . . . . 91
Change an Outbound Firewall Rule. . . . . . . . . . . . . . . . . . . . . . . . . . . . . . . . . . . 93
Remove an Outbound Firewall Rule . . . . . . . . . . . . . . . . . . . . . . . . . . . . . . . . . . 94
Set Up a Schedule for Keyword Blocking and Outbound Firewall Rules . . . . . . 95
Set Up a WiFi Access List and Manage WiFi Access . . . . . . . . . . . . . . . . . . . . . . . 97
Set Up and Enable a WiFi Access List . . . . . . . . . . . . . . . . . . . . . . . . . . . . . . . . . 97
Change the Settings for a Device on the WiFi Access List . . . . . . . . . . . . . . . 98
Remove a Device From the WiFi Access List. . . . . . . . . . . . . . . . . . . . . . . . . . . 99
Set Up Security Event Email Notifications. . . . . . . . . . . . . . . . . . . . . . . . . . . . . . 100
Chapter 6 Share a Storage Device
USB Device Requirements . . . . . . . . . . . . . . . . . . . . . . . . . . . . . . . . . . . . . . . . . . . 104
Connect a USB Device to the Modem Router. . . . . . . . . . . . . . . . . . . . . . . . . . . 104
Access a Storage Device Connected to the Modem Router . . . . . . . . . . . . . . . 105
Back Up Windows Computers with ReadySHARE Vault. . . . . . . . . . . . . . . . . . . 106
Back Up Mac Computers with Time Machine . . . . . . . . . . . . . . . . . . . . . . . . . . . 106
Set Up a USB Hard Drive on a Mac. . . . . . . . . . . . . . . . . . . . . . . . . . . . . . . . . . 106
Prepare to Back Up a Large Amount of Data . . . . . . . . . . . . . . . . . . . . . . . . . 107
Use Time Machine to Back Up onto a Storage Device. . . . . . . . . . . . . . . . . . 107
Control Access to a Storage Device . . . . . . . . . . . . . . . . . . . . . . . . . . . . . . . . . . . 108
Use FTP Within Your Network . . . . . . . . . . . . . . . . . . . . . . . . . . . . . . . . . . . . . . . . 110
View Network Folders on a Device. . . . . . . . . . . . . . . . . . . . . . . . . . . . . . . . . . . . 111
Add a Network Folder on a Storage Device. . . . . . . . . . . . . . . . . . . . . . . . . . . . . 112
Change a Network Folder, Including Read and Write Access, on a USB Drive 113
Safely Remove a USB Device. . . . . . . . . . . . . . . . . . . . . . . . . . . . . . . . . . . . . . . . . 115

5
N600 and AC750 WiFi DSL Modem Routers
Chapter 7 Share a USB Printer
Install the Printer Driver and Cable the Printer. . . . . . . . . . . . . . . . . . . . . . . . . . 117
Download the ReadySHARE Printer Utility . . . . . . . . . . . . . . . . . . . . . . . . . . . . . 117
Install the ReadySHARE Printer Utility . . . . . . . . . . . . . . . . . . . . . . . . . . . . . . . . . 118
Use the Shared Printer . . . . . . . . . . . . . . . . . . . . . . . . . . . . . . . . . . . . . . . . . . . . . . 119
View or Change the Status of a Printer . . . . . . . . . . . . . . . . . . . . . . . . . . . . . . . . 120
Use the Scan Feature of a Multifunction USB Printer . . . . . . . . . . . . . . . . . . . . 121
Change NETGEAR USB Control Center Settings . . . . . . . . . . . . . . . . . . . . . . . . . 122
Change the NETGEAR USB Control Center Language . . . . . . . . . . . . . . . . . . 123
Specify the Time-out . . . . . . . . . . . . . . . . . . . . . . . . . . . . . . . . . . . . . . . . . . . . . 123
Chapter 8 Access Storage Devices Through the Internet
Set Up and Manage Dynamic DNS . . . . . . . . . . . . . . . . . . . . . . . . . . . . . . . . . . . . 125
Your Personal FTP Server . . . . . . . . . . . . . . . . . . . . . . . . . . . . . . . . . . . . . . . . . 125
Set Up Dynamic DNS . . . . . . . . . . . . . . . . . . . . . . . . . . . . . . . . . . . . . . . . . . . . . 126
Access Storage Devices Through the Internet . . . . . . . . . . . . . . . . . . . . . . . . . . 127
Set Up FTP Access Through the Internet. . . . . . . . . . . . . . . . . . . . . . . . . . . . . 127
Access Storage Devices Through the Internet with FTP . . . . . . . . . . . . . . . . 129
Chapter 9 Manage the WAN and LAN Network Settings
Manage the ADSL Settings . . . . . . . . . . . . . . . . . . . . . . . . . . . . . . . . . . . . . . . . . . 131
Change the Type of Physical WAN Connection. . . . . . . . . . . . . . . . . . . . . . . . . . 133
Manage the WAN Security Settings . . . . . . . . . . . . . . . . . . . . . . . . . . . . . . . . . . .134
Set Up a Default DMZ Server . . . . . . . . . . . . . . . . . . . . . . . . . . . . . . . . . . . . . . . . 135
Manage IGMP Proxying and VPN Pass-Through. . . . . . . . . . . . . . . . . . . . . . . . . 136
Manage NAT Filtering . . . . . . . . . . . . . . . . . . . . . . . . . . . . . . . . . . . . . . . . . . . . . . .137
Manage the SIP Application-Level Gateway . . . . . . . . . . . . . . . . . . . . . . . . . . . . 137
Manage the Modem Router’s LAN IP Address Settings. . . . . . . . . . . . . . . . . . . 138
Manage Reserved LAN IP Addresses . . . . . . . . . . . . . . . . . . . . . . . . . . . . . . . . . . 139
Reserve a LAN IP address . . . . . . . . . . . . . . . . . . . . . . . . . . . . . . . . . . . . . . . . . 139
Change a Reserved IP Address . . . . . . . . . . . . . . . . . . . . . . . . . . . . . . . . . . . . . 140
Remove a Reserved IP Address Entry . . . . . . . . . . . . . . . . . . . . . . . . . . . . . . . 141
Change the Modem Router’s Device Name. . . . . . . . . . . . . . . . . . . . . . . . . . . . . 141
Manage the DHCP Server Address Pool . . . . . . . . . . . . . . . . . . . . . . . . . . . . . . .142
Disable the Built-In DHCP Server . . . . . . . . . . . . . . . . . . . . . . . . . . . . . . . . . . . . . 143
Set Up and Manage Custom Static Routes. . . . . . . . . . . . . . . . . . . . . . . . . . . . . . 144
Set Up a Static Route . . . . . . . . . . . . . . . . . . . . . . . . . . . . . . . . . . . . . . . . . . . . . 145
Change a Static Route . . . . . . . . . . . . . . . . . . . . . . . . . . . . . . . . . . . . . . . . . . . . 147
Remove a Static Route . . . . . . . . . . . . . . . . . . . . . . . . . . . . . . . . . . . . . . . . . . . . 147
Improve Network Connections with Universal Plug and Play . . . . . . . . . . . . . . 148
Chapter 10 Manage the Modem Router and Monitor the Traffic
Update the Firmware of the Modem Router . . . . . . . . . . . . . . . . . . . . . . . . . . . . 151
Check for New Firmware and Update the Modem Router . . . . . . . . . . . . . . 151
Manually Upload New Firmware and Update the Modem Router . . . . . . . . 152

6
N600 and AC750 WiFi DSL Modem Routers
Manage the Configuration File of the Modem Router. . . . . . . . . . . . . . . . . . . . 153
Back Up the Settings . . . . . . . . . . . . . . . . . . . . . . . . . . . . . . . . . . . . . . . . . . . . . 153
Restore the Settings . . . . . . . . . . . . . . . . . . . . . . . . . . . . . . . . . . . . . . . . . . . . . . 154
Return the Modem Router to Its Factory Default Settings. . . . . . . . . . . . . . . . 155
Use the Reset Button . . . . . . . . . . . . . . . . . . . . . . . . . . . . . . . . . . . . . . . . . . . . . 155
Erase the Settings. . . . . . . . . . . . . . . . . . . . . . . . . . . . . . . . . . . . . . . . . . . . . . . . 156
View the Status and Statistics of the Modem Router . . . . . . . . . . . . . . . . . . . . 157
View Information About the Modem Router and the Internet,
Modem, and WiFi Settings. . . . . . . . . . . . . . . . . . . . . . . . . . . . . . . . . . . . . . . . . 157
View the Traffic Statistics . . . . . . . . . . . . . . . . . . . . . . . . . . . . . . . . . . . . . . . . . 161
View or Change a PPPoE or PPPoA Internet Connection . . . . . . . . . . . . . . . 164
View or Change a TCP/IP Internet Connection . . . . . . . . . . . . . . . . . . . . . . . 165
Manage the Activity Log . . . . . . . . . . . . . . . . . . . . . . . . . . . . . . . . . . . . . . . . . . . . 167
View the Logs . . . . . . . . . . . . . . . . . . . . . . . . . . . . . . . . . . . . . . . . . . . . . . . . . . . 167
Specify Which Activities Are Logged. . . . . . . . . . . . . . . . . . . . . . . . . . . . . . . . 168
View Devices Currently on the Network . . . . . . . . . . . . . . . . . . . . . . . . . . . . . . . 169
Manage the Modem Router Remotely . . . . . . . . . . . . . . . . . . . . . . . . . . . . . . . . . 170
Chapter 11 Manage Port Forwarding and Port Triggering
Manage Port Forwarding to a Local Server for Services and Applications. . . 173
Forward Incoming Traffic for a Default Service or Application . . . . . . . . . . 173
Add a Port Forwarding Rule with a Custom Service or Application. . . . . . . 174
Change a Port Forwarding Rule . . . . . . . . . . . . . . . . . . . . . . . . . . . . . . . . . . . . 176
Remove a Port Forwarding Rule . . . . . . . . . . . . . . . . . . . . . . . . . . . . . . . . . . . . 177
Application Example: Make a Local Web Server Public . . . . . . . . . . . . . . . . . 178
How the Modem Router Implements the Port Forwarding Rule . . . . . . . . . 179
Manage Port Triggering for Services and Applications . . . . . . . . . . . . . . . . . . . 179
Add a Port Triggering Rule. . . . . . . . . . . . . . . . . . . . . . . . . . . . . . . . . . . . . . . . . 180
Change a Port Triggering Rule . . . . . . . . . . . . . . . . . . . . . . . . . . . . . . . . . . . . . 182
Remove a Port Triggering Rule . . . . . . . . . . . . . . . . . . . . . . . . . . . . . . . . . . . . . 183
Specify the Time-Out Period for Port Triggering . . . . . . . . . . . . . . . . . . . . . 184
Disable Port Triggering. . . . . . . . . . . . . . . . . . . . . . . . . . . . . . . . . . . . . . . . . . . . 185
Application Example: Port Triggering for Internet Relay Chat . . . . . . . . . . . 185
Chapter 12 Troubleshooting
Quick Tips for Troubleshooting . . . . . . . . . . . . . . . . . . . . . . . . . . . . . . . . . . . . . . . 188
Troubleshoot with the LEDs . . . . . . . . . . . . . . . . . . . . . . . . . . . . . . . . . . . . . . . . . . 189
Power LED Is Off. . . . . . . . . . . . . . . . . . . . . . . . . . . . . . . . . . . . . . . . . . . . . . . . . 189
WiFi LED Is Off . . . . . . . . . . . . . . . . . . . . . . . . . . . . . . . . . . . . . . . . . . . . . . . . . . 189
Ethernet LED Is Off . . . . . . . . . . . . . . . . . . . . . . . . . . . . . . . . . . . . . . . . . . . . . . 190
You Cannot Log In to the Modem Router . . . . . . . . . . . . . . . . . . . . . . . . . . . . . . 190
Troubleshoot the Internet Connection . . . . . . . . . . . . . . . . . . . . . . . . . . . . . . . . . 191
Troubleshoot the DSL Link. . . . . . . . . . . . . . . . . . . . . . . . . . . . . . . . . . . . . . . . . 191
Internet LED Is Off . . . . . . . . . . . . . . . . . . . . . . . . . . . . . . . . . . . . . . . . . . . . . . . 192
Obtain an Internet IP Address . . . . . . . . . . . . . . . . . . . . . . . . . . . . . . . . . . . . . . 192
Troubleshoot PPPoE or PPPoA . . . . . . . . . . . . . . . . . . . . . . . . . . . . . . . . . . . . . 193
Troubleshoot Internet Browsing . . . . . . . . . . . . . . . . . . . . . . . . . . . . . . . . . . . . 194

7
N600 and AC750 WiFi DSL Modem Routers
Changes Are Not Saved . . . . . . . . . . . . . . . . . . . . . . . . . . . . . . . . . . . . . . . . . . . . . 195
Troubleshoot the WiFi Connectivity . . . . . . . . . . . . . . . . . . . . . . . . . . . . . . . . . . . 195
Troubleshoot Your Network Using the Ping Utility . . . . . . . . . . . . . . . . . . . . . . . 196
Test the LAN Path to Your Modem Router . . . . . . . . . . . . . . . . . . . . . . . . . . . 196
Test the Path from Your Computer to a Remote Device . . . . . . . . . . . . . . . .197
Appendix A Supplemental Information
Factory Settings. . . . . . . . . . . . . . . . . . . . . . . . . . . . . . . . . . . . . . . . . . . . . . . . . . . .199
Technical and Environmental Specifications . . . . . . . . . . . . . . . . . . . . . . . . . . . .201

8
1
1. Hardware Overview of the Modem
Router
This manual describes the following models:
•NETGEAR® N600 WiFi DSL Modem Router, Model D3600.
Provides two radios with WiFi connection speeds up to 1 300 Mbps per radio for a total
aggregate throughput of 600 Mbps. The 2.4 GHz radio supports 802.11n and the 5 GHz
radio supports 802.11na.
•NETGEAR® AC750 WiFi DSL Modem Router, Model D6000.
Provides two radios with WiFi connection speeds up to 1 300 Mbps for the 2.4 GHz radio
and up to1 433 Mbps for the 5 GHz radio for a total aggregate throughput of 750 Mbps.
The 2.4 GHz radio supports 802.11n and the 5 GHz radio supports 802.11ac.
For each model, both radios can be active simultaneously.These models are compatible with
most major DSL Internet service providers and also supports cable or fiber Internet service.
In this manual, both models are referred to as the modem router. Also, in this manual, the terms
wireless WiFi and are interchangeable.
The chapter contains the following sections:
•Unpack Your Modem Router
•Top Panel with LEDs
•Back Panel with Ports, Buttons, DC Connector, and Antennas
•Bottom Panel Product Label
Note: For more information about the topics that are covered in this manual,
visit the support website at support.netgear.com.
Note: Firmware updates with new features and bug fixes are made available
from time to time at downloadcenter.netgear.com. You can check for and
download new firmware manually. If the features or behavior of your
product does not match what is described in this guide, you might need to
update your firmware.
1. Actual data throughput and WiFi coverage will vary. Network conditions and environmental factors, including volume of network traffic, building
materials and construction, and network overhead, lower actual data throughput rate and WiFi coverage. NETGEAR makes no express or implied
representations or warranties about this product’s compatibility with any future standards.

Hardware Overview of the Modem Router
9
N600 and AC750 WiFi DSL Modem Routers
Unpack Your Modem Router
Your package contains the following items.
Power adapter
Ethernet cablePhone cable
ADSL filterModem router
(varies by region)
(varies by region)
(D6000 shown)
Figure 1. Package contents for the modem router
Your package might contain more items. The filter or phone cable provided depends on the
region, and in some locations, a CD is included.

Hardware Overview of the Modem Router
11
N600 and AC750 WiFi DSL Modem Routers
Back Panel with Ports, Buttons, DC Connector, and
Antennas
Ethernet
Ethernet LAN
DC power LAN ports
Reset and
WPS button
connector
ADSL
port
USB port
1 through3
port 4 or
WAN port
WiFi
On/Off
button
The following figure shows the ports, button, DC connector, and antennas on the back panel
of the modem router.
Figure 3. Modem router back panel
WPS • Solid green. WPS (Wi-Fi Protected Setup) is ready for use. By default, the WPS LED
lights solid green when the power is on.
• Blinking green for two minutes. Someone pressed the WPS button on the modem
router to join the WiFi network. For more information, see Use WPS to Add a Device
to the WiFi Network on page 64.
USB • Solid green. A USB device is connected and is ready.
• Blinking green. A USB device is plugged in and is trying to connect.
• Off. No USB device is connected, or someone clicked the Safely Remove Hardware
button and it is now safe to remove the attached USB device.
Ethernet • Solid green. One or more Ethernet ports are connected to powered-on devices.
• Blinking green. One or more Ethernet ports are transmitting or receiving traf
fic.
• Off. None of the Ethernet ports are connected to a powered-on device.
Table 1. LED descriptions (continued)
LED Icon Description

Hardware Overview of the Modem Router
13
N600 and AC750 WiFi DSL Modem Routers
Bottom Panel Product Label
The product label on the bottom panel of the modem router lists the login information, WiFi
network name (SSID), network key (password), serial number, and MAC address of the
modem router.
Figure 5. Modem router product label

14
2
2. Install and Access the Modem
Router and Its Network
This chapter describes how you can install and access the modem router and its network.
The chapter contains the following sections:
•Position Your Modem Router
•Before You Connect to the Modem Router
•Set Up Your Modem Router for DSL Service
•Set Up Your Modem Router for Cable or Fiber Service
•Log In to the Modem Router After Setup to View or Change Settings
•Change the Language
•Change the admin Password
•Let the Modem Router Automatically Update Its Firmware
•Access the Modem Router with the NETGEAR genie App

Install and Access the Modem Router and Its Network
15
N600 and AC750 WiFi DSL Modem Routers
Position Your Modem Router
The modem router lets you access your network anywhere within the operating range of your
WiFi network. However, the operating distance or range of your WiFi connection can vary
significantly depending on the physical placement of your modem router. For example, the
thickness and number of walls the WiFi signal passes through can limit the range.
Additionally, other WiFi access points in and around your home might affect your modem
router’s signal. WiFi access points are routers, repeaters, WiFi range extenders, and any
other device that emits a WiFi signal for network access.
Position your modem router according to the following guidelines:
•Place your modem router near the center of the area where your computers and other
devices operate and within line of sight to your WiFi devices.
•Make sure that the modem router is within reach of an AC power outlet and near Ethernet
cables for wired computers.
•Place the modem router in an elevated location, minimizing the number walls and ceilings
between the modem router and your other devices.
•Place the modem router away from electrical devices such as these:
-Ceiling fans
-Home security systems
-Microwaves
-Computers
-Base of a cordless phone
-2.4 GHz cordless phone
•Place the modem router away from large metal surfaces, large glass surfaces, insulated
walls, and items such as these:
-Solid metal door
-Aluminum studs
-Fish tanks
-Mirrors
-Brick
-Concrete
If you are using adjacent access points, use different radio frequency channels to reduce
interference.
For information about the best angle for the antennas of the modem router, see Back Panel
with Ports, Buttons, DC Connector, and Antennas on page .11

Install and Access the Modem Router and Its Network
16
N600 and AC750 WiFi DSL Modem Routers
Before You Connect to the Modem Router
During and after installation, you can connect to the modem router’s network through a wired
or WiFi connection. If you set up your computer to use a static IP address, change the
settings of your computer so that it uses Dynamic Host Configuration Protocol (DHCP).
Wired Connection
You can connect your computer to the modem router using an Ethernet cable and join the
modem router’s local area network (LAN).
WiFi Connection
You can connect to the modem router’s WiFi network, which is listed on the product label in
the WiFi Network Name (SSID) field. The password that you must use to connect to the WiFi
network is listed in the Network Key (Password) field.
WiFi Network Name (SSID)
Network key (password)
Figure 6. Modem router product label with WiFi network name (SSID) and password (network key)

Install and Access the Modem Router and Its Network
17
N600 and AC750 WiFi DSL Modem Routers
Types of Logins
Separate types of logins serve different purposes. It is important that you understand the
difference so that you know which login to use when.
Types of logins:
•ISP login. The login that your Internet service provider (ISP) gave you logs you in to your
Internet service. Your ISP gave you this login information in a letter or some other way. If
you cannot find this login information, contact your ISP.
•WiFi network key or password. Your modem router is preset with a unique WiFi
network name (SSID) and password for WiFi access. This information is on the product
label. Use this information to connect a WiFi device to the WiFi network of the modem
router.
•Modem Router login. This logs you in to the modem router interface as admin from an
Internet browser.
NETGEAR genie Setup Wizard
How you can use the NETGEAR genie Setup Wizard during installation and setup of your
modem router depends on the type of Internet service that you use:
•DSL service. If you install your modem router for DSL service, you can set up your
modem router with the NETGEAR genie Setup Wizard, which launches the first time that
you set up the Internet connection for your modem router. The NETGEAR genie Setup
Wizard runs on any device with a web browser.
For more information, see Set Up Your Modem Router for DSL Service on page 18.
•Cable or fiber service. If you install your modem router for cable or fiber service, you
must cancel the NETGEAR genie Setup Wizard when it launches the first time that you
set up the Internet connection for your modem router. You must first use the web
management interface to change the default WAN connection method and then manually
start the NETGEAR genie Setup Wizard.
For more information, see Set Up Your Modem Router for Cable or Fiber Service on
page 26.
Note: After installation and setup, the NETGEAR genie Setup Wizard is
always accessible, either for an installation with cable or fiber service
or for an installation with DSL service.
Whether you install your modem router for DSL service or for cable or fiber service, you can
always use the genie menus and screens to set up your modem router manually.
Before you start the setup process, get your ISP information and make sure that the settings
that are described here are specified for the computers and devices in the network.

Install and Access the Modem Router and Its Network
18
N600 and AC750 WiFi DSL Modem Routers
When your Internet service starts, your Internet service provider (ISP) typically gives you all
the information that you need to connect to the Internet.
For DSL service, you might need the following information to set up your modem router:
•The ISP configuration information for your DSL account
•ISP login name and password
•Fixed or static IP address settings (special deployment by ISP; this setting is rare)
If you cannot locate this information, ask your ISP to provide it. When your Internet
connection is working, you no longer need to launch the ISP login program on your computer
to access the Internet. When you start an Internet application, your modem router
automatically logs you in.
Set Up Your Modem Router for DSL Service
You can install your modem router for DSL service or for cable or fiber (Ethernet WAN)
service. If you use a DSL modem, follow the procedure that is described in Cable the Modem
Router for DSL Service and Access the Modem Router on page 19. If you use a cable or fiber
modem, follow the procedure that is described in Set Up Your Modem Router for Cable or
Fiber Service on page 26.
DSL Service
Make sure that your DSL service is active before you install the modem router. You need the
following information to install your DSL modem and connect to the Internet:
•DSL user name and password. This information is included in the welcome letter your
DSL ISP sent you when you signed up for your service. Record your DSL Internet service
account user name and password.
•Your telephone number or DSL account number. If you do not use voice service, you
can use your DSL account number in place of a phone number.
If you do not know or cannot locate your DSL user name and password, call your DSL
Internet service provider (ISP). Be specific when speaking with your DSL Internet service
provider. For example, you could say, “I need my DSL service user name and password. Can
you help me?”
Note: If your provider says that they do not support NETGEAR services, tell
them that you need only your DSL user name and password; you do
not need support.

Install and Access the Modem Router and Its Network
20
N600 and AC750 WiFi DSL Modem Routers
8. Connect a computer to the modem router by one of the following methods:
•Ethernet cable. Use an Ethernet cable to connect your computer to a yellow Ethernet
port on the modem router.
The product package contains a yellow Ethernet cable.
Your computer connects to the modem router’s LAN.
•WiFi. Connect to the default WiFi network of the modem router:
a. On your computer or WiFi device, find and select the WiFi network.
The WiFi network name (SSID) is on the label.product
b. Join the WiFi network and enter the WiFi password.
The password (network key) is on the label.product
Your computer or WiFi device connects to the WiFi network.modem router’s
9. Launch a web browser.
The NETGEAR genie Setup Wizard displays.
If the NETGEAR genie Setup Wizard displays, skip to Step 11. If it does not display, do
the following:
a. In the address field of the web browser, enter www.routerlogin.net.
b. admin passwordWhen prompted, enter for the user name and for the password.
If the NETGEAR genie Setup Wizard displays, skip to Step 11. If the NETGEAR genie
Setup Wizard still does not display, see Step 10.
10. If the browser cannot display the web page, do the following:
•Make sure that the computer is connected to one of the LAN Ethernet ports or over
WiFi to the modem router.
•Make sure that the Power LED of the modem router is lit green.
•Make sure that your browser does not cache the previous page by closing and
reopening the browser.

Install and Access the Modem Router and Its Network
21
N600 and AC750 WiFi DSL Modem Routers
•Clear the browser cache.
•If the computer is set to a static or fixed IP address (this setting is uncommon), either
change the computer to obtain an IP address automatically from the modem router
through DHCP, or change the IP address of the computer to a static or fixed IP
address in the 192.168.1.2–192.168.1.254 range.
11. Keep the Yes radio button selected (which is the default setting) and click the Next button.
The Setup Wizard starts.
12. From the Country menu, select the country in which you use the modem router.
13. From the ISP menu, select the ISP that you are using.
If your ISP is not in the menu, select Other.
14. Select the Yes radio button.
15. Click the Next button.
The Setup Wizard searches your Internet connection for servers and protocols to
determine your ISP configuration.
When the modem router is connected to the Internet, the Congratulations! screen
displays, and you successfully completed the setup process.
If the Congratulations! screen does not display, other screens might display and you
might need to provide more information, in which case you must continue with the next
step. The screens that display depend on your type of ISP connection and configuration.

Install and Access the Modem Router and Its Network
22
N600 and AC750 WiFi DSL Modem Routers
16. (Only if the following screen displays) Specify a full scan to let the Setup Wizard find the
PVC protocol.
The screen that displays might ask you if you need the Setup Wizard to do a full scan to
find the PVC protocol. If this screen does not display, continue with the next step.
Do the following:
a. Select the Yes radio button.
b. NextClick the button.
The Setup Wizard performs a full scan, which might take up to six minutes.
17. (Only if the following screen displays) Specify how to manage problems with the detection of
the Internet connection.
The screen that might display states that a problem occurred while detecting the Internet
connection. If this screen does not display, continue with the next step.

Install and Access the Modem Router and Its Network
23
N600 and AC750 WiFi DSL Modem Routers
Note: The option for the Ethernet cable connection that is stated onscreen
applies to a cable or fiber Internet connection only (see Set Up Your
Modem Router for Cable or Fiber Service on page 26).
Take one of the following actions:
•If you already power-cycled the DSL modem (see Step 1 Step 7 through ), do the
following:
a. Select the None of the above radio button.
b. NextClick the button.
•If you did not yet power-cycle the DSL modem, do the following:
a. Unplug your DSL modem’s power, leaving the DSL modem connected to the wall
jack for your Internet service.
b. If your DSL modem includes a battery backup, remove the battery.
c. Wait 10 seconds.
d. If your DSL modem includes a battery backup, reinsert the battery.
e. Plug in your DSL modem’s power and turn on your DSL modem.
f. Wait two minutes.
g. Select the I just power cycled the modem and waited for 2 minutes radio
button.
h. NextClick the button.
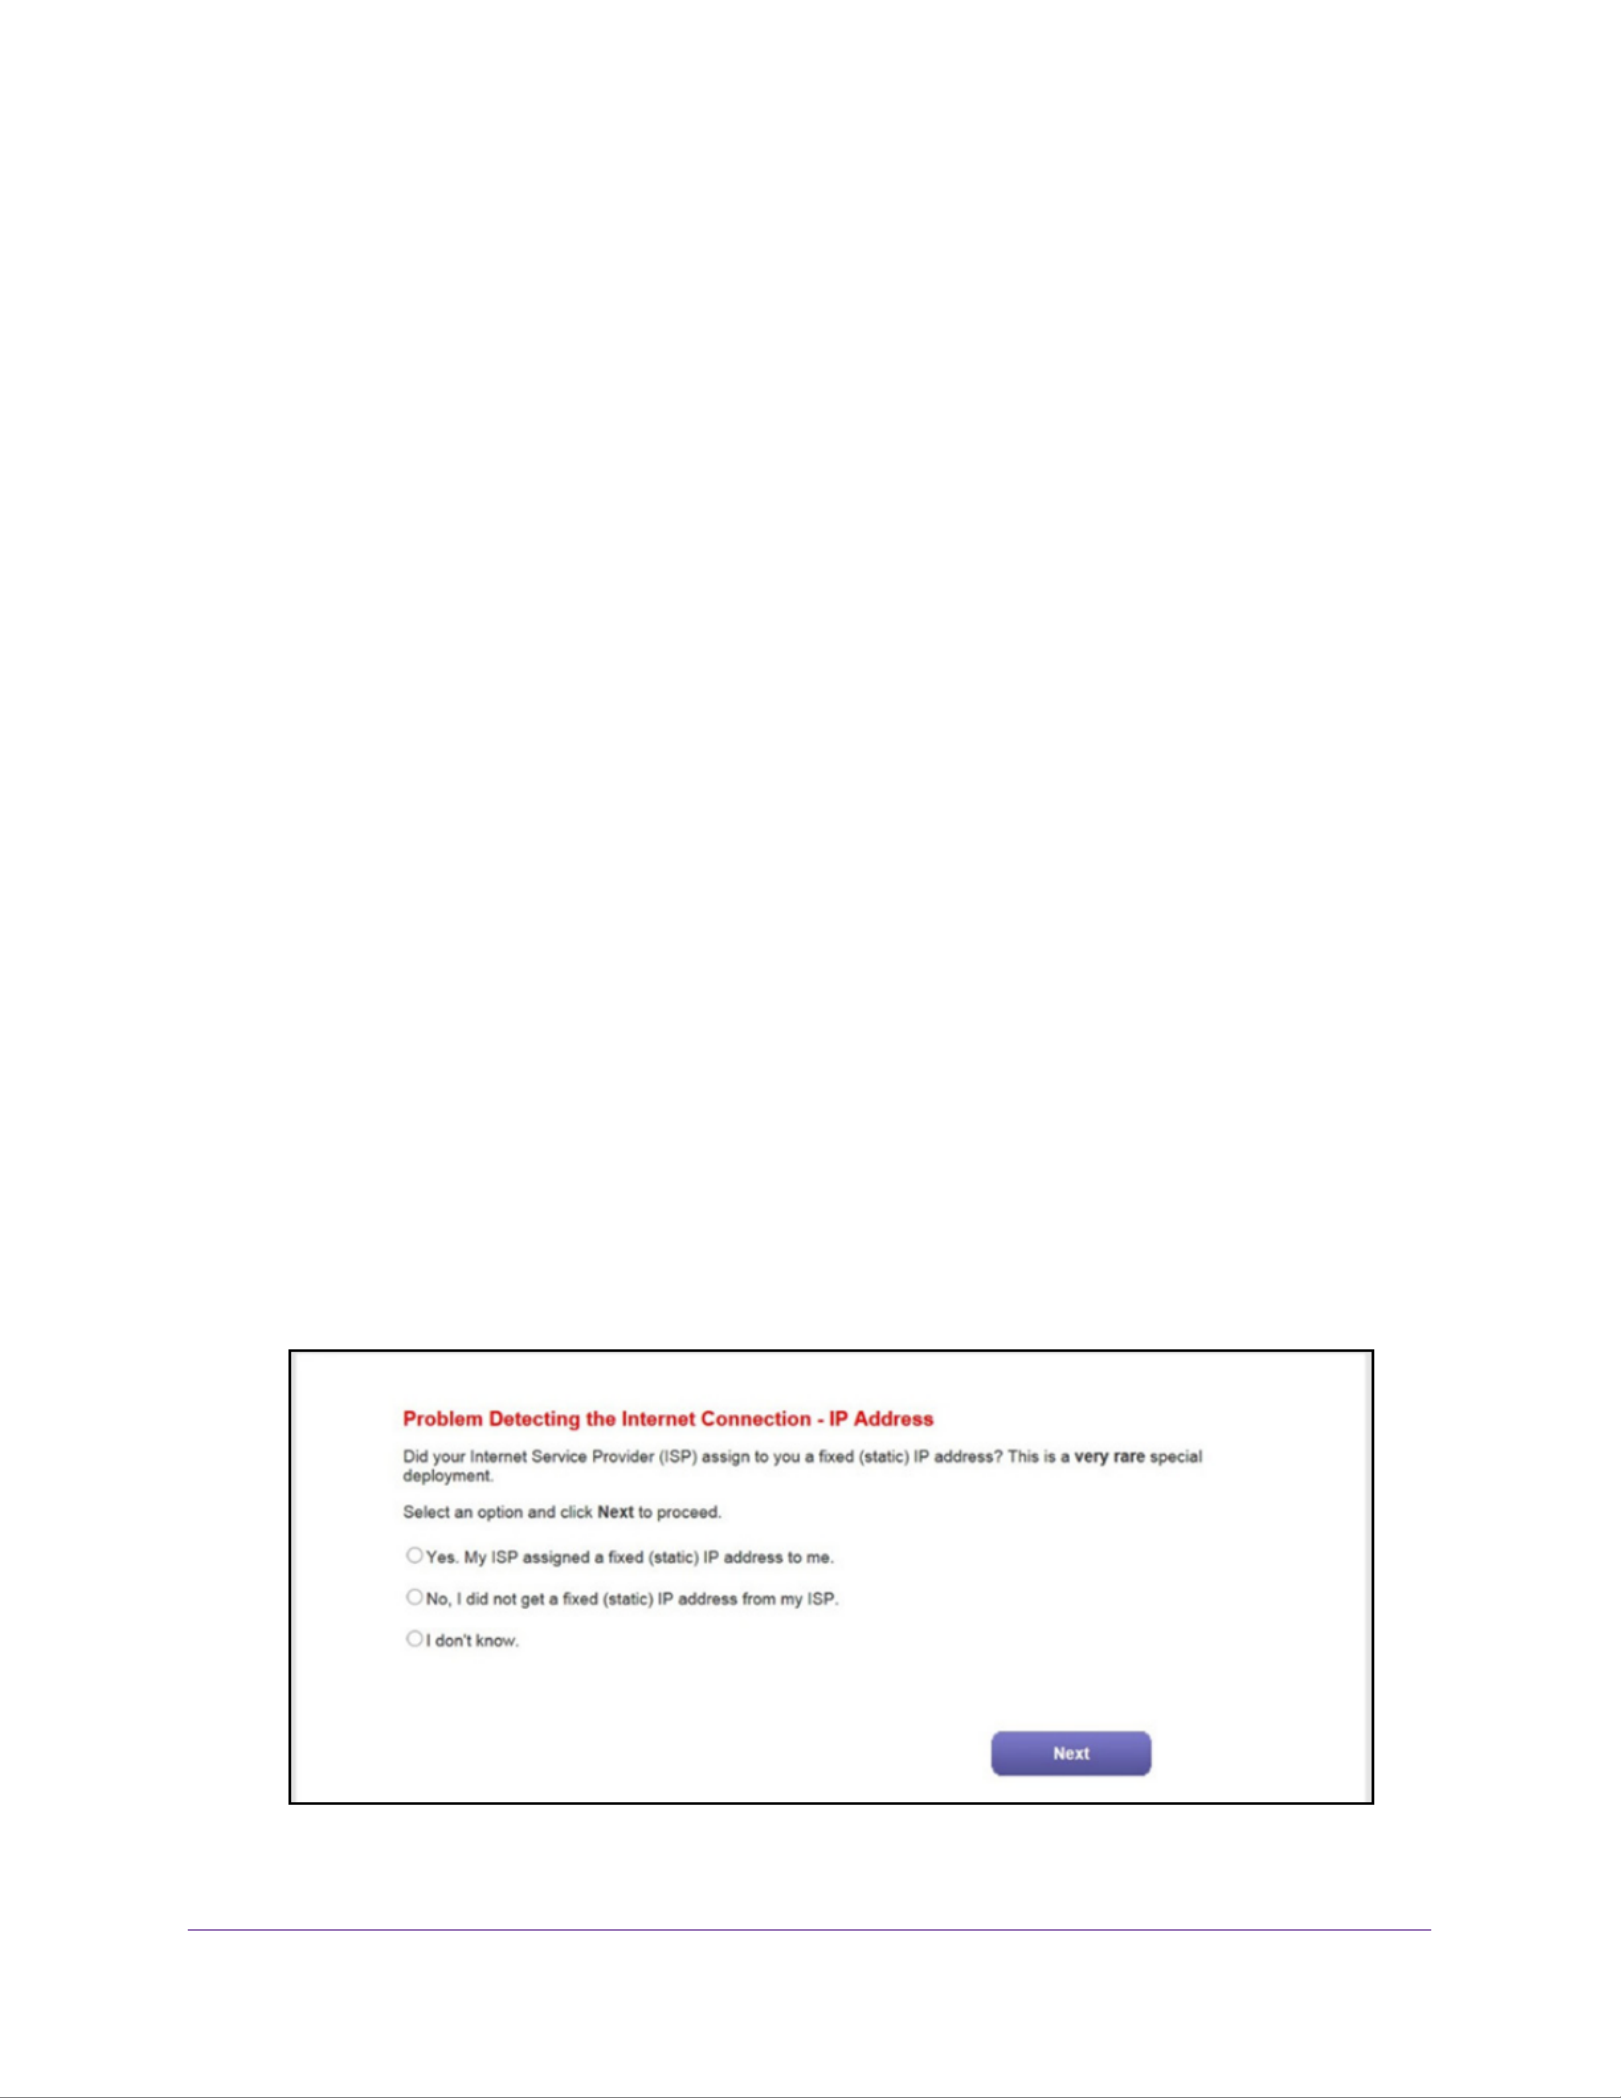
18. (Only if the following screen displays) Specify how to manage problems with the detection of
the IP address for the Internet connection.
The screen that might display states that a problem occurred while detecting the Internet
connection IP address.

Install and Access the Modem Router and Its Network
24
N600 and AC750 WiFi DSL Modem Routers
Take one of the following actions:
•If your ISP assigned you a fixed (static) IP address, do the following:
a. Select the Yes radio button.
b. NextClick the button.
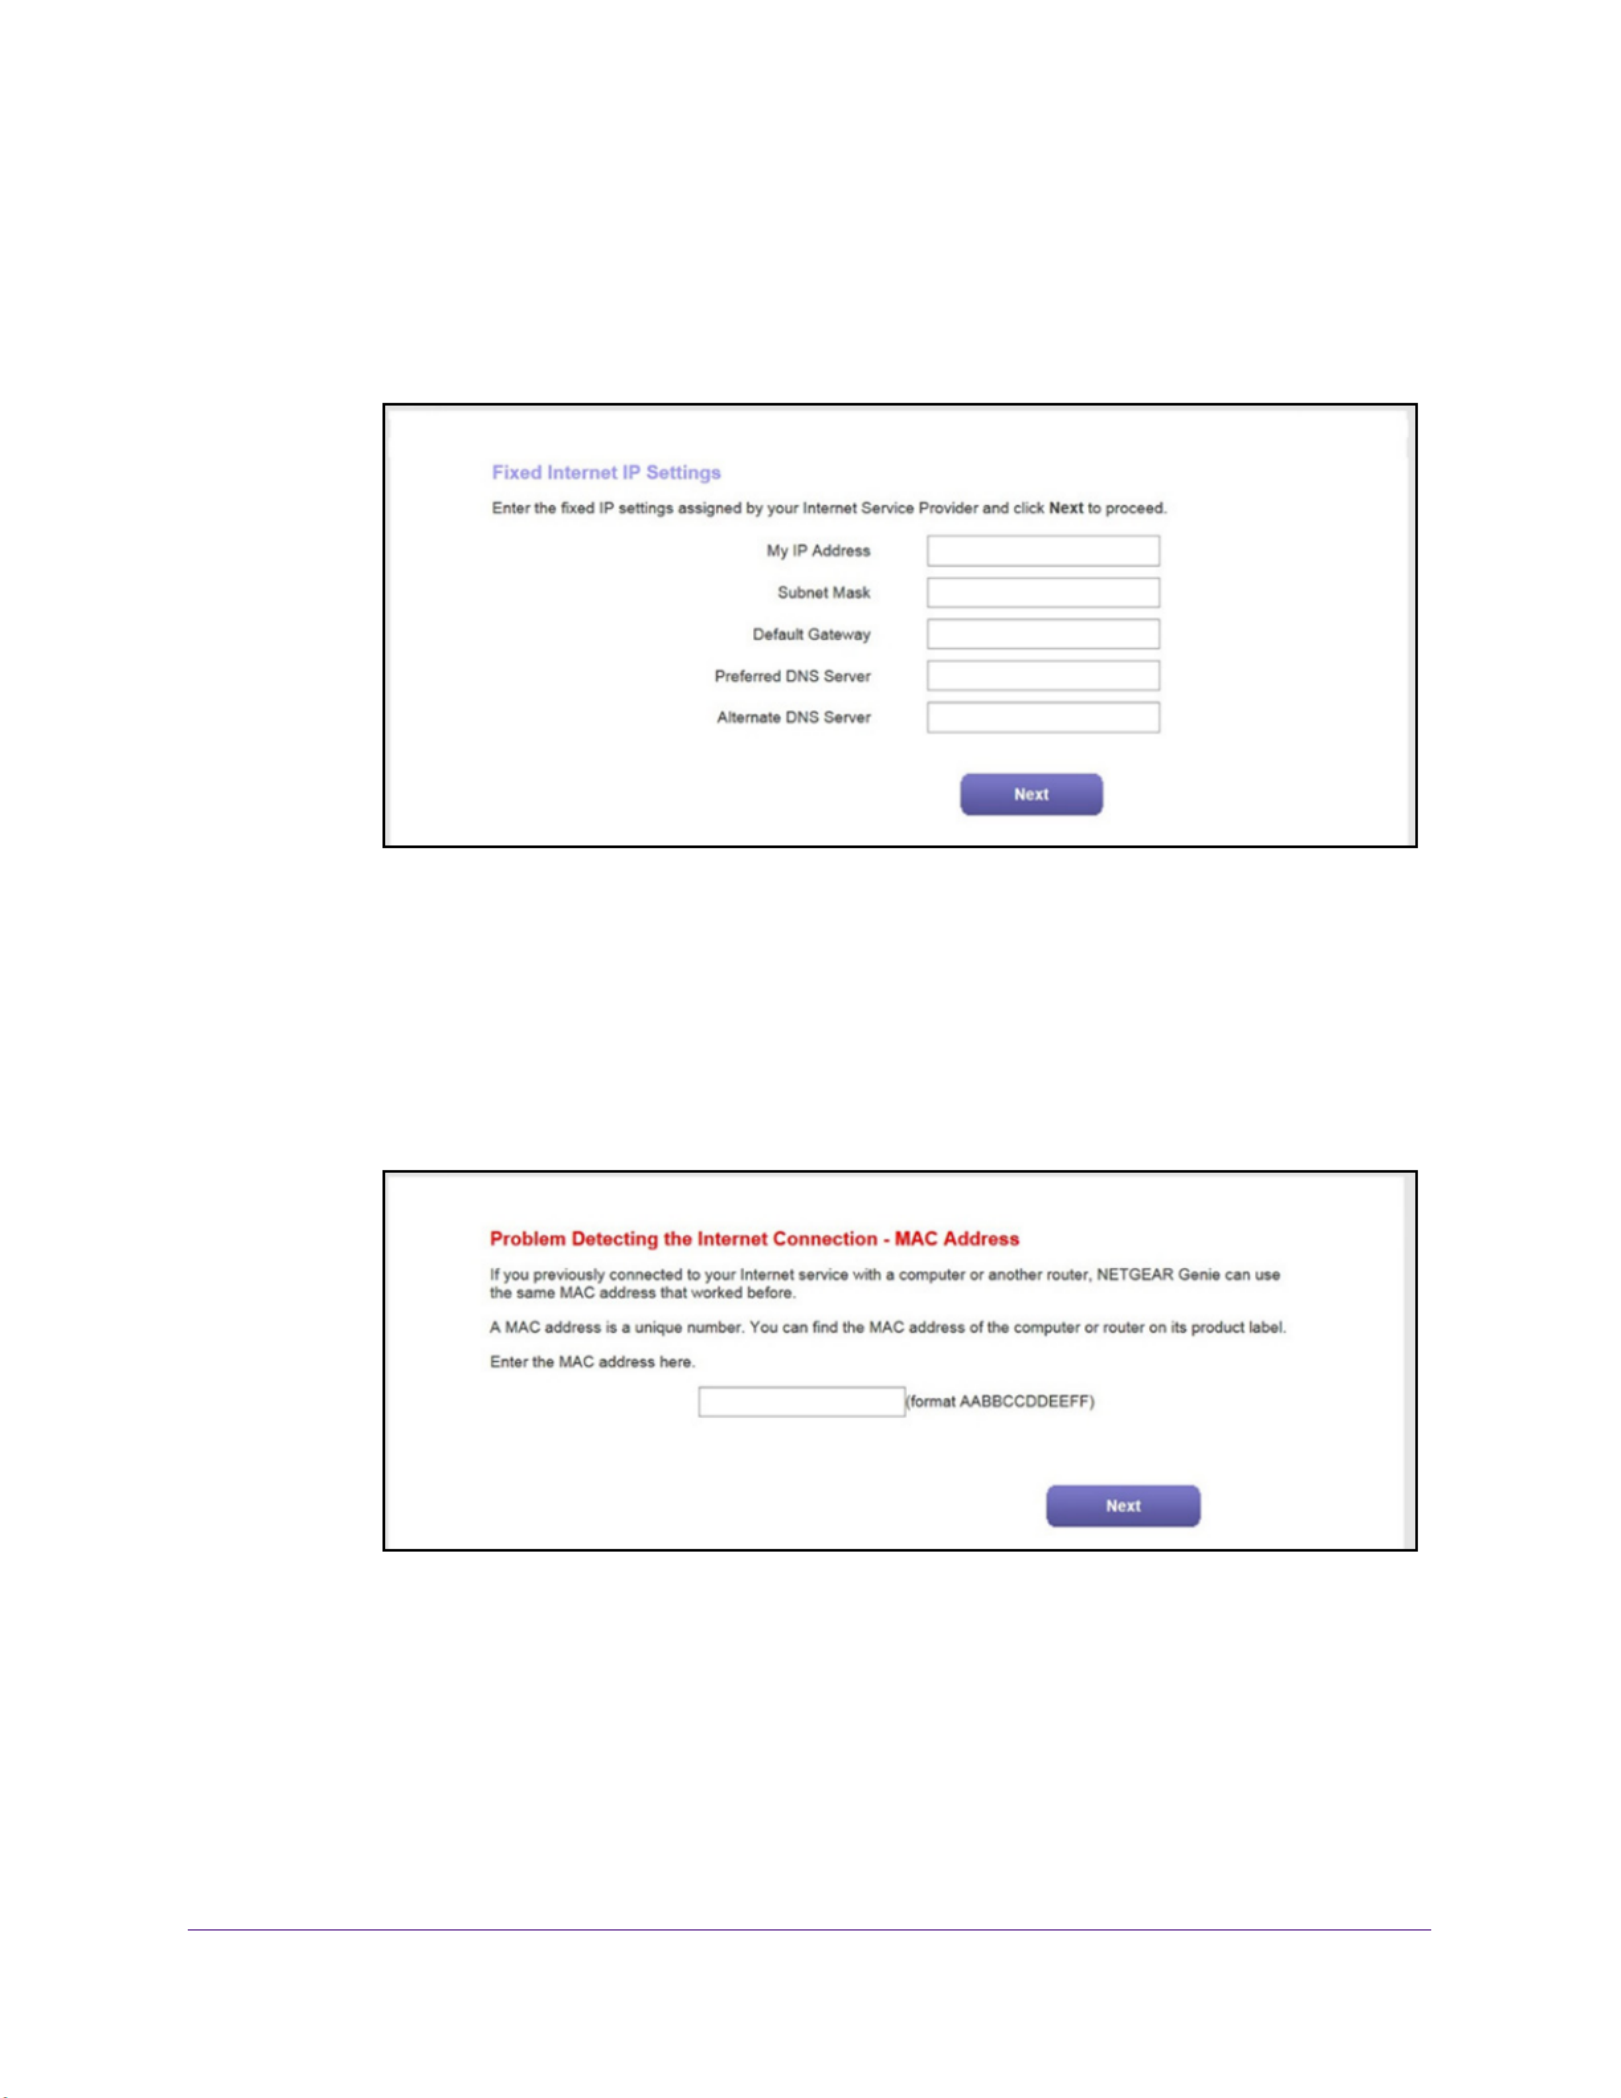
c. Enter the address information that your ISP gave you for your fixed IP address
configuration.
d. NextClick the button.
•If your ISP did not assign you a fixed IP address or you do not know if your ISP
assigned you a fixed IP address, do the following:
a. NoSelect either the or the I don’t know radio button.
b. NextClick the button.

Install and Access the Modem Router and Its Network
25
N600 and AC750 WiFi DSL Modem Routers
c. Enter the MAC address of the computer or router with which you previously were
able to connect to the Internet.
You might find the MAC address on the product label of your device. Enter the
MAC address in the AABBCCDDEEFF format, not in the AA:BB:CC:DD:EE:FF
format.
d. NextClick the button.
19. If the Congratulations! screen still does not display and the modem router still does not
connect to the Internet, do the following:
a. Review all your settings.
Make sure that you selected the correct options and entered everything correctly.
b. Run the Setup Wizard one more time.
c. Contact your ISP to verify that you are using the correct configuration information.
d. Read Troubleshoot the Internet Connection on page 191.
e. If problems persist, register your NETGEAR product and contact NETGEAR
technical support.

Install and Access the Modem Router and Its Network
26
N600 and AC750 WiFi DSL Modem Routers
Set Up Your Modem Router for Cable or Fiber Service
You can install your modem router for cable or fiber (Ethernet WAN) service or for DSL
service. If you use a cable or fiber modem, follow the procedure that is described in this
section. If you use a DSL modem, follow the procedure that is described in Cable the Modem
Router for DSL Service and Access the Modem Router on page 19.
The following figure shows the cabling of your modem router for cable or fiber service.
Figure 8. Modem router cabling for cable or fiber service
To connect your modem router to a cable or fiber service:
1. Unplug your cable or fiber modem’s power, leaving the modem connected to the wall
jack for your Internet service.
2. If your cable of fiber modem includes a battery backup, remove the battery.
3. Use an Ethernet cable to connect the cable or fiber modem t o the yellow LAN4 WAN
Ethernet port on the modem router.
The product package contains a yellow Ethernet cable.
WARNING:
Do not use another yellow Ethernet port for the connection to the
cable or fiber modem. Use the LAN4 WAN port only.
4. If your DSL modem includes a battery backup, reinsert the battery.
5. Plug in your DSL modem’s power and turn on your DSL modem.

Install and Access the Modem Router and Its Network
27
N600 and AC750 WiFi DSL Modem Routers
6. Connect the power adapter to the modem router and plug it into an electrical outlet.
Wait for the Power LED to light solid green, which takes about 80 seconds. (The
Power LED lights solid green for about 20 seconds and then blinks for about one minute
before it lights solid green again.)
7. Connect a computer to the modem router by one of the following methods:
•Ethernet cable. Use an Ethernet cable to connect your computer to the yellow LAN1,
LAN2, or LAN3 Ethernet port on the modem router.
The product package contains a yellow Ethernet cable.
Your computer connects to the modem router’s LAN.
•WiFi. Connect to the default WiFi network of the modem router:
a. On your computer or WiFi device, find and select the WiFi network.
The WiFi network name (SSID) is on the label.product
b. Join the WiFi network and enter the WiFi password.
The password (network key) is on the product label.
Your computer or WiFi device connects to the WiFi network.modem router’s
8. Launch a web browser.
The NETGEAR genie Setup Wizard displays.
If the NETGEAR genie Setup Wizard displays, skip to Step 10. If it does not display, do
the following:
a. In the address field of the web browser, enter www.routerlogin.net.
b. admin passwordWhen prompted, enter for the user name and for the password.
If the Setup Wizard displays, skip to Step 10. If the NETGEAR genie Setup Wizard still
does not display, see Step 9.
Install and Access the Modem Router and Its Network
28
N600 and AC750 WiFi DSL Modem Routers
9. If the browser cannot display the web page, do the following:
•Make sure that the computer is connected to the yellow LAN1, LAN2, or LAN3
Ethernet port or over WiFi to the modem router.
•Make sure that the Power LED of the modem router is lit green.
•Make sure that your browser does not cache the previous page by closing and
reopening the browser.
•Clear the browser cache.
•If the computer is set to a static or fixed IP address (this setting is uncommon), either
change the computer to obtain an IP address automatically from the modem router
through DHCP, or change the IP address of the computer to a static or fixed IP
address in the 192.168.1.2–192.168.1.254 range.
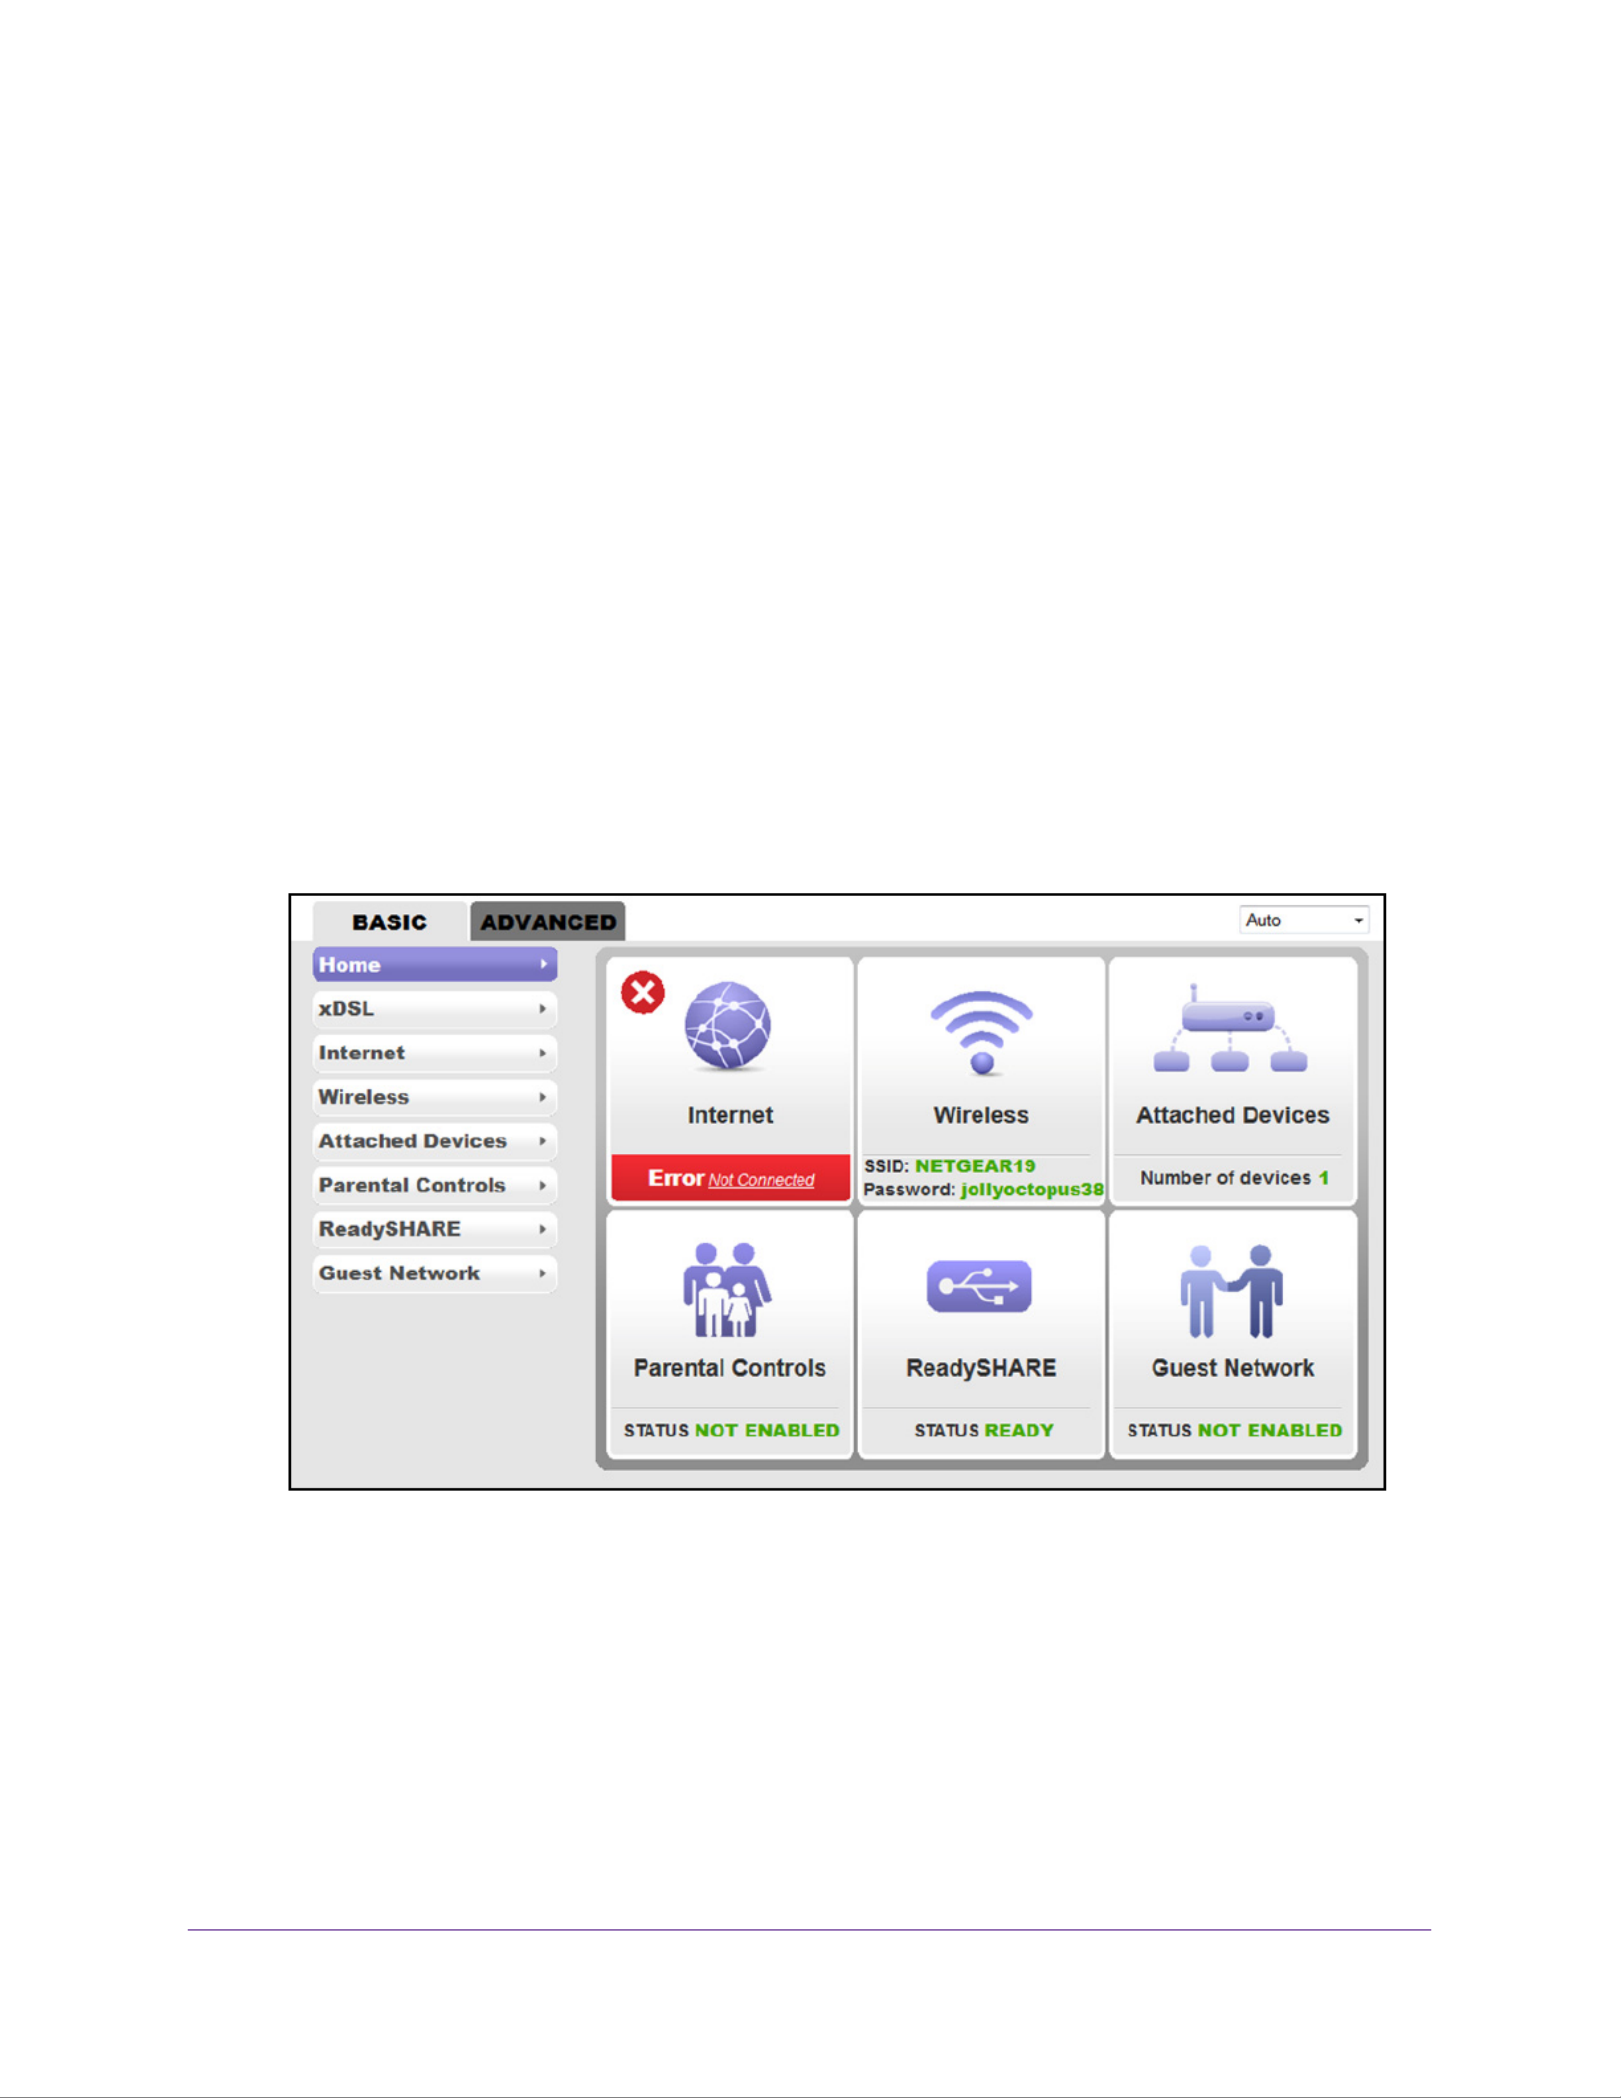
10. On the NETGEAR genie Setup Wizard screen, select the No, I want to configure the
Internet connection myself radio button.
11. Click the Next button.
12. Confirm your selection.
The NETGEAR genie BASIC home screen of the web management interface displays.
Because you are not yet connected to the Internet, the Internet pane displays Error Not
Connected.

Install and Access the Modem Router and Its Network
30
N600 and AC750 WiFi DSL Modem Routers
15. Select ADVANCED > Setup Wizard.
16. Select the Yes radio button.
17. Click the Next button.
The Setup Wizard starts and searches your Internet connection for servers and protocols
to determine your ISP configuration.
If the Internet connection is set up successfully, the Congratulation screen displays. If this
screen does not display , see Step 18.
18. (Only if the following screen displays) Specify how to manage problems with the detection of
the Internet connection.
The screen that might display states that a problem occurred while detecting the Internet
connection. If this screen does not display , continue with the next step.

Install and Access the Modem Router and Its Network
31
N600 and AC750 WiFi DSL Modem Routers
Note: The option for power-cycling the modem router that is stated onscreen
applies to a DSL Internet connection only (see Set Up Your Modem
Router for DSL Service on page 18).
Take one of the following actions:
•If the yellow Ethernet cable is fully inserted in the correct places at the cable or fiber
modem and at the modem router, do the following:
a. Select the None of the above radio button.
b. NextClick the button.
•If the yellow Ethernet cable is not fully inserted or is inserted at a wrong place, do the
following:
a. Fully insert the Ethernet cable in the correct port on the cable or fiber modem
and in the red Internet port on the modem router.
b. Select the I corrected a problem with the Ethernet cable radio button.
c. NextClick the button.
19. (Only if the following screen displays) Specify how to manage problems with the detection of
the IP address for the Internet connection.
The screen that might display states that a problem occurred while detecting the Internet
connection IP address.

Install and Access the Modem Router and Its Network
32
N600 and AC750 WiFi DSL Modem Routers
Take one of the following actions:
•If your ISP assigned you a fixed (static) IP address, do the following:
a. Select the Ye s radio button.
b. NextClick the button.
c. Enter the address information that your ISP gave you for your fixed IP address
configuration.
d. NextClick the button.
•If your ISP did not assign you a fixed IP address or you do not know if your ISP
assigned you a fixed IP address, do the following:
a. NoSelect either the or the I don’t know radio button.
b. NextClick the button.

Install and Access the Modem Router and Its Network
33
N600 and AC750 WiFi DSL Modem Routers
c. Enter the MAC address of the computer or router with which you previously were
able to connect to the Internet.
You might find the MAC address on the product label of your device. Enter the
MAC address in the AABBCCDDEEFF format, not in the AA:BB:CC:DD:EE:FF
format.
d. NextClick the button.
20. If the Congratulations! screen still does not display and the modem router still does not
connect to the Internet, do the following:
a. Review all your settings.
Make sure that you selected the correct options and entered everything correctly.
b. Run the Setup Wizard one more time.
c. Contact your ISP to verify that you are using the correct configuration information.
d. Read Troubleshoot the Internet Connection on page 191.
e. If problems persist, register your NETGEAR product and contact NETGEAR
technical support.
Log In to the Modem Router After Setup to View or
Change Settings
After you set up the modem router for DSL, cable, or fiber service, you can view or change
the settings for the modem router by accessing NETGEAR genie.
To log in to the modem router:
1. Launch an Internet browser from a computer or WiFi device that is connected to the
network.
2. Type http://www.routerlogin.net http://www.routerlogin.comor .
The nature of the login screen that displays depends on your Internet browser.

Install and Access the Modem Router and Its Network
34
N600 and AC750 WiFi DSL Modem Routers
3. Enter the modem router user name and password.
The user name is . admin The default password is . The user name and password
password are case-sensitive.
4. Click the OK button.
The BASIC Home screen displays a dashboard that lets you see the status of your
Internet connection and network at a glance. You can click any of the three sections of
the dashboard to view more detailed information. The left column displays the menus,
and at the top is an ADVANCED tab that you can use to access more menus and
screens.
Change the Language
By default, the language is set as Auto, which means that the modem router detects the
language automatically based on your browser settings. You can change the language.
To change the language:
1. Launch an Internet browser from a computer or WiFi device that is connected to the
network.
2. Type http://www.routerlogin.net.

Install and Access the Modem Router and Its Network
36
N600 and AC750 WiFi DSL Modem Routers
6. Type the old password.
7. Type the new password twice.
8. Click the Apply button.
Your settings are saved.
Let the Modem Router Automatically Update Its Firmware
When you set up your modem router and are connected to the Internet, the modem router
automatically checks for you to see if newer firmware is available. If it is, a message is
displayed at the top of the screen. For information about manually upgrading firmware, see
Manually Upload New Firmware and Update the Modem Router on page 152.
To automatically update the firmware:
1. Launch an Internet browser from a computer or WiFi device that is connected to the
network.
2. Type http://www.routerlogin.net.
A login screen displays.
3. Enter the modem router user name and password.
The user name is . admin The default password is . The user name and password
password are case-sensitive.
4. Click the OK button.
The BASIC Home screen displays.
5. Wait for the modem router to check if newer firmware is available.

Install and Access the Modem Router and Its Network
37
N600 and AC750 WiFi DSL Modem Routers
This process might take a few minutes. If the modem router detects new firmware, the
modem router displays a message at the top of the screen.
6. Click the message.
7. To upgrade the modem router with the latest firmware, click the Yes button.
After the upgrade, the modem router restarts.
WARNING:
To avoid the risk of corrupting the firmware, do not interrupt the
upload. For example, do not close the browser, click a link, or load a
new page. Do not turn off the modem router. Wait until the modem
router finishes restarting and the Power LED turns solid green.
Access the Modem Router with the NETGEAR genie App
The genie app is the easy dashboard for managing, monitoring, and repairing your
home network from a smartphone, tablet, or computer . The genie app can help you with the
following:
•Automatically repair common WiFi network problems.
•Easily manage modem router features such as Live Parental Controls, guest access,
speed test, and more.
•Share and stream music or videos.
To use the genie app to access the modem router:
1. Visit the NETGEAR genie web page at www.NETGEAR.com/genie.
2. Follow the onscreen instructions to install the app on your smartphone, tablet, or computer .
3. Launch the genie app.
The genie app dashboard screen displays. The following figure shows the genie app
dashboard for a PC.

38
3
3. Manage the Internet Settings
Manually
This chapter describes how you can manage the Internet settings of the modem router manually.
Usually, the quickest way to set up the modem router is to allow the NETGEAR genie Setup
Wizard to detect the Internet connection when you first access the modem router with an Internet
browser. For a cable of fiber service, you can use the Setup Wizard to detect the Internet
connection. These options are described in Chapter 2, Install and Access the Modem Router
and Its Network. You can also customize or specify your Internet settings manually.
The chapter contains the following sections:
• Use the Setup Wizard After Initial Setup
• Manually Set Up the Internet Connection
• Manage the MTU Size

Manage the Internet Settings Manually
39
N600 and AC750 WiFi DSL Modem Routers
Use the Setup Wizard After Initial Setup
Whether you use DSL, cable, or fiber service, you can use the Setup Wizard to detect your
Internet settings and automatically set up your modem router. If you use cable or fiber
service, the default connection method must be Ethernet WAN for you to be able to use the
Setup Wizard successfully. For more information about the default connection method, see
Change the Type of Physical WAN Connection on page 133.
To use the Setup Wizard:
1. Launch an Internet browser from a computer or WiFi device that is connected to the
network.
2. Type http://www.routerlogin.net.
A login screen displays.
3. Enter the modem router user name and password.
The user name is . admin The default password is . The user name and password
password are case-sensitive.
4. Click the OK button.
The BASIC Home screen displays.
5. Select ADV ANCED > Setup Wizard.
The screen that displays depends on whether the type of Internet connection is DSL,
cable, or fiber:
•DSL connection.
For a DSL connection, configure the following settings, which do not display for a
cable or fiber connection:
a. CountryFrom the menu, select the country in which the modem router operates.
b. ISPFrom the menu, select the DSL service provider .
c. Go to Step 6.

Manage the Internet Settings Manually
40
N600 and AC750 WiFi DSL Modem Routers
•Cable of fiber connection.
6. Select the Yes radio button.
If you select the radio button, you are taken to the Internet Setup screen (see No
Manually Set Up the Internet Connection on page 44).
7. Click the Next button.
The Setup Wizard searches your Internet connection for servers and protocols to
determine your ISP configuration.
When the modem router is connected to the Internet, the Congratulations! screen
displays, and you successfully completed the setup process.
If the Congratulations! screen does not display, other screens might display and you
might need to provide more information, in which case you must continue with the next
step. The screens that display depend on your type of ISP connection and configuration.

Manage the Internet Settings Manually
41
N600 and AC750 WiFi DSL Modem Routers
8. (Only if the following screen displays) Specify a full scan to let the Setup Wizard find the
PVC protocol.
The screen that might display asks you if you need the Setup Wizard to do a full scan to
find the PVC protocol. If this screen does not display , continue with the next step.
Do the following:
a. Select the Ye s radio button.
b. NextClick the button.
The Setup Wizard performs a full scan, which might take up to six minutes.
9. (Only if the following screen displays) Specify how to manage problems with the detection of
the Internet connection.
The screen that might display states that a problem occurred while detecting the Internet
connection. If this screen does not display , continue with the next step.
Manage the Internet Settings Manually
42
N600 and AC750 WiFi DSL Modem Routers
Take one of the following actions:
•If your setup includes a DSL modem, power-cycle the DSL modem:
a. Unplug your DSL modem’ s power, leaving the DSL modem connected to the wall
jack for your Internet service.
b. If your DSL modem includes a battery backup, remove the battery .
c. Wait 10 seconds.
d. If your DSL modem includes a battery backup, reinsert the battery .
e. Plug in your DSL modem’ s power and turn on your DSL modem.
f. Wait two minutes.
g. Select the I just power cycled the modem and waited for 2 minutes radio
button.
h. NextClick the button.
•If your setup includes a cable or fiber modem, see if the yellow Ethernet cable is not
fully inserted or is inserted at the wrong place. If necessary, do the following:
a. Fully insert the Ethernet cable in the correct port on the cable or fiber modem
and in the red Internet port on the modem router.
b. Select the I corrected a problem with the Ethernet cable radio button.
c. NextClick the button.
•If you do not need to power-cycle the DSL modem or the Ethernet cable is already
fully inserted in the correct ports, do the following:
a. Select the None of the above radio button.
b. NextClick the button.
10. (Only if the following screen displays) Specify how to manage problems with the detection of
the IP address for the Internet connection.
The screen that might display states that a problem occurred while detecting the Internet
connection IP address.
Manage the Internet Settings Manually
43
N600 and AC750 WiFi DSL Modem Routers
Take one of the following actions:
•If your ISP assigned you a fixed (static) IP address, do the following:
a. Select the Ye s radio button.
b. NextClick the button.
c. Enter the address information that your ISP gave you for your fixed IP address
configuration.
d. NextClick the button.
•If your ISP did not assign you a fixed IP address or you do not know if your ISP
assigned you a fixed IP address, do the following:
a. NoSelect either the or the I don’t know radio button.
b. NextClick the button.
c. Enter the MAC address of the computer or router with which you previously were
able to connect to the Internet.
You might find the MAC address on the product label of your device. Enter the
MAC address in the AABBCCDDEEFF format, not in the AA:BB:CC:DD:EE:FF
format.
d. NextClick the button.

Manage the Internet Settings Manually
44
N600 and AC750 WiFi DSL Modem Routers
11. If the Congratulations! screen still does not display and the modem router still does not
connect to the Internet, do the following:
a. Review all your settings.
Make sure that you selected the correct options and entered everything correctly.
b. Run the Setup Wizard one more time.
c. Contact your ISP to verify that you are using the correct configuration information.
d. Read Troubleshoot the Internet Connection on page 191.
e. If problems persist, register your NETGEAR product and contact NETGEAR
technical support.
Manually Set Up the Internet Connection
You can view or change the modem router’s Internet connection settings manually. The
following sections describe the options to manually set up the Internet connection:
•Specify an Internet Connection Without a Login on page 44
•Specify an Internet Connection That Uses a Login and PPPoE Service on page 47
•Specify an Internet Connection That Uses a Login and PPPoA Service on page 50
Specify an Internet Connection Without a Login
If you want to manually configure the Internet connection settings, use the information that
your ISP gave you to log in to your Internet service. If you cannot find this information, contact
your ISP.
To view or specify the Internet connection settings without a login:
1. Launch an Internet browser from a computer or WiFi device that is connected to the
network.
2. Type http://www.routerlogin.net.
A login screen displays.
3. Enter the modem router user name and password.
The user name is . The default password is . The user name and admin password
password are case-sensitive.
4. Click the OK button.
The BASIC Home screen displays.
5. Select Internet.
The Internet Setup screen displays.
6. In the Does your Internet connection require a login? section, select the No radio button.

Manage the Internet Settings Manually
45
N600 and AC750 WiFi DSL Modem Routers
7. Enter the settings as described in the following table.
Field Description
Account Name (If Required) Enter the account name provided by your ISP. This name might also be
called the host name. If you do not know the account name, leave this field
blank.
By default, the Account Name field contains the model number of the
modem router.
Domain Name (If Required) Enter the domain name provided by your ISP. If you do not know the
domain name, leave this field blank.
Internet IP Address
Get Dynamically from ISP Your ISP uses DHCP to assign your IP address. Your ISP automatically
assigns these addresses.

Manage the Internet Settings Manually
48
N600 and AC750 WiFi DSL Modem Routers
7. From the Encapsulation menu, select PPPoE (PPP over Ethernet).
8. Enter the settings as described in the following table.
Field Description
Login Enter the login name that your ISP gave you. This login name is often an
email address.
Password Enter the password that you use to log in to your Internet service.
Service Name (If Required) Enter the service name that your ISP gave you. Often, a service name is
not required.
Connection Mode From the menu, selectConnection Mode Always On, , Dial on Demand
or .Manually Connect
Especificaciones del producto
| Marca: | Netgear |
| Categoría: | Enrutador |
| Modelo: | D3600 |
| Color del producto: | Black, Grey |
| Peso.: | 6900 g |
| Ancho: | 318 mm |
| Profundidad: | 290 mm |
| Altura: | 288 mm |
| Manual de usuario: | Ja |
| Frecuencia del adaptador de CA: | 50 - 60 Hz |
| Voltaje de entrada del adaptador de CA: | 110 - 240 V |
| Formato de audio soportado: | MP3 |
| Tipo de fuente de energía: | AC |
| Tarjetas de memoria compatibles: | SD |
| Incluye adaptador de CA: | Ja |
| Número de puertos USB 2.0: | 1 |
| Altavoces incorporados: | Ja |
| Energía promedio: | 4 W |
| Número de altavoces incorporados: | 2 |
| Salidas de auriculares: | 1 |
| Número: | 1 |
| tipo de dispositivo: | Persoonlijke cd-speler |
| Reproducir MP3: | Ja |
| Formatos de disco de reproducción: | Cd-audio |
| Entrada auxiliar: | Ja |
| Bandas de frecuencia soportadas: | DAB+, FM |
| Platina de casete: | Ja |
| Mando a distancia incluido: | Ja |
| Sintonizador digital: | Ja |
| Cambiador de CD: | Nee |
| Número de cubiertas: | 2 deck(s) |
¿Necesitas ayuda?
Si necesitas ayuda con Netgear D3600 haz una pregunta a continuación y otros usuarios te responderán
Enrutador Netgear Manuales

27 Octubre 2024
15 Octubre 2024
11 Octubre 2024
10 Octubre 2024
8 Octubre 2024
3 Octubre 2024
28 Septiembre 2024
19 Septiembre 2024
19 Septiembre 2024
18 Septiembre 2024
Enrutador Manuales
- Enrutador Samsung
- Enrutador Huawei
- Enrutador HP
- Enrutador DeWalt
- Enrutador Motorola
- Enrutador Nokia
- Enrutador Siemens
- Enrutador Topcom
- Enrutador Alcatel
- Enrutador Allnet
- Enrutador Alfa
- Enrutador Allied Telesis
- Enrutador Apple
- Enrutador Airlive
- Enrutador Anker
- Enrutador Silverline
- Enrutador Edimax
- Enrutador Strong
- Enrutador Hikvision
- Enrutador Arris
- Enrutador BenQ
- Enrutador Makita
- Enrutador Hitachi
- Enrutador Thomson
- Enrutador Gembird
- Enrutador Black And Decker
- Enrutador Asus
- Enrutador Eminent
- Enrutador Renkforce
- Enrutador Vivanco
- Enrutador Sitecom
- Enrutador Metabo
- Enrutador TP Link
- Enrutador Manhattan
- Enrutador Ezviz
- Enrutador Black Box
- Enrutador Trust
- Enrutador Hikoki
- Enrutador Sagem
- Enrutador Roland
- Enrutador ZTE
- Enrutador Nilox
- Enrutador Einhell
- Enrutador Hama
- Enrutador AVM
- Enrutador TCL
- Enrutador Gigabyte
- Enrutador Techly
- Enrutador Totolink
- Enrutador Cisco
- Enrutador Engenius
- Enrutador KPN
- Enrutador Netis
- Enrutador Digitus
- Enrutador Draytek
- Enrutador Belkin
- Enrutador Devolo
- Enrutador Linksys
- Enrutador Barco
- Enrutador Buffalo
- Enrutador Powerplus
- Enrutador Porter-Cable
- Enrutador Dahua Technology
- Enrutador Cotech
- Enrutador Nest
- Enrutador LevelOne
- Enrutador BT
- Enrutador Vodafone
- Enrutador ICIDU
- Enrutador Mercusys
- Enrutador Milan
- Enrutador Planet
- Enrutador ZyXEL
- Enrutador Western Digital
- Enrutador Clas Ohlson
- Enrutador Konig
- Enrutador Sweex
- Enrutador MSI
- Enrutador Foscam
- Enrutador Zebra
- Enrutador D-Link
- Enrutador Aruba
- Enrutador Tenda
- Enrutador Phicomm
- Enrutador Teltonika
- Enrutador Ubiquiti Networks
- Enrutador Zoom
- Enrutador Kasda
- Enrutador Thrustmaster
- Enrutador Jung
- Enrutador Technicolor
- Enrutador Synology
- Enrutador Trendnet
- Enrutador Mikrotik
- Enrutador ATen
- Enrutador Digi
- Enrutador Verizon
- Enrutador Billion
- Enrutador T-Mobile
- Enrutador Conceptronic
- Enrutador RGBlink
- Enrutador Gefen
- Enrutador RAVPower
- Enrutador Hawking Technologies
- Enrutador Kopul
- Enrutador Nexxt
- Enrutador Beafon
- Enrutador Zolid
- Enrutador Sagemcom
- Enrutador Toolcraft
- Enrutador Telstra
- Enrutador SPL
- Enrutador Logilink
- Enrutador Moxa
- Enrutador Smart-AVI
- Enrutador StarTech.com
- Enrutador Holzmann
- Enrutador SIIG
- Enrutador Eero
- Enrutador Advantech
- Enrutador IOGEAR
- Enrutador Hercules
- Enrutador Xantech
- Enrutador KanexPro
- Enrutador Intelix
- Enrutador Blustream
- Enrutador Intellinet
- Enrutador Lancom
- Enrutador Digiconnect
- Enrutador Ubee
- Enrutador SMC
- Enrutador Tele 2
- Enrutador Kogan
- Enrutador Ocean Matrix
- Enrutador Peak
- Enrutador CradlePoint
- Enrutador Davolink
- Enrutador Sixnet
- Enrutador ModeCom
- Enrutador Kramer
- Enrutador 7inova
- Enrutador Media-tech
- Enrutador AVPro Edge
- Enrutador Cudy
- Enrutador Lindy
- Enrutador F-Secure
- Enrutador Rosewill
- Enrutador Digicom
- Enrutador Sabrent
- Enrutador On Networks
- Enrutador Atlona
- Enrutador AVMATRIX
- Enrutador PENTAGRAM
- Enrutador Leoxsys
- Enrutador Readynet
- Enrutador OneAccess
- Enrutador Accelerated
- Enrutador Nexaira
- Enrutador FSR
- Enrutador Hamlet
- Enrutador Approx
- Enrutador T-com
- Enrutador Alfatron
- Enrutador Amped Wireless
- Enrutador Key Digital
- Enrutador Cambium Networks
- Enrutador 3Com
- Enrutador I-Tec
- Enrutador Avenview
- Enrutador BZBGear
- Enrutador WyreStorm
- Enrutador Ruckus Wireless
- Enrutador Dovado
- Enrutador Mach Power
- Enrutador MuxLab
- Enrutador EXSYS
- Enrutador NetComm
- Enrutador Juniper
- Enrutador Comtrend
- Enrutador Premiertek
- Enrutador GL.iNet
- Enrutador A-NeuVideo
- Enrutador Shinybow
- Enrutador Edgewater
- Enrutador Atlantis Land
- Enrutador Lantronix
- Enrutador Lumantek
- Enrutador Keenetic
- Enrutador Starlink
- Enrutador Keewifi
- Enrutador Milesight
- Enrutador PulseAudio
- Enrutador United Telecom
- Enrutador Predator
- Enrutador Comprehensive
- Enrutador Digitalinx
- Enrutador Luxul
- Enrutador Silentwind
- Enrutador Keezel
- Enrutador Wisetiger
Últimos Enrutador Manuales
27 Octubre 2024
27 Octubre 2024
26 Octubre 2024
24 Octubre 2024
20 Octubre 2024
19 Octubre 2024
19 Octubre 2024
18 Octubre 2024
18 Octubre 2024
18 Octubre 2024