Pioneer HTZ-830DV Manual de Usario
Pioneer
Sistema de casa
HTZ-830DV
Lee a continuación 📖 el manual en español para Pioneer HTZ-830DV (197 páginas) en la categoría Sistema de casa. Esta guía fue útil para 20 personas y fue valorada con 4.5 estrellas en promedio por 2 usuarios
Página 1/197


READ INSTRUCTIONS — All the safety and
operating instructions should be read before
the product is operated.
RETAIN INSTRUCTIONS — The safety and
operating instructions should be retained for
future reference.
HEED WARNINGS — All warnings on the
product and in the operating instructions should
be adhered to.
FOLLOW INSTRUCTIONS — All operating and
use instructions should be followed.
CLEANING — Unplug this product from the wall
outlet before cleaning. The product should be
cleaned only with a polishing cloth or a soft dry
cloth. Never clean with furniture wax, benzine,
insecticides or other volatile liquids since they
may corrode the cabinet.
ATTACHMENTS — Do not use attachments not
recommended by the product manufacturer as
they may cause hazards.
WATER AND MOISTURE — Do not use this
product near water Ñ for example, near a
bathtub, wash bowl, kitchen sink, or laundry
tub; in a wet basement; or near a swimming
pool; and the like.
ACCESSORIES — Do not place this product on
an unstable cart, stand, tripod, bracket, or table.
The product may fall, causing serious injury to a
child or adult, and serious damage to the
product. Use only with a cart, stand, tripod,
bracket, or table recommended by the
manufacturer, or sold with the product. Any
mounting of the product should follow the
manufacturerÕs instructions, and should use a
mounting accessory recommended by the
manufacturer.
CART — A product and cart
combination should be moved with
care. Quick stops, excessive force,
and uneven surfaces may cause the
product and cart combination to
overturn.
VENTILATION — Slots and openings in the
cabinet are provided for ventilation and to
ensure reliable operation of the product and to
protect it from overheating, and these openings
must not be blocked or covered. The openings
should never be blocked by placing the product
on a bed, sofa, rug, or other similar surface.
This product should not be placed in a built-in
installation such as a bookcase or rack unless
proper ventilation is provided or the
manufacturerÕs instructions have been adhered
to.
POWER SOURCES — This product should be
operated only from the type of power source
indicated on the marking label. If you are not
sure of the type of power supply to your home,
consult your product dealer or local power
company.
LOCATION – The appliance should be installed
in a stable location.
NONUSE PERIODS – The power cord of the
appliance should be unplugged from the outlet
when left unused for a long period of time.
GROUNDING OR POLARIZATION
•If this product is equipped with a polarized
alternating current line plug (a plug having one
blade wider than the other), it will fit into the
outlet only one way. This is a safety feature. If
you are unable to insert the plug fully into the
outlet, try reversing the plug. If the plug should
still fail to fit, contact your electrician to replace
your obsolete outlet. Do not defeat the safety
purpose of the polarized plug.
•If this product is equipped with a three-wire
grounding type plug, a plug having a third
(grounding) pin, it will only fit into a grounding
type power outlet. This is a safety feature. If
you are unable to insert the plug into the outlet,
contact your electrician to replace your
obsolete outlet. Do not defeat the safety
purpose of the grounding type plug.
IMPORTANT SAFETY INSTRUCTIONS
The lightning flash with arrowhead
symbol, within an equilateral
triangle, is intended to alert the
user to the presence of uninsulated
Òdangerous voltageÓ within the
product's enclosure that may be of
sufficient magnitude to constitute
a risk of electric shock to persons.
IMPORTANT
CAUTION:
TO PREVENT THE RISK OF ELECTRIC
SHOCK, DO NOT REMOVE COVER
(OR BACK). NO USER-SERVICEABLE
PARTS INSIDE. REFER SERVICING
TO QUALIFIED SERVICE
PERSONNEL.
The exclamation point within an
equilateral triangle is intended to
alert the user to the presence of
important operating and
maintenance (servicing)
instructions in the literature
accompanying the appliance.
H002_En
RISK OF ELECTRIC SHOCK
DO NOT OPEN
CAUTION
Location: underside of the unit
HTS.book Page 2 Monday, June 2, 2003 2:28 PM

POWER-CORD PROTECTION — Power-supply
cords should be routed so that they are not
likely to be walked on or pinched by items
placed upon or against them, paying particular
attention to cords at plugs, convenience
receptacles, and the point where they exit from
the product.
OUTDOOR ANTENNA GROUNDING — If an
outside antenna or cable system is connected
to the product, be sure the antenna or cable
system is grounded so as to provide some
protection against voltage surges and built-up
static charges. Article 810 of the National
Electrical Code, ANSI/NFPA 70, provides
information with regard to proper grounding of
the mast and supporting structure, grounding
of the lead-in wire to an antenna discharge unit,
size of grounding conductors, location of
antenna-discharge unit, connection to
grounding electrodes, and requirements for the
grounding electrode. See Figure A.
LIGHTNING — For added protection for this
product during a lightning storm, or when it is
left unattended and unused for long periods of
time, unplug it from the wall outlet and
disconnect the antenna or cable system. This
will prevent damage to the product due to
lightning and power-line surges.
POWER LINES — An outside antenna system
should not be located in the vicinity of
overhead power lines or other electric light or
power circuits, or where it can fall into such
power lines or circuits. When installing an
outside antenna system, extreme care should
be taken to keep from touching such power
lines or circuits as contact with them might be
fatal.
OVERLOADING — Do not overload wall outlets,
extension cords, or integral convenience
receptacles as this can result in a risk of fire or
electric shock.
OBJECT AND LIQUID ENTRY — Never push
objects of any kind into this product through
openings as they may touch dangerous voltage
points or short-out parts that could result in a
fire or electric shock. Never spill liquid of any
kind on the product.
SERVICING — Do not attempt to service this
product yourself as opening or removing covers
may expose you to dangerous voltage or other
hazards. Refer all servicing to qualified service
personnel.
[For U.S. model]
IMPORTANT NOTICE
H006A_En
WARNING: TO PREVENT FIRE OR SHOCK
HAZARD, DO NOT EXPOSE THIS APPLIANCE
TO RAIN OR MOISTURE.
NOTE: THE NO USER-SERVICEABLE PARTS
COMPARTMENT WARNING IS LOCATED ON
THE APPLIANCE BOTTOM.
H001_En
DAMAGE REQUIRING SERVICE — Unplug this
product from the wall outlet and refer servicing
to qualified service personnel under the
following conditions:
• When the power-supply cord or plug is
damaged.
• If liquid has been spilled, or objects have fallen
into the product.
• If the product has been exposed to rain or
water.
• If the product does not operate normally by
following the operating instructions. Adjust only
those controls that are covered by the
operating instructions as an improper
adjustment of other controls may result in
damage and will often require extensive work
by a qualified technician to restore the product
to its normal operation.
• If the product has been dropped or damaged in
any way.
• When the product exhibits a distinct change in
performance — this indicates a need for
service.
REPLACEMENT PARTS — When replacement
parts are required, be sure the service
technician has used replacement parts
specified by the manufacturer or have the
same characteristics as the original part.
Unauthorized substitutions may result in fire,
electric shock, or other hazards.
SAFETY CHECK — Upon completion of any
service or repairs to this product, ask the
service technician to perform safety checks to
determine that the product is in proper
operating condition.
WALL OR CEILING MOUNTING — The product
should not be mounted to a wall or ceiling.
HEAT — The product should be situated away
from heat sources such as radiators, heat
registers, stoves, or other products (including
amplifiers) that produce heat.
POWER SERVICE GROUNDING
ELECTRODE SYSTEM
(NEC ART 250, PART H)
GROUND CLAMPS
GROUNDING CONDUCTORS
(NEC SECTION 810-21)
ANTENNA
DISCHARGE UNIT
(NEC SECTION 810-20)
GROUND
CLAMP
Fig. A
NEC — NATIONAL ELECTRICAL CODE
ANTENNA
LEAD IN WIRE
ELECTRIC
SERVICE
EQUIPMENT
The serial number for this equipment is located
on the bottom (DVD/CD Tuner) / Rear panel
(Powered Subwoofer). Please write this serial
number on your enclosed warranty card and
keep it in a secure area. This is for your security.
HTS.book Page 3 Monday, June 2, 2003 2:28 PM
[For Canadian model]
This Class B digital apparatus complies with
Canadian ICES-003.
[Pour le modèle Canadien]
Cet appareil numérique de la classe B est
conforme à la norme NMB-003 du Canada.
H009_2L
NOTE: This equipment has been tested and
found to comply with the limits for a Class B
digital device, pursuant to Part 15 of the FCC
Rules. These limits are designed to provide
reasonable protection against harmful
interference in a residential installation. This
equipment generates, uses, and can radiate
radio frequency energy and, if not installed
and used in accordance with the instructions,
may cause harmful interference to radio
communications. However, there is no
guarantee that interference will not occur in a
particular installation. If this equipment does
cause harmful interference to radio or
television reception, which can be determined
by turning the equipment off and on, the user
is encouraged to try to correct the interference
by one or more of the following measures:
– Reorient or relocate the receiving antenna.
– Increase the separation between the
equipment and receiver.
– Connect the equipment into an outlet on a
circuit different from that to which the
receiver is connected.
– Consult the dealer or an experienced radio/
TV technician for help. H010_En
Information to User
Alteration or modifications carried out without
appropriate authorization may invalidate the
user's right to operate the equipment. H011_En
[For Canadian model]
CAUTION: TO PREVENT ELECTRIC SHOCK, DO
NOT USE THIS (POLARIZED) PLUG WITH AN
EXTENSION CORD, RECEPTACLE OR OTHER
OUTLET UNLESS THE BLADES CAN BE FULLY
INSERTED TO PREVENT BLADE EXPOSURE.
ATTENTION: POUR PREVENIR LES CHOCS
ELECTRIQUES NE PAS UTILISER CETTE FICHE
POLARISEE AVEC UN PROLONGATEUR UNE
PRISE DE COURANT OU UNE AUTRE SORTIE
DE COURANT, SAUF SI LES LAMES PEUVENT
ETRE INSEREES A FOND SANS EN LAISSER
AUCUNE PARTIE A DECOUVERT. H007A_2L
This product incorporates copyright protection
technology that is protected by method claims
of certain U.S. patents and other intellectual
property rights owned by Macrovision
Corporation and other rights owners. Use of
this copyright protection technology must be
authorized by Macrovision Corporation, and is
intended for home and other limited viewing
uses only unless otherwise authorized by
Macrovision Corporation. Reverse engineering
or disassembly is prohibited.
CAUTION
• Use of controls or adjustments or
performance of procedures other than those
specified herein may result in hazardous
radiation exposure.
• The use of optical instruments with this
product will increase eye hazard. H013_En
[For U.S. model]
E
NERGY
S
TAR¨ and the
E
NERGY
S
TAR
certification mark are
registered US marks.
K001C_En
This product is for general household purposes.
Any failure due to use for other than household
purposes (such as long-term use for business
purposes in a restaurant or use in a car or ship)
and which requires repair will be charged for
even during the warranty period. K041_En
This product includes FontAvenue® fonts
licenced by NEC corporation. FontAvenue is
a registered trademark of NEC Corporation.
Energy-saving design
This system is designed to use 0.78W of
electricity when power is switched to
standby.
WARNING:
Handling the power cord on this product or
cords associated with accessories sold with
the product will expoes you to lead, a chemical
known to the State of California and other
governmental entities to cause cancer and
birth defects or other reproductive harm.
Wash hands after handling.
cover & anki.fm Page 4 Wednesday, June 4, 2003 2:26 PM

Wall-mounting the center and
surround speaker system
Before mounting
• Remember that the speaker system is
heavy and that its weight could cause the
wood screws to work loose, or the wall
material to fail to support it, resulting in
the speaker falling. Make sure that the
wall you intend to mount the speakers on
is strong enough to support them. Do not
mount on plywood or soft surface walls.
• Mounting screws are not supplied. Use
screws that are suitable for the wall
material and that will support the weight
of the speaker.
• If you are unsure of the qualities and
strength of the walls, consult a
professional for advice.
• Pioneer is not responsible for any
accidents or damage that result from
improper installation.
Installation precaution
• Install components so that there are no
obstructions above or either side, and
nothing blocking ventilation holes.
• Leave at least 2 in. / 5 cm of free space
around the subwoofer and at least 11 in. /
28cm above and 6 in. / 15cm to the left and
right of the DVD/CD Tuner, as shown
below. Remember to also leave 6 in. /
15cm of space at the rear.
•Use a vacuum cleaner periodically to clean
the port of the subwoofer to keep it free of
dust.
2 in. / 5 cm
2 in. /
5 cm
2 in. /
5 cm
Powered subwoofer unit
(S-DV940SW/S-DV830SW)
11 in. / 28
cm
6 in. / 15 cm
6 in. / 15 cm
DVD/CD Tuner unit
(XV-DV940/XV-DV830)
Wood screw
Protrusion: 0.2 in. - 0.3 in.
(5-7mm)
0.2 in. /
5 mm
0.2 in. /
5 mm
0.4 in. /
10 mm
(S-DV830ST)
HTS.book 5 ページ 2004年1月15日 木曜日 午後12時22分

6
En
Thank you for buying this Pioneer product.
Please read through these operating instructions so that you will know how to operate your
model properly. After you have finished reading the instructions, put them in a safe place for
future reference.
Contents
Installation precaution . . . . . . . . . . . . . . . . 5
Wall-mounting the center and surround
speaker system . . . . . . . . . . . . . . . . . . . . 5
01 Before you start
Features. . . . . . . . . . . . . . . . . . . . . . . . . . . 9
Introduction to home theater . . . . . . . . . . 10
General disc compatibility . . . . . . . . . . . . 10
CD-R/RW compatibility . . . . . . . . . . . . . 11
DVD-R/RW compatibility . . . . . . . . . . . . 11
PC-created disc compatibility . . . . . . . . 11
Compressed audio compatibility . . . . . . 11
JPEG file compatibility . . . . . . . . . . . . . . 12
02 Controls and displays
Front panel. . . . . . . . . . . . . . . . . . . . . . . . 13
Display unit . . . . . . . . . . . . . . . . . . . . . . . 13
Display . . . . . . . . . . . . . . . . . . . . . . . . . . . 14
Remote control . . . . . . . . . . . . . . . . . . . . 16
03 Getting started
Switching on and setting up . . . . . . . . . . 19
Setting the clock . . . . . . . . . . . . . . . . . . 20
Setting up the remote to control
your TV. . . . . . . . . . . . . . . . . . . . . . . . . . 21
Using the Room Setup . . . . . . . . . . . . . . . 21
Using the on-screen displays . . . . . . . . . . 22
Playing discs . . . . . . . . . . . . . . . . . . . . . . 23
Basic playback controls . . . . . . . . . . . . . 24
Resume and Last Memory . . . . . . . . . . . 25
DVD disc menus . . . . . . . . . . . . . . . . . . 26
Video CD PBC menus . . . . . . . . . . . . . . 27
Listening to the radio . . . . . . . . . . . . . . . . 28
Improving poor FM reception. . . . . . . . . 29
Memorizing stations . . . . . . . . . . . . . . . 29
Listening to station presets . . . . . . . . . . 30
Listening to other sources . . . . . . . . . . . . 30
04 Home theater sound
Auto listening mode . . . . . . . . . . . . . . . . . 31
Listening in surround sound . . . . . . . . . . . 31
Dolby Pro Logic II Music settings . . . . . . 32
Listening in stereo. . . . . . . . . . . . . . . . . . . 32
Listening with headphones . . . . . . . . . . . . 33
Using the Advanced Surround effects . . . . 33
Adjusting the Advanced Surround
effect level. . . . . . . . . . . . . . . . . . . . . . . . 34
Enhancing dialogue . . . . . . . . . . . . . . . . . 34
Listening with a virtual surround back
speaker . . . . . . . . . . . . . . . . . . . . . . . . . . . 35
Using Quiet and Midnight listening
modes . . . . . . . . . . . . . . . . . . . . . . . . . . . . 35
Adjusting the bass and treble . . . . . . . . . . 36
Boosting the bass level . . . . . . . . . . . . . . . 36
Muting the sound . . . . . . . . . . . . . . . . . . . 37
05 Playing discs
Introduction . . . . . . . . . . . . . . . . . . . . . . . 38
Using the Disc Navigator to browse
the contents of a disc . . . . . . . . . . . . . . . . 38
Scanning discs . . . . . . . . . . . . . . . . . . . . . 39
Playing in slow motion . . . . . . . . . . . . . . . 40
Frame advance/frame reverse . . . . . . . . . . 40
Looping a section of a disc . . . . . . . . . . . . 41
Using repeat play . . . . . . . . . . . . . . . . . . . 41
Using the OSD . . . . . . . . . . . . . . . . . . . . 42
Using the display unit . . . . . . . . . . . . . . . 42
Using random play . . . . . . . . . . . . . . . . . . 43
Using the OSD . . . . . . . . . . . . . . . . . . . . 43
Creating a program list . . . . . . . . . . . . . . . 44
Using the OSD . . . . . . . . . . . . . . . . . . . . 44
Using the unit display . . . . . . . . . . . . . . . 47
Clearing the program list . . . . . . . . . . . . 47
Searching a disc . . . . . . . . . . . . . . . . . . . . 47
Playing DVD-Audio ‘Bonus Groups’. . . . . . 48
Switching subtitles . . . . . . . . . . . . . . . . . . 48
Switching DVD-Video audio language . . . . 48
HTS.book Page 6 Monday, June 2, 2003 2:28 PM

8
En
Selecting languages using the language
code list
. . . . . . . . . . . . . . . . . . . . . . . . . . 87
Language code list
. . . . . . . . . . . . . . . . . . 88
Country code list
. . . . . . . . . . . . . . . . . . . 88
Preset code list
. . . . . . . . . . . . . . . . . . . . 89
Glossary
. . . . . . . . . . . . . . . . . . . . . . . . . . 91
Specifications
. . . . . . . . . . . . . . . . . . . . . 94
Amplifier Section
. . . . . . . . . . . . . . . . . . 94
Disc section
. . . . . . . . . . . . . . . . . . . . . . 94
FM tuner section
. . . . . . . . . . . . . . . . . . 94
AM tuner section
. . . . . . . . . . . . . . . . . . 94
Miscellaneous
. . . . . . . . . . . . . . . . . . . . 94
Accessories
. . . . . . . . . . . . . . . . . . . . . . 94
Satellite Speaker System(S-DV940ST)
. . 95
Satellite Speaker System(S-DV830ST)
. . 95
Powered subwoofer
(S-DV940SW/S-DV830SW)
. . . . . . . . . . . 95
HTS.book 8 ページ 2004年1月15日 木曜日 午後12時22分

Before you start01
12
En
Files and folders are read/ displayed in
alphabetical order. Note that if the file
structure is very complex, you may not be
able to read/play all files on the disc.
• Folder and track names (excluding the file
extension) are displayed.
• There are many different recording bit-
rates available to encode MP3 files. This
unit was designed to be compatible with
all of them. Audio encoded at 128Kbps
should sound close to regular CD Audio
quality. This player will play lower bit-rate
files, but please note that the sound
quality becomes noticeably worse at
lower bit-rates.
JPEG file compatibility
• Baseline JPEG and EXIF 2.1* still image
files up to 8 mega-pixels are supported
(maximum vertical and horizontal
resolution is 5120 pixels). (*File format
used by digital still cameras)
• The CD-ROM used to compile your JPEG
files must be ISO 9660 Level 1 or 2
compliant. CD physical format: Mode1,
Mode2 XA Form1. Romeo and Joliet file
systems are both compatible with this
player.
• This player only displays files that are
named with the file extension .jpg or
.JPG.
HTS.book Page 12 Monday, June 2, 2003 2:28 PM

Controls and displays02
14
En
Display
1 Tuner indicators
Lights when a broadcast is being
received.
Lights when a stereo FM broadcast is
being received in auto stereo mode.
Lights when FM mono reception is
selected.
2
Lights when a disc is playing.
3 MIDNIGHT
Lights when the Midnight mode is selected
(page 35).
4QUIET
Lights when the Quiet mode is selected
(page 35).
5PGM
Lights when a program list has been
programmed (page 44).
6 RPT and RPT-1
RPT lights during repeat play. RPT-1 lights
during repeat one-track play (page 41).
7RDM
Lights during random play (page 43).
8V.PART
Light when playing a video part of a DVD disc.
9ATT
Lights when the input attenuator is active for
the currently selected analog input (page 74).
10 REC MODE
Lights when Rec Mode is active (page 75).
11 Timer indicators
Lights when the wake-up timer is set
(page 55).
Lights when the sleep timer is active
(page 57).
12 2 PRO LOGIC II
Lights during Dolby Pro Logic decoding
(page 31).
13 2 DIGITAL
Lights during playback of a Dolby Digital
source (page 31).
MIDNIGHT QUIET PGM RPT - 1 RDM ATTV.PA RT REC MODE
kHz ADV.SURR.
DIGITAL
MHz
PRO LOGIC
PRGSVE
16 1517181920
2
13456 7 98 10 11 12 13 14
HTS.book Page 14 Monday, June 2, 2003 2:28 PM

Controls and displays02
16
En
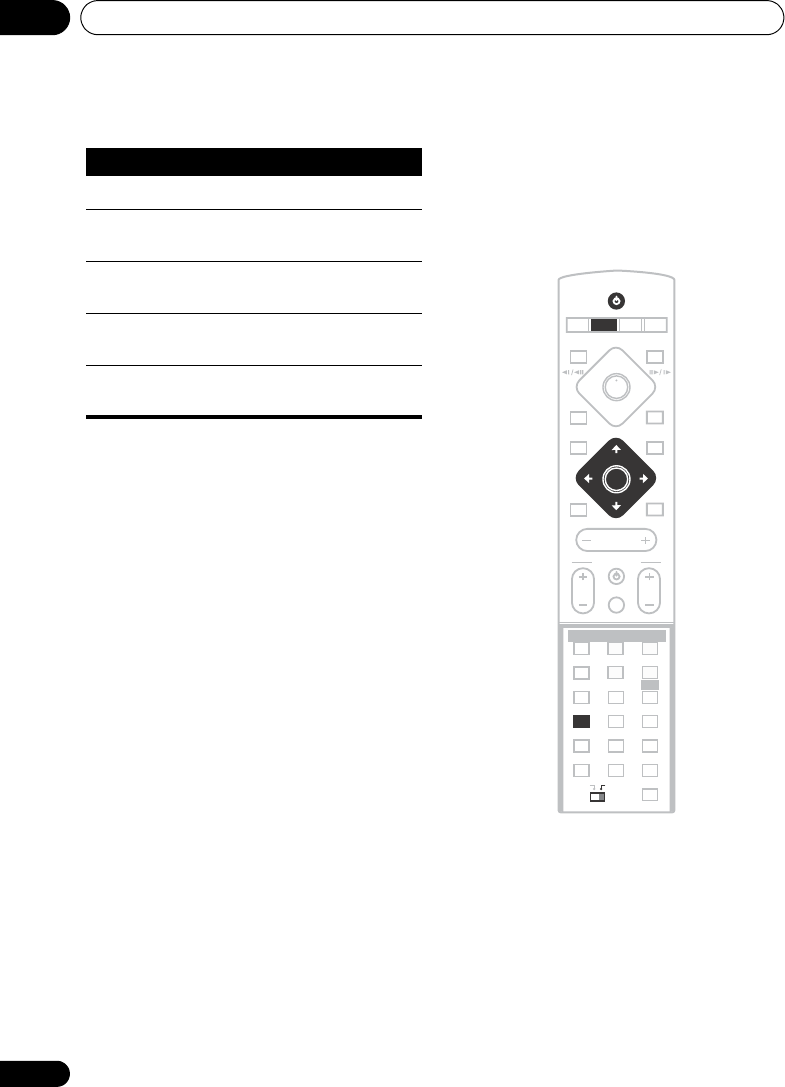
Remote control
• Functions printed in green on the remote
control are accessed by switching the
MAIN/SUB switch to SUB.
1 STANDBY/ON
Press to switch the system on or into standby.
2 Function select buttons
Press to select the source you want to listen to
(DVD (CD). TUNER, TV, LINE)
3 DISPLAY
Press to display/change disc information
shown on-screen (page 50).
4 Disc playback controls
Press to start or resume playback.
and /
Use for reverse slow motion playback,
frame reverse and reverse scanning.
and /
Use for forward slow motion playback,
frame advance and forward scanning.
Press to pause playback; press again to
restart.
Press to stop playback.
5
Press to jump to the beginning of the current
chapter/track, then to previous chapters/
tracks.
6DVD MENU
Press to display a DVD disc menu, or the Disc
Navigator if a VR format DVD-RW, CD, Video
CD, MP3 or JPEG disc is loaded.
7 Cursor buttons, ENTER and tuning
buttons
Cursor buttons
Use the cursor buttons (///) to
navigate on-screen displays and menus.
ENTER
Press to select an option or execute a
command.
TUNE +/–
Use to tune the radio.
ST +/–
Use to select station presets when
listening to the radio.
ST+
TUNE+
ENTER
TUNE–
MASTER
VOLUME
ST–
STANDBY/ON
CD FM/AM
OPEN/CLOSEDISPLAY
DVD TUNER TV LINE
L1/L2
DVD MENU
RETURN
SOUND
TV CONTROL
CH VOL
INPUT
MUTE
TEST TONE
123
ZOOM TOP MENU
CH LEVEL
DIMMER
REPEAT
AUDIO ANGLE
RANDOM
SUBTITLE
PROGRAM
456
789
0
FOLDER–
CLR
ENTER
FOLDER+
MENU
HOME
SETUP
SYSTEM
MIDNIGHT
QUIET/ CLOCK
TIMER/
BASS MODE DIALOGUE VIRTUAL SB
AUTO SURROUND ADVANCED
MAIN SUB ROOM SETUP
1
2
3
4
5
6
7
8
9
10
15
16
17
18
19
21
20
11
12
13
14
22
HTS.book Page 16 Monday, June 2, 2003 2:28 PM

Controls and displays02
18
En
HOME MENU
Press to display (or exit) the on-screen
menu for Initial Settings, Play Mode
functions, etc.
18 (In SUB)
SYSTEM SETUP
Use to make various system and surround
sound settings (page 58).
TEST TONE
Use to output the test tone (for speaker
setup) (page 60).
CH LEVEL
Use to adjust the speaker level (page 60).
19 (In SUB)
DIMMER
Press to dim or brighten the display.
QUIET/MIDNIGHT
Use to select the Quiet and Midnight
modes (page 35).
TIMER/CLOCK
Press to display the clock and to access
the timer menu (page 20 and page 55).
20 (In MAIN)
CLR
Press to clear an entry.
ENTER
Selects menu options, etc. (works exactly
the same as the ENTER button in 7
above).
(In SUB)
FOLDER –
Press to jump to previous folders.
FOLDER +
Press to jump to the next folder.
21 MAIN / SUB
Change from MAIN to SUB to access
functions printed in green.
(In MAIN)
ROOM SETUP
Press to start Room Setup (page 21).
22 (In MAIN)
Number buttons
Use the number buttons for selecting
titles/chapters/tracks from a disc directly.
HTS.book Page 18 Monday, June 2, 2003 2:28 PM

Getting started 03
19
En
English Italiano Français
Nederlands
EspañolDeutsch
Chapter 3
Getting started
Switching on and setting up
After making sure everything is connected up
properly, you’re ready to switch on. The first
thing to do is to tell the system what kind of TV
you’re using, standard or widescreen.
After that you can set up the surround sound
for your room, and set the clock so that you
can use the timer features.
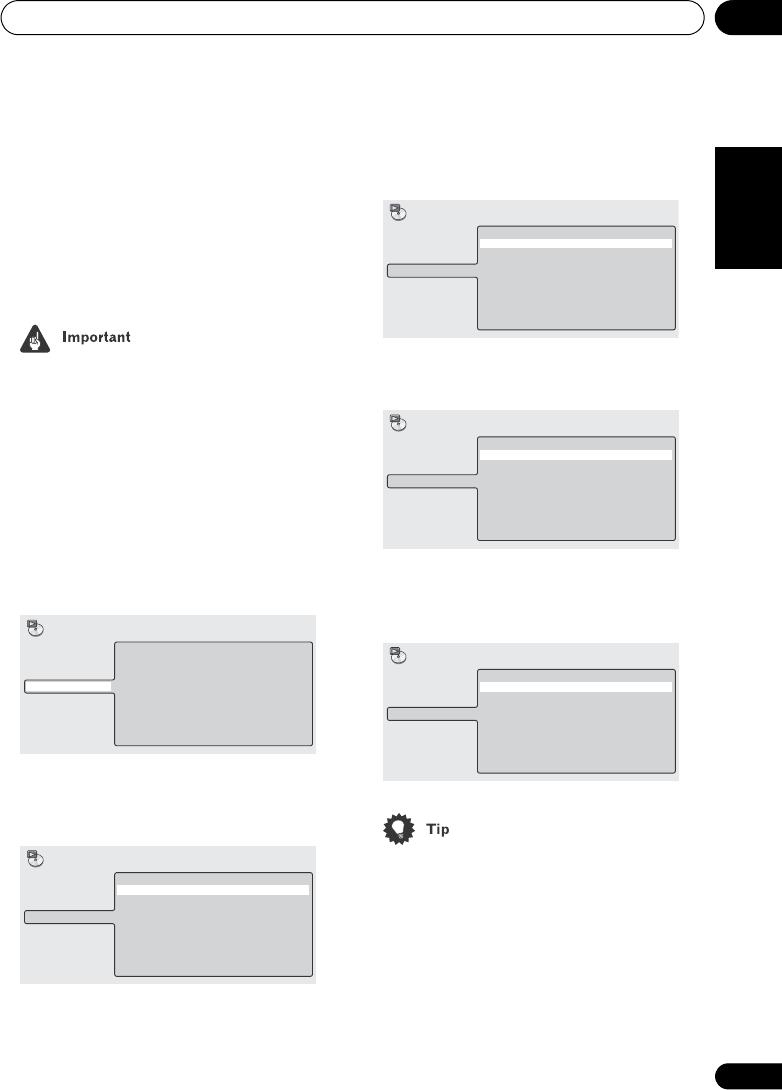
1 Press STANDBY/ON (on the remote
or on the front panel) to switch the system
on.
Also make sure that your TV is switched on
and that the video input is set to this system.
You should see the welcome screen
displayed.
2 Press ENTER to move on to the next
screen.
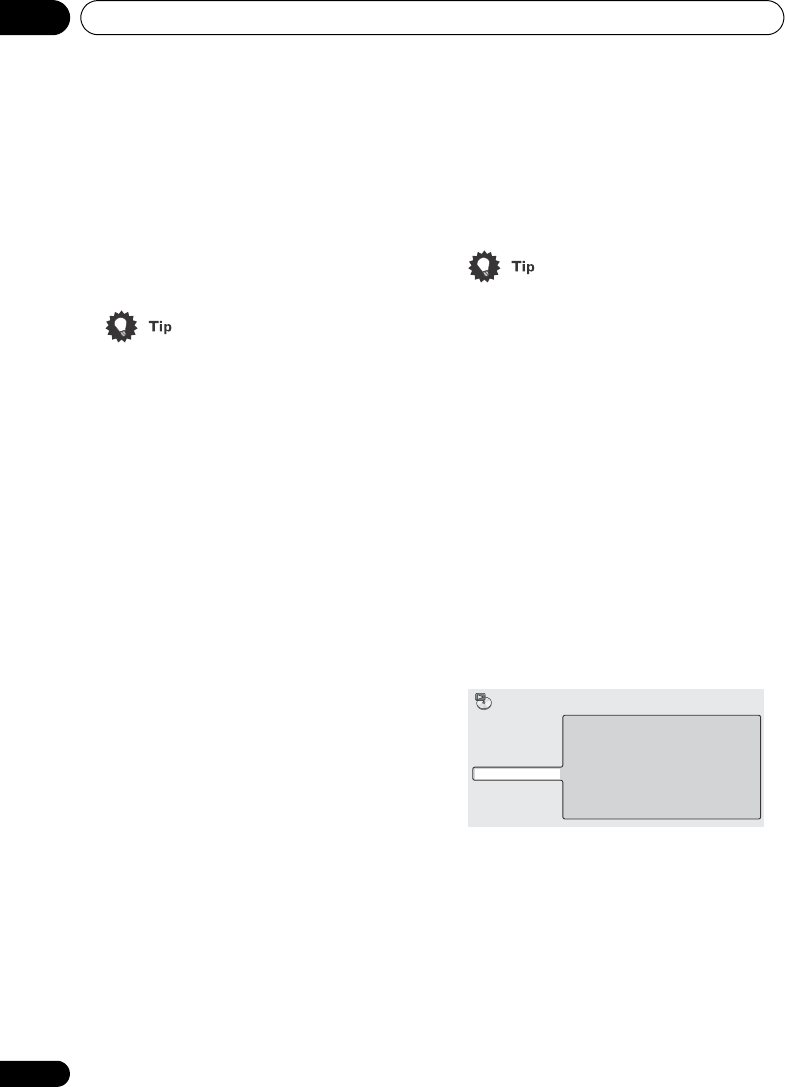
3Use the / (cursor left/right)
buttons to select either ‘Wide screen
(16:9)’ or ‘Standard size screen (4:3)’
according to the kind of TV you have, then
press ENTER.
See also Screen sizes and disc formats on
page 87 if you’re not sure which one to
choose.
MASTER
VOLUME
CD FM/AM
OPEN CLOSEDISPLAY
DVD TUNER TV LINE
L1/L2
DVD MENU
RETURN
SOUND
TV CONTROL
CH VOL
INPUT
MUTE
STANDBY/ON
ST+
TUNE+
TUNE–
ST–
ENTER
Welcome to Pioneer DVD!
Thank you for purchasing this Pioneer DVD player.
Before using, please take a little time
to setup your DVD player
Put the batteries into the remote control
Next, press the [ENTER] button on the remote control
and start the Let's Get Started Menu
Next
Let's Get Started Menu
What kind of TV do you have?
Use the / cursor buttons
to choose, then press [ENTER]
Wide screen (16:9) Standard size screen (4:3)
Let's Get Started Menu
What kind of TV do you have?
Use the / cursor buttons
to choose, then press [ENTER]
Wide screen (16:9) Standard size screen (4:3)
HTS.book Page 19 Monday, June 2, 2003 2:28 PM

Getting started 03
21
En
English Italiano Français
Nederlands
EspañolDeutsch
6Use the / (cursor up/down)
buttons to set the minute.
7 Press ENTER to confirm.
The display flashes to indicate the clock is set.
• Press TIMER/CLOCK anytime to display
the clock.
• If you unplug the system from the wall
outlet, or there is a power outage, you will
need to set the clock again.
Setting up the remote to control
your TV
You can set up the supplied remote to control
your TV using the TV CONTROL buttons.
1 Switch on your TV.
2 Find the name of the manufacturer of
your TV in the Preset code list on page 89
Next to each manufacturer is one or more
three digit codes. These tell the remote what
kind of TV you have.
If the name of the manufacturer of your TV
does not appear in the table, you won’t be able
to set up this remote to control your TV.
3 Point the remote at your TV, hold
down the CLR button, then enter the
three digit code for your TV.
The remote transmits an on/off signal to the
TV. If you’ve entered the correct code, your TV
should switch off.
If your TV doesn’t turn off, repeat the
procedure using the next code in the list until
your TV switches off successfully. Once set,
you can then use the individual TV controls
shown below.
• The default setting is for a Pioneer TV.
Using the Room Setup
Before using your system to enjoy surround
sound playback, we recommend you spend a
few minutes using the Room Setup. This is a
quick and easy way to get good surround
sound for your room.
Depending on the distance of the surround
speakers from your main listening position,
choose between S (small), M (medium), or L
(large) room, then depending on your seating
position relative to the front and surround
speakers, choose Fwd (forward), Mid
(middle), or Back.
Button What it does
Switches your TV on or into
standby.
CH +/– Changes the TV channel.
VOL +/– Adjusts the TV volume.
INPUT Switches the TV’s input
between the built in TV tuner
and an external video source.
MASTER
VOLUME
TV CONTROL
CH VOL
INPUT
REPEAT RANDOMPROGRAM
BASS MODE DIALOGUE VIRTUAL SB
AUTO SURROUND ADVANCED
TV CONTROL
INPUTCH VOL
HTS.book Page 21 Monday, June 2, 2003 2:28 PM

Getting started 03
23
En
English Italiano Français
Nederlands
EspañolDeutsch
• The button guide at the bottom of every
OSD screen shows you which buttons
you’ll need to use for that screen.
Playing discs
The basic playback controls for playing DVD,
CD, SACD, Video CD and MP3 discs are
covered here. Further functions are detailed
in the chapter 5.
Throughout this manual, the term ‘DVD’
means any kind of DVD disc (DVD-Video,
DVD-Audio or DVD-R/RW).
1 If the player isn’t already on, press
STANDBY/ON to switch it on.
If you’re playing a DVD or Video CD also turn
on your TV and make sure that it is set to the
correct video input.
2 Press OPEN/CLOSE to open the disc
tray.
3 Load a disc.
Load a disc with the label side facing up,
using the disc tray guide to align the disc (if
you’re loading a double-sided DVD disc, load
it with the side you want to play face down).
Button What it does
HOME
MENU
Displays/exits the on-screen
display
Changes the highlighted menu
item
ENTER Selects the highlighted menu
item (both ENTER buttons work
in exactly the same way)
RETURN Returns to the main menu
without saving changes
MASTER
VOLUME
OPEN CLOSEDISPLAY
DVD MENU
SOUND
TV CONTROL
CH VOL
INPUT
MUTE
TEST TONE
12
ZOOM TOP MENU
CH LEVEL
DIMMER
REPEAT
AUDIO ANGLE
RANDOM
SUBTITLE
PROGRAM
456
789
0
FOLDER–
CLR
ENTER
FOLDER+
SETUP
SYSTEM
MIDNIGHT
QUIET/ CLOCK
TIMER/
BASS MODE DIALOGUE VIRTUAL SB
AUTO SURROUND ADVANCED
RETURN
MENU
HOME
ENTER
3
MAIN SUB ROOM SETUP
HTS.book Page 23 Monday, June 2, 2003 2:28 PM

Getting started 03
27
En
English Italiano Français
Nederlands
EspañolDeutsch
Video CD PBC menus
Some Video CDs have menus from which you
can choose what you want to watch. These
are called PBC (Playback control) menus.
You can play a PBC Video CD without having
to navigate the PBC menu by pressing
(stop) then starting playback using a number
button to select a track, rather than (play)
(or on the top panel).
Button What it does
TOP MENU Displays the ‘top menu’ of a DVD
disc—this varies with the disc.
DVD
MENU
Displays a DVD disc menu—this
varies with the disc and may be
the same as the ‘top menu’.
Moves the cursor around the
screen.
ENTER Selects the current menu option.
RETURN Returns to the previously
displayed menu screen. On
some DVD-Audio discs featuring
browsable pictures, press to
display the browser screen.
Numbers
(MAIN)
Highlights a numbered menu
option (some discs only). Press
ENTER to select (or wait a few
seconds).
MASTER
VOLUME
DVD MENU
SOUND
TV CONTROL
CH VOL
INPUT
MUTE
TEST TONE
1
ZOOM
CH LEVEL
DIMMER
REPEAT
AUDIO ANGLE
RANDOM
SUBTITLE
PROGRAM
456
789
0
FOLDER–
CLR
ENTER
FOLDER+
SETUP
SYSTEM
MIDNIGHT
QUIET/ CLOCK
TIMER/
BASS MODE DIALOGUE VIRTUAL SB
AUTO SURROUND ADVANCED
RETURN
ENTER
TOP MENU
MENU
HOME
23
MAIN SUB ROOM SETUP
MASTER
VOLUME
DVD MENU
SOUND
TV CONTROL
CH VOL
INPUT
TEST TONE
1
ZOOM
CH LEVEL
DIMMER
REPEAT
AUDIO ANGLE
RANDOM
SUBTITLE
PROGRAM
456
789
0
FOLDER–
CLR
FOLDER+
SETUP
SYSTEM
MIDNIGHT
QUIET/ CLOCK
TIMER/
BASS MODE DIALOGUE VIRTUAL SB
AUTO SURROUND ADVANCED
RETURN
HOME
MUTE
ST+
TUNE+
TUNE–
ST–
ENTER
ENTER
TOP MENU
MENU
HOME
23
MAIN SUB ROOM SETUP
HTS.book Page 27 Monday, June 2, 2003 2:28 PM
Getting started03
28
En
Listening to the radio
The tuner can receive both FM and AM
broadcasts, and lets you memorize your
favorite stations so you don’t have to manually
tune in every time you want to listen.
1 If the system isn’t already on, press
STANDBY/ON to switch on.
2 Press TUNER to switch to the tuner,
then press repeatedly to select the AM or
FM band.
The display indicates the tuner band and the
frequency.
3 Tune to a frequency.
There are three tuning modes—manual, auto,
and high-speed:
Button What it does
RETURN Displays the PBC menu.
Numbers Selects a numbered menu
option.
Displays the previous menu page
(if there is one).
Displays the next menu page (if
there is one).
ENTER Press to select highlighted menu
option.
MASTER
VOLUME
CD
OPEN CLOSEDISPLAY
DVD TV LINE
L1/L2
DVD MENU
RETURN
SOUND
TV CONTROL
CH VOL
INPUT
MUTE
TEST TONE
123
ZOOM TOP MENU
CH LEVEL
DIMMER
REPEAT
AUDIO ANGLE
RANDOM
SUBTITLE
PROGRAM
5 6
789
0
FOLDER–
CLR
ENTER
FOLDER+
MENU
HOME
MIDNIGHT
QUIET/ CLOCK
TIMER/
BASS MODE DIALOGUE VIRTUAL SB
AUTO SURROUND ADVANCED
STANDBY/ON
FM/AM
SETUP
SYSTEM
TUNER
TUNE+
TUNE–
ENTER
ST+ST–
MAIN SUB ROOM SETUP
4
HTS.book Page 28 Monday, June 2, 2003 2:28 PM

Getting started 03
29
En
English Italiano Français
Nederlands
EspañolDeutsch
•Manual tuning: Press TUNE +/–
repeatedly to change the displayed
frequency.
•Auto tuning: Press and hold TUNE +/–
until the frequency display starts to move,
then release. The tuner will stop on the
next station it finds. Repeat to search for
other stations.
•High-speed tuning: Press and hold
TUNE +/– until the frequency display
starts to move rapidly. Keep the button
held down until you reach the frequency
you want. If necessary, fine tune the
frequency using the manual tuning
method.
Improving poor FM reception
If you’re listening to an FM station in stereo
but the reception is weak, you can improve
the sound quality by switching to mono.
1 Tune to an FM radio station.
2 Press SYSTEM SETUP.
3Use the / (cursor left/right)
buttons to choose ‘FM Mode?’ then press
ENTER.
4Use the / (cursor up/down)
buttons to select ‘FM Mono’ then press
ENTER.
The mono indicator ( ) lights when the tuner
is in mono reception mode.
Select FM Auto above to switch back to auto-
stereo mode (the stereo indicator ( ) lights
when receiving a stereo broadcast).
Memorizing stations
You can save up to 30 station presets so that
you always have easy access to your favorite
stations without having to tune in manually
each time.
1 Tune to an AM or FM radio station.
For the FM band, select mono or auto-stereo
reception as necessary. This setting is saved
along with the preset.
MASTER
VOLUME
CD
OPEN CLOSEDISPLAY
DVD TV LINE
L1/L2
DVD MENU
RETURN
SOUND
TV CONTROL
CH VOL
INPUT
MUTE
TEST TONE
123
ZOOM TOP MENU
CH LEVEL
DIMMER
REPEAT
AUDIO ANGLE
RANDOM
SUBTITLE
PROGRAM
5 6
789
0
FOLDER–
CLR
ENTER
FOLDER+
MENU
HOME
MIDNIGHT
QUIET/ CLOCK
TIMER/
BASS MODE DIALOGUE VIRTUAL SB
AUTO SURROUND ADVANCED
STANDBY/ON
FM/AM
SETUP
SYSTEM
TUNER
TUNE+
TUNE–
ENTER
ST+ST–
MAIN SUB ROOM SETUP
4
HTS.book Page 29 Monday, June 2, 2003 2:28 PM
Home theater sound 04
31
En
English Italiano Français
Nederlands
EspañolDeutsch
Chapter 4
Home theater sound
Using this system you can enjoy listening to
sources, analog or digital, in either stereo or
surround sound.
Auto listening mode
The Auto listening mode is the simplest way
to listen to any source as it was mastered: the
output from the speakers mirrors the
channels in the source material.
• Press AUTO to select the ‘Auto’
listening mode.
If the source is Dolby Digital or DTS, the
2 DIGITAL or DTS indicator on the display
unit lights.
• Any previously active Dolby Pro Logic or
Advanced Surround mode is canceled
when Auto listening mode is selected.
Listening in surround sound
You can listen to any source—stereo or
multichannel, analog or digital—in surround
sound. Surround sound is generated from
stereo sources (except SACD and DVD-Audio)
using one of the Dolby Pro Logic decoding
modes.
• Press SURROUND repeatedly to select
a listening mode (or press SURROUND
then use the / (cursor up/down)
buttons).
The listening mode choices that appear in the
display will vary according to the type of
source that’s playing.
•Auto – Auto listening mode (see above)
•Dolby Digital / DTS – Dolby Digital or
DTS decoding (depending on the source).
For a multichannel source, this will be the
same as Auto.
•Pro Logic – 4.1 channel surround sound
for use with any two-channel source
•PL II Movie – Pro Logic II 5.1 channel
surround sound, especially suited to
movie sources, for use with any two-
channel source
TEST TONE
123
ZOOM TOP MENU
CH LEVEL
DIMMER
REPEAT
AUDIO ANGLE
RANDOM
SUBTITLE
PROGRAM
456
789
0
FOLDER–
CLR
ENTER
FOLDER+
MENU
HOME
SETUP
SYSTEM
MIDNIGHT
QUIET/ CLOCK
TIMER/
BASS MODE DIALOGUE VIRTUAL SB
AUTO SURROUND ADVANCED
BASS MODE
AUTO
MAIN SUB ROOM SETUP
TEST TONE
123
ZOOM TOP MENU
CH LEVEL
DIMMER
REPEAT
AUDIO ANGLE
RANDOM
SUBTITLE
PROGRAM
456
789
0
FOLDER–
CLR
ENTER
FOLDER+
MENU
HOME
SETUP
SYSTEM
MIDNIGHT
QUIET/ CLOCK
TIMER/
BASS MODE DIALOGUE VIRTUAL SB
AUTO SURROUND ADVANCED
AUTO SURROUND
MAIN SUB ROOM SETUP
HTS.book Page 31 Monday, June 2, 2003 2:28 PM

Home theater sound 04
33
En
English Italiano Français
Nederlands
EspañolDeutsch
• See also Using the Advanced Surround
effects below, for further stereo and
surround playback options.
Listening with headphones
When headphones are connected, only the
Stereo (default) and Phones Surround
(virtual surround sound for headphones)
modes are available.
• With headphones connected, press
ADVANCED to select ‘Phones Surround’ or
SURROUND to select ‘Stereo’.
Using the Advanced Surround
effects
Advanced Surround effects can be used with
multichannel or stereo sources for a variety of
additional surround sound effects.
• Press ADVANCED to select an
Advanced Surround mode (or press
ADVANCED then use the / (cursor up/
down) bottons).
Press repeatedly to select from:
•Adv. Music – Gives a concert hall-type
sound
•Adv. Movie – Gives a movie theater-type
sound
•Expanded – Creates an extra wide stereo
field
•TV Surr. – Designed for mono or stereo TV
broadcasts and other sources
MASTER
VOLUME
OPEN CLOSEDISPLAY
DVD MENU
RETURN
SOUND
TV CONTROL
CH VOL
INPUT
MUTE
TEST TONE
123
ZOOM TOP MENU
CH LEVEL
DIMMER
REPEAT
AUDIO ANGLE
RANDOM
SUBTITLE
PROGRAM
456
789
0
FOLDER–
CLR
ENTER
FOLDER+
MENU
HOME
SETUP
SYSTEM
MIDNIGHT
QUIET/ CLOCK
TIMER/
BASS MODE DIALOGUE
AUTO SURROUND ADVANCED
ST+
TUNE+
TUNE–
ST–
ENTER
ADVANCED
MAIN SUB ROOM SETUP
HTS.book Page 33 Monday, June 2, 2003 2:28 PM
Playing discs05
40
En
3 To resume normal playback, press
(play).
• Sound can be heard while scanning audio
CDs, SACD and MP3 discs.
• When scanning a Video CD or MP3 track,
playback automatically resumes at the
end or beginning of the track.
• There is no sound while scanning DVD-
Videos and Video CDs, and no subtitles
while scanning DVD-Videos.
• Depending on the disc, normal playback
may automatically resume when a new
chapter is reached on a DVD-Video disc.
Playing in slow motion
You can play DVD-Video, DVD-R/RW and
Video CDs at four different forward slow
motion speeds. DVD-Videos and DVD-R/RW
discs can also be played at two reverse
speeds.
1 During playback, press (pause)
( on the top panel).
2 Press and hold / or / until
slow motion playback starts.
• The slow motion speed is shown on-
screen.
• There is no sound during slow motion
playback.
3 Press repeatedly to change the slow
motion speed.
• The slow motion speed is displayed on-
screen.
4 To resume normal playback, press
(play).
• Video CD only supports forward slow
motion playback.
• The picture quality during slow motion
playback is not as good as during normal
playback.
• Depending on the disc, normal playback
may automatically resume when a new
chapter is reached.
Frame advance/frame reverse
You can advance or back up DVD-Video or VR
format DVD-RW discs frame-by-frame. With
Video CDs, you can only use frame advance.
1 During playback, press (pause)
( on the top panel).
2 Press / or / to reverse or
advance a frame at a time.
3 To resume normal playback, press
(play) ( on the top panel).
• The picture quality when using frame
reverse is not as good as frame advance.
• Depending on the disc, normal playback
may automatically resume when a new
chapter is reached.
• When changing direction with a DVD
disc, the picture may ‘move’ in an unex-
pected way. This is not a malfunction.
HTS.book Page 40 Monday, June 2, 2003 2:28 PM
Playing discs 05
43
En
English Italiano Français
Nederlands
EspañolDeutsch
Using random play
Use the random play function to play titles or
chapters (DVD-Video), groups or tracks (DVD-
Audio), or tracks (SACD, CD, Video CD and
MP3 discs) in a random order.
You can set the random play option when a
disc is playing or stopped.
• You can’t use random play with VR format
DVD-RW discs, Video CDs playing in PBC
mode or while a DVD disc menu is being
displayed.
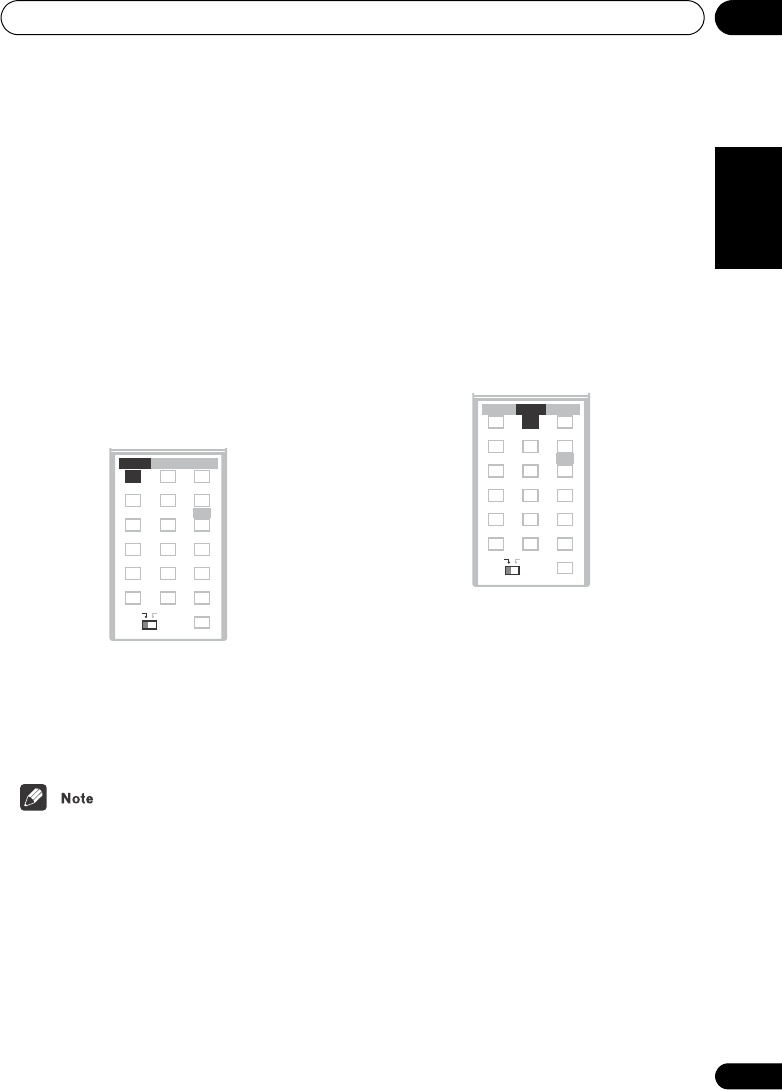
Using the OSD
1 During playback, press HOME MENU
and select ‘Play Mode’.
2 Select ‘Random’ from the list of
functions on the left.
3 Select a random play option.
For DVD-Video discs, select Random Title or
Random Chapter, (or Random Off).
For DVD-Audio discs, select Random Group
or Random Track (or Random Off).
For CDs and Video CDs, select On or Off to
switch random play on or off.
For MP3 discs, select Random All (all folders)
or Random Track (current folder only), (or
Random Off).
• You can also use the RANDOM button on
the remote to select a random play mode.
The random mode is indicated in the
display unit and on-screen. The random
modes available are the same as when
choosing from the Play Mode menu.
Press ENTER to start random play.
• To stop the disc and cancel random play-
back, press (stop).
Random Title
Random Chapter
Random Off
A-B Repeat
Repeat
Random
Program
Search Mode
Play Mode
Random Title
Random Chapter
Random Off
A-B Repeat
Repeat
Random
Program
Search Mode
Play Mode
Random Group
Random Track
Random Off
A-B Repeat
Repeat
Random
Program
Search Mode
Play Mode
On
Off
A-B Repeat
Repeat
Random
Program
Search Mode
Play Mode
Random All
Random Track
Random Off
A-B Repeat
Repeat
Random
Program
Search Mode
Play Mode
HTS.book Page 43 Monday, June 2, 2003 2:28 PM
Playing discs05
46
En
6 To play the program list, press
(play).
Program play remains active until you turn off
program play (see below), erase the program
list (see below), eject the disc or switch off the
player or switched to a function other than
DVD (CD).
• To save your program list and exit the
program edit screen without starting play-
back, press HOME MENU. (Don’t press
RETURN – your program list won’t be
saved.)
• During program play, press to skip to
the next program step.
• Press CLR during playback to switch off
program play. Press while stopped to
erase the program list.
Editing a program list using the OSD
After creating a program list, you can add,
delete and change steps.
1 During playback, press HOME MENU
and select ‘Play Mode’.
2 Select ‘Program’ from the list of
functions on the left.
3 Select ‘Create/Edit’ from the list of
program options.
4 To clear a step, highlight the step
number and press CLR.
5 To insert a step in the middle of the
program list, highlight the step where you
want the new step to appear, then select
a title/chapter/group/folder/track to add.
After pressing ENTER, the new step is
inserted into the list.
6 To add a step to the end of the
program list, highlight the next free step
then select a title/chapter/group/folder/
track to add.
• To save your program list and exit the
program edit screen without starting play-
back, press HOME MENU.
• If you want to exit the program edit screen
without saving the changes you made,
press RETURN.
Other functions available from the OSD
program menu
As well as creating and editing a program list,
you can start program play, cancel program
play, erase the program list, and memorize a
program list from the Play Mode menu.
1 During playback, press HOME MENU
and select ‘Play Mode’.
2 Select ‘Program’ from the list of
functions on the left.
3 Select a program play function.
•Create/Edit – See above
•Playback Start – Starts playback of a
saved program list
•Playback Stop – Turns off program play,
but does not erase the program list
•Program Delete – Erases the program
list and turns off program play
Create/Edit
Playback Start
Playback Stop
Program Delete
Program Memory Off
A-B Repeat
Repeat
Random
Program
Search Mode
Play Mode
HTS.book Page 46 Monday, June 2, 2003 2:28 PM

Playing discs 05
47
En
English Italiano Français
Nederlands
EspañolDeutsch
•Program Memory (DVD-Video only) –
Select On to save the program list for the
disc loaded. (Select Off to cancel the
program memory for the disc loaded)
• Program lists are saved for the DVD disc
loaded. When you load a disc with a saved
program list, program play is automati-
cally turned on.
• You can save program lists for up to 24
discs. After that, the oldest one is
replaced with the new one saved.
Using the unit display
Even though the OSD is available for SACDs,
CDs and MP3 discs, the Display unit provides
enough information to make a program list
easily. If a disc is playing, stop it first.
1 Press PROGRAM.
You’re prompted to enter a track or folder for
the first step in the program list.
2Use / (cursor up/down) to select a
track or a folder, then press ENTER.
•For MP3 discs only: To select an individual
track within a folder, use the / (cursor
up/down) buttons to select the folder,
then press , then use / (cursor up/
down) to select a track. Press ENTER.
Wait for the display to prompt you after
completing each selection. If you make a
mistake, press CLR to delete the last (most
recently) programmed track.
3 Repeat step 2 to build up a program
list.
A program list can contain up to 24 steps.
4 To play the program list, press
(play).
Program play remains active until you press
(stop), clear the playlist (see below), eject
the disc or switch off the player.
Clearing the program list
You must clear the program list to program a
new one.
1 If a disc is playing, press (stop).
2 Press CLR.
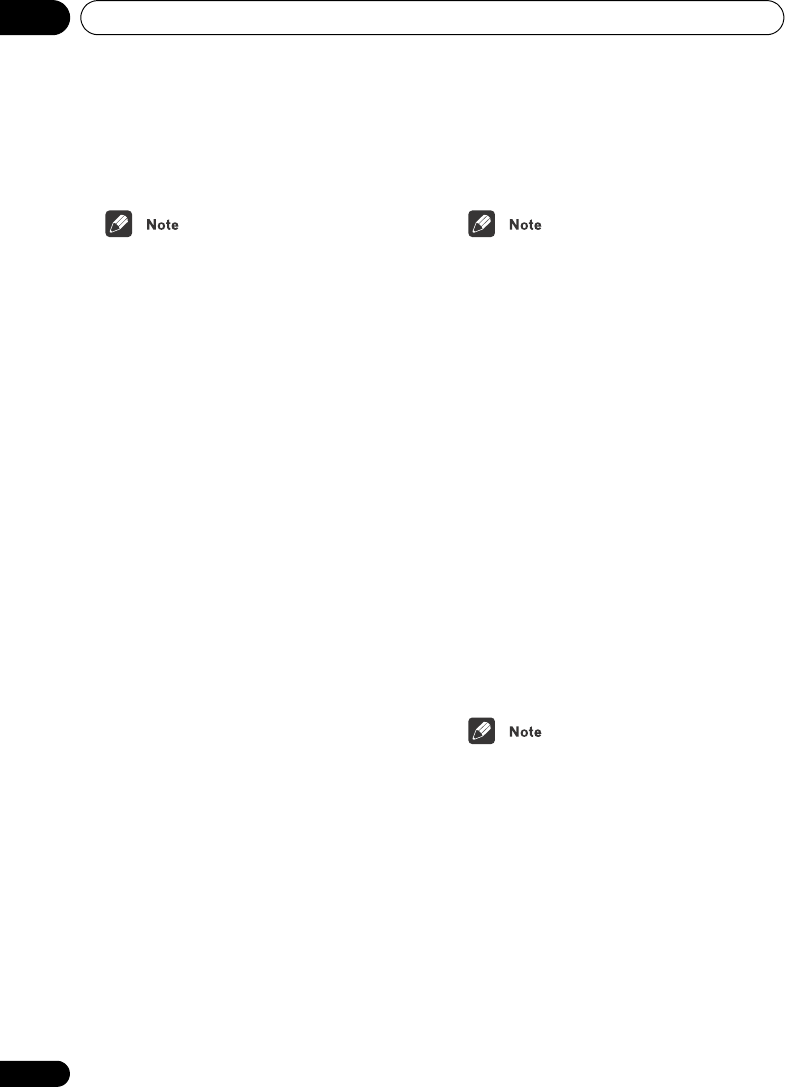
Searching a disc
You can search DVD-Video discs by title or
chapter number, or by time. DVD-Audio discs
can be searched by group or track, or by page.
SACDs, CDs can be searched by track
number, and Video CDs by track number or
time. MP3 discs can be searched by folder or
track number.
1 During playback, press HOME MENU
and select ‘Play Mode’.
2 Select ‘Search Mode’ from the list of
functions on the left.
The search options that appear depend on the
kind of disc loaded. The screen below shows
the DVD-Video search options.
P0-0 000
P0-1 537
Title Search
Chapter Search
Time Search
A-B Repeat
Repeat
Random
Program
Search Mode
Play Mode
HTS.book Page 47 Monday, June 2, 2003 2:28 PM

Playing discs05
48
En
3 Select a search mode.
4 Use the number buttons to enter a
title, group, chapter, folder or track
number, or a time or a page.
• For a time search, enter the number of
minutes and seconds into the currently
playing title (DVD-Video/DVD-RW) or
track (Video CD) you want playback to
resume from.
For example, press 4, 5, 0, 0 to have play-
back start from 45 minutes into the disc.
For 1 hour, 20 minutes and 30 seconds,
press 8, 0, 3, 0.
• Some DVD-Audio discs feature pages of
browsable pictures. Enter the page
number you want.
5 Press ENTER to start playback.
• You can only use time search with DVD-
Video and Video CD discs.
• The disc must be playing in order to use
time search.
• Search functions are not available with
Video CDs in PBC mode, or unfinalized
CD-R/RW discs.
• With more than two SACD discs you may
not be able to select the first track of discs
after the second disc.
Playing DVD-Audio ‘Bonus
Groups’
Some DVD-Audio discs have an extra ‘bonus’
group that requires a 4-digit key number to
access. See the disc packaging for details
and the key number. When you try and play
the bonus group, the player will automatically
ask you for the key number.
1 Use the number buttons to enter the
4-digit key number.
• It’s also possible to enter the key number
from the Options menu. See page 70.
Switching subtitles
Some DVD-Video discs have subtitles in one
or more languages; the disc box will usually
tell you which subtitle languages are avail-
able. You can switch subtitle language during
playback.
• Press SUBTITLE repeatedly to select a
subtitle option.
• Some discs only allow you to change
subtitle language from the disc menu.
Press TOP MENU to access.
• To set subtitle preferences, see Subtitle
Language on page 66.
Switching DVD-Video audio
language
When playing a DVD-Video disc recorded with
dialog in two or more languages, you can
switch audio language during playback.
0 0 1
Title Search
Chapter Search
Time Search
Input Chapter
A-B Repeat
Repeat
Random
Program
Search Mode
Play Mode
Subtitle English1/2
Current / Total
HTS.book Page 48 Monday, June 2, 2003 2:28 PM
Especificaciones del producto
| Marca: | Pioneer |
| Categoría: | Sistema de casa |
| Modelo: | HTZ-830DV |
| Color del producto: | Zwart |
| Peso.: | 10900 g |
| Ancho: | 175 mm |
| Profundidad: | 440 mm |
| Altura: | 402 mm |
| Fuente de alimentación: | 120 - 230 V |
| Frecuencia del procesador: | 2 GHz |
| Familia de procesadores: | AMD Athlon X2 |
| Modelo de procesador: | 3800+ |
| Número de núcleos de procesador: | 2 |
| Incluye sistema operativo: | Windows XP Professional |
| Plataforma: | PC |
| red LAN: | Ja |
| Lector de tarjetas de memoria integrado: | Nee |
| Sistema de audio: | HD |
| Número de puertos USB 2.0: | 6 |
| Puerto(s) VGA (D-Sub): | 1 |
| Micrófono, entrada de línea: | Ja |
| Puerto DVI: | Nee |
| Número de puertos Ethernet LAN (RJ-45): | 1 |
| Salidas de auriculares: | 1 |
| Suministro de red: | 250 W |
| Memoria interna: | 0.5 GB |
| Tipo de memoria interna: | DDR2-SDRAM |
| Sintonizador de TV integrado: | Nee |
| Cumple con los estándares de la industria: | IEEE802.3, IEEE802.3u, IEEE802.3ab |
| LAN Ethernet, velocidades de transferencia de datos: | 10,100,1000 Mbit/s |
| Tecnología de cableado: | 10/100/1000Base-T(X) |
| Tipo de comida: | AC |
| Caché del procesador: | 1 MB |
| Tipo de caché del procesador: | L2 |
| Fabricante del procesador: | AMD |
| Memoria interna máxima: | 4 GB |
| Capacidad total de almacenamiento: | 160 GB |
| Compatibilidad con Mac: | Nee |
| Funciones de red: | Gigabit Ethernet |
| Tipo de vivienda: | Tower |
| Diseño de memoria: | 1 x 0.5 GB |
| Ranuras de memoria: | 2x DIMM |
| Presión sonora: | 29 dB |
| Número de procesadores instalados: | 1 |
| Incluye monitor: | Nee |
| Interfaz de disco duro: | SATA |
| Velocidad de rotación del disco duro: | 7200 RPM |
| Ranuras PCI Express x1: | 1 |
| Ranuras PCI Express x16: | 1 |
| Memoria máxima del adaptador de gráficos: | - GB |
| Puerto(s) PS/2: | 2 |
| Puertos seriales): | 1 |
| Mando a distancia incluido: | Nee |
| Disco duro, contraseña de usuario: | Ja |
| Activación de la LAN: | Ja |
| Unidad de disquete instalada: | Nee |
| Puerto(s) paralelo(s): | 1 |
| Wifi.: | Nee |
| Humedad relativa de funcionamiento (VV): | 10 - 80 procent |
| Tipo-producto: | PC |
| Temperatura máxima de funcionamiento: | 10 - 35 °C |
¿Necesitas ayuda?
Si necesitas ayuda con Pioneer HTZ-830DV haz una pregunta a continuación y otros usuarios te responderán
Sistema de casa Pioneer Manuales

20 Octubre 2024
25 Julio 2024
17 Julio 2024
16 Julio 2024
16 Julio 2024
15 Julio 2024
15 Julio 2024
Sistema de casa Manuales
Últimos Sistema de casa Manuales
3 Septiembre 2024
27 Agosto 2024
25 Julio 2024
13 Julio 2024
11 Julio 2024
11 Julio 2024
11 Julio 2024
11 Julio 2024