Primera LX810e Manual de Usario
Primera
Impresora de etiquetas
LX810e
Lee a continuación 📖 el manual en español para Primera LX810e (2 páginas) en la categoría Impresora de etiquetas. Esta guía fue útil para 4 personas y fue valorada con 4.5 estrellas en promedio por 2 usuarios
Página 1/2
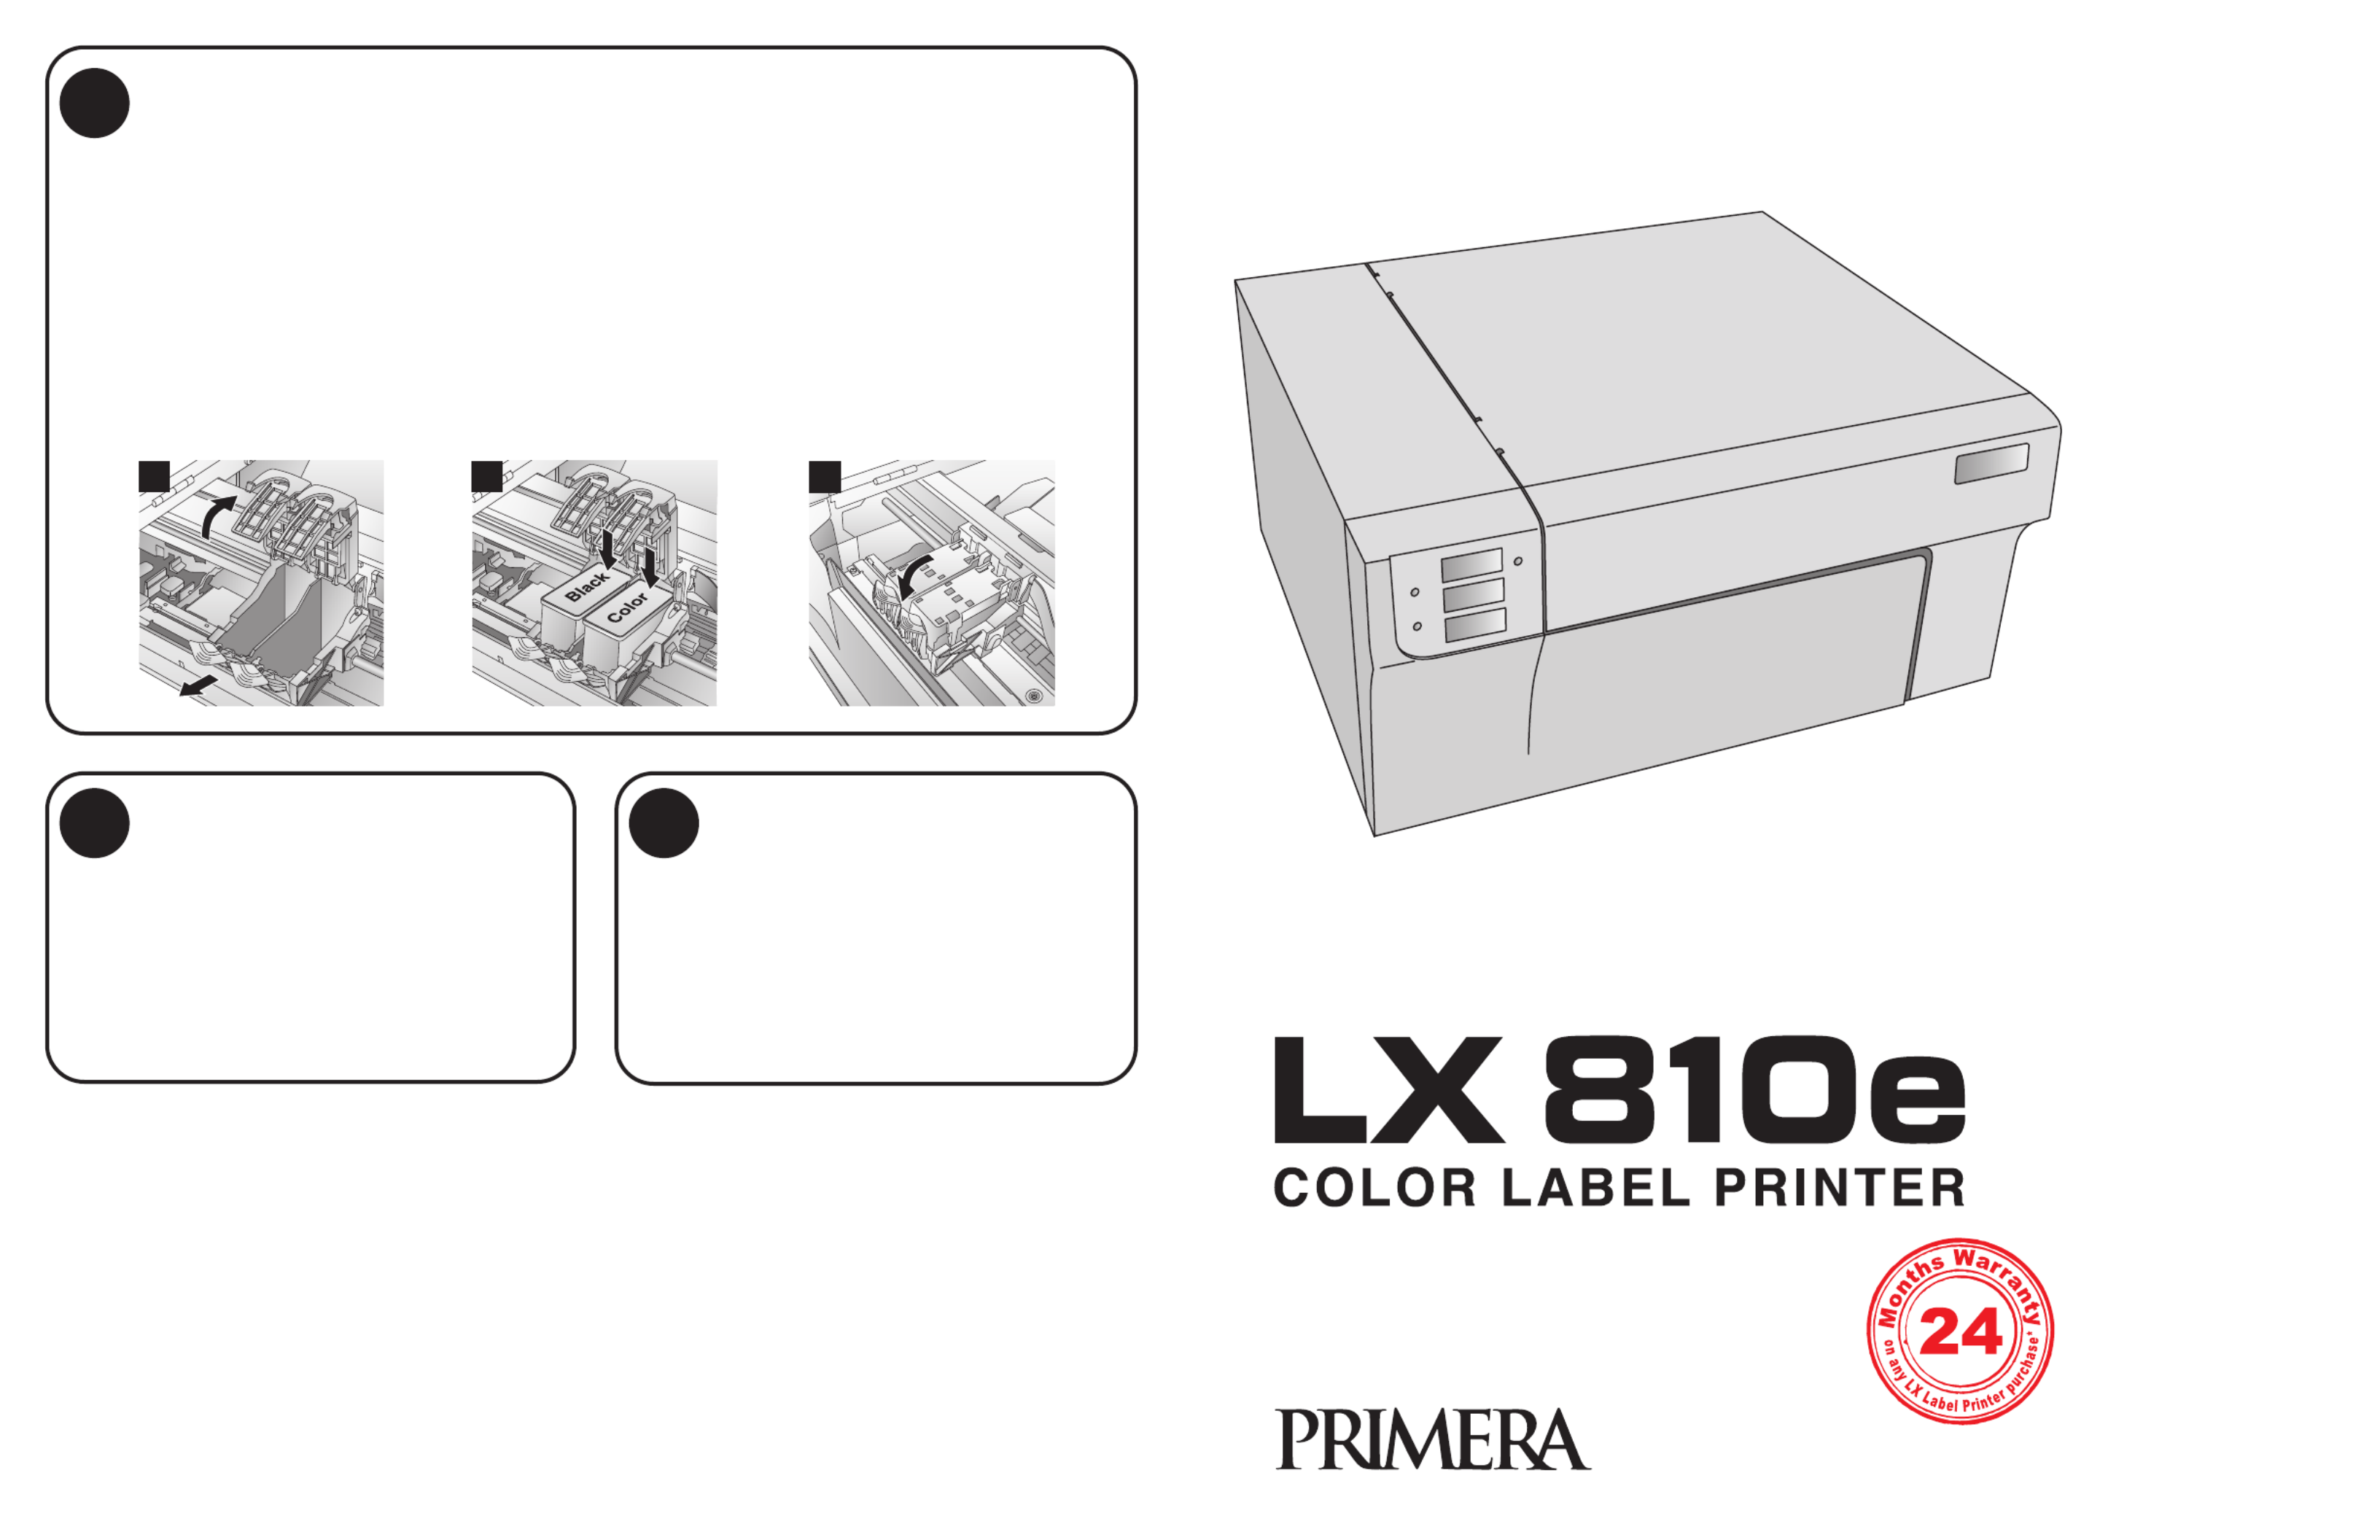
6Install Cartridges
Quick Start
P/N 510929-060409
7Finishing the Install 8Congratulations
Once you have installed the media, the installer
will prompt you to install the cartridges.
Open the Top Cover. Click the Install Cartridges
button to start the cartridge installation process.
The Cartridge Carrier will move itself to the center
of the print area.
1. Press the Cartridge Cover Release to open the
Cartridge Holder.
2. Remove each cartridge from its packaging
and slowly remove the tape covering the
cartridge's print head.
3. Replace/install the cartridge.
4. Push cartridge cover downward until it snaps
in place.
5. Close the Top Cover.
Click Finished Installing Cartridges to confirm
the cartridges have been installed. You will now
be prompted to align your cartridges.
Click Align Cartridges to start the cartridge
alignment. The Printer will now print and
automatically scan a pattern of lines that will
align the black cartridge to the color cartridge.
12 3
After the cartridges and the label media have
been installed and configured, the installer will
complete its process by installing the NiceLabel
SE software on your computer. Simply click
Next to continue installing, and follow the
onscreen instructions to the finish.
Note: For optimal printing speed you MUST
reboot the PC after installing the software!
Congratulations! Your LX810e Color Label
Printer is now installed and ready for use.
Please refer to Section 3 of the User Manual
for a tutorial on using NiceLabel®SE.
© 2009 All rights reserved
*after registering your
product. See
www.primerawarranty.com
for terms and conditions.
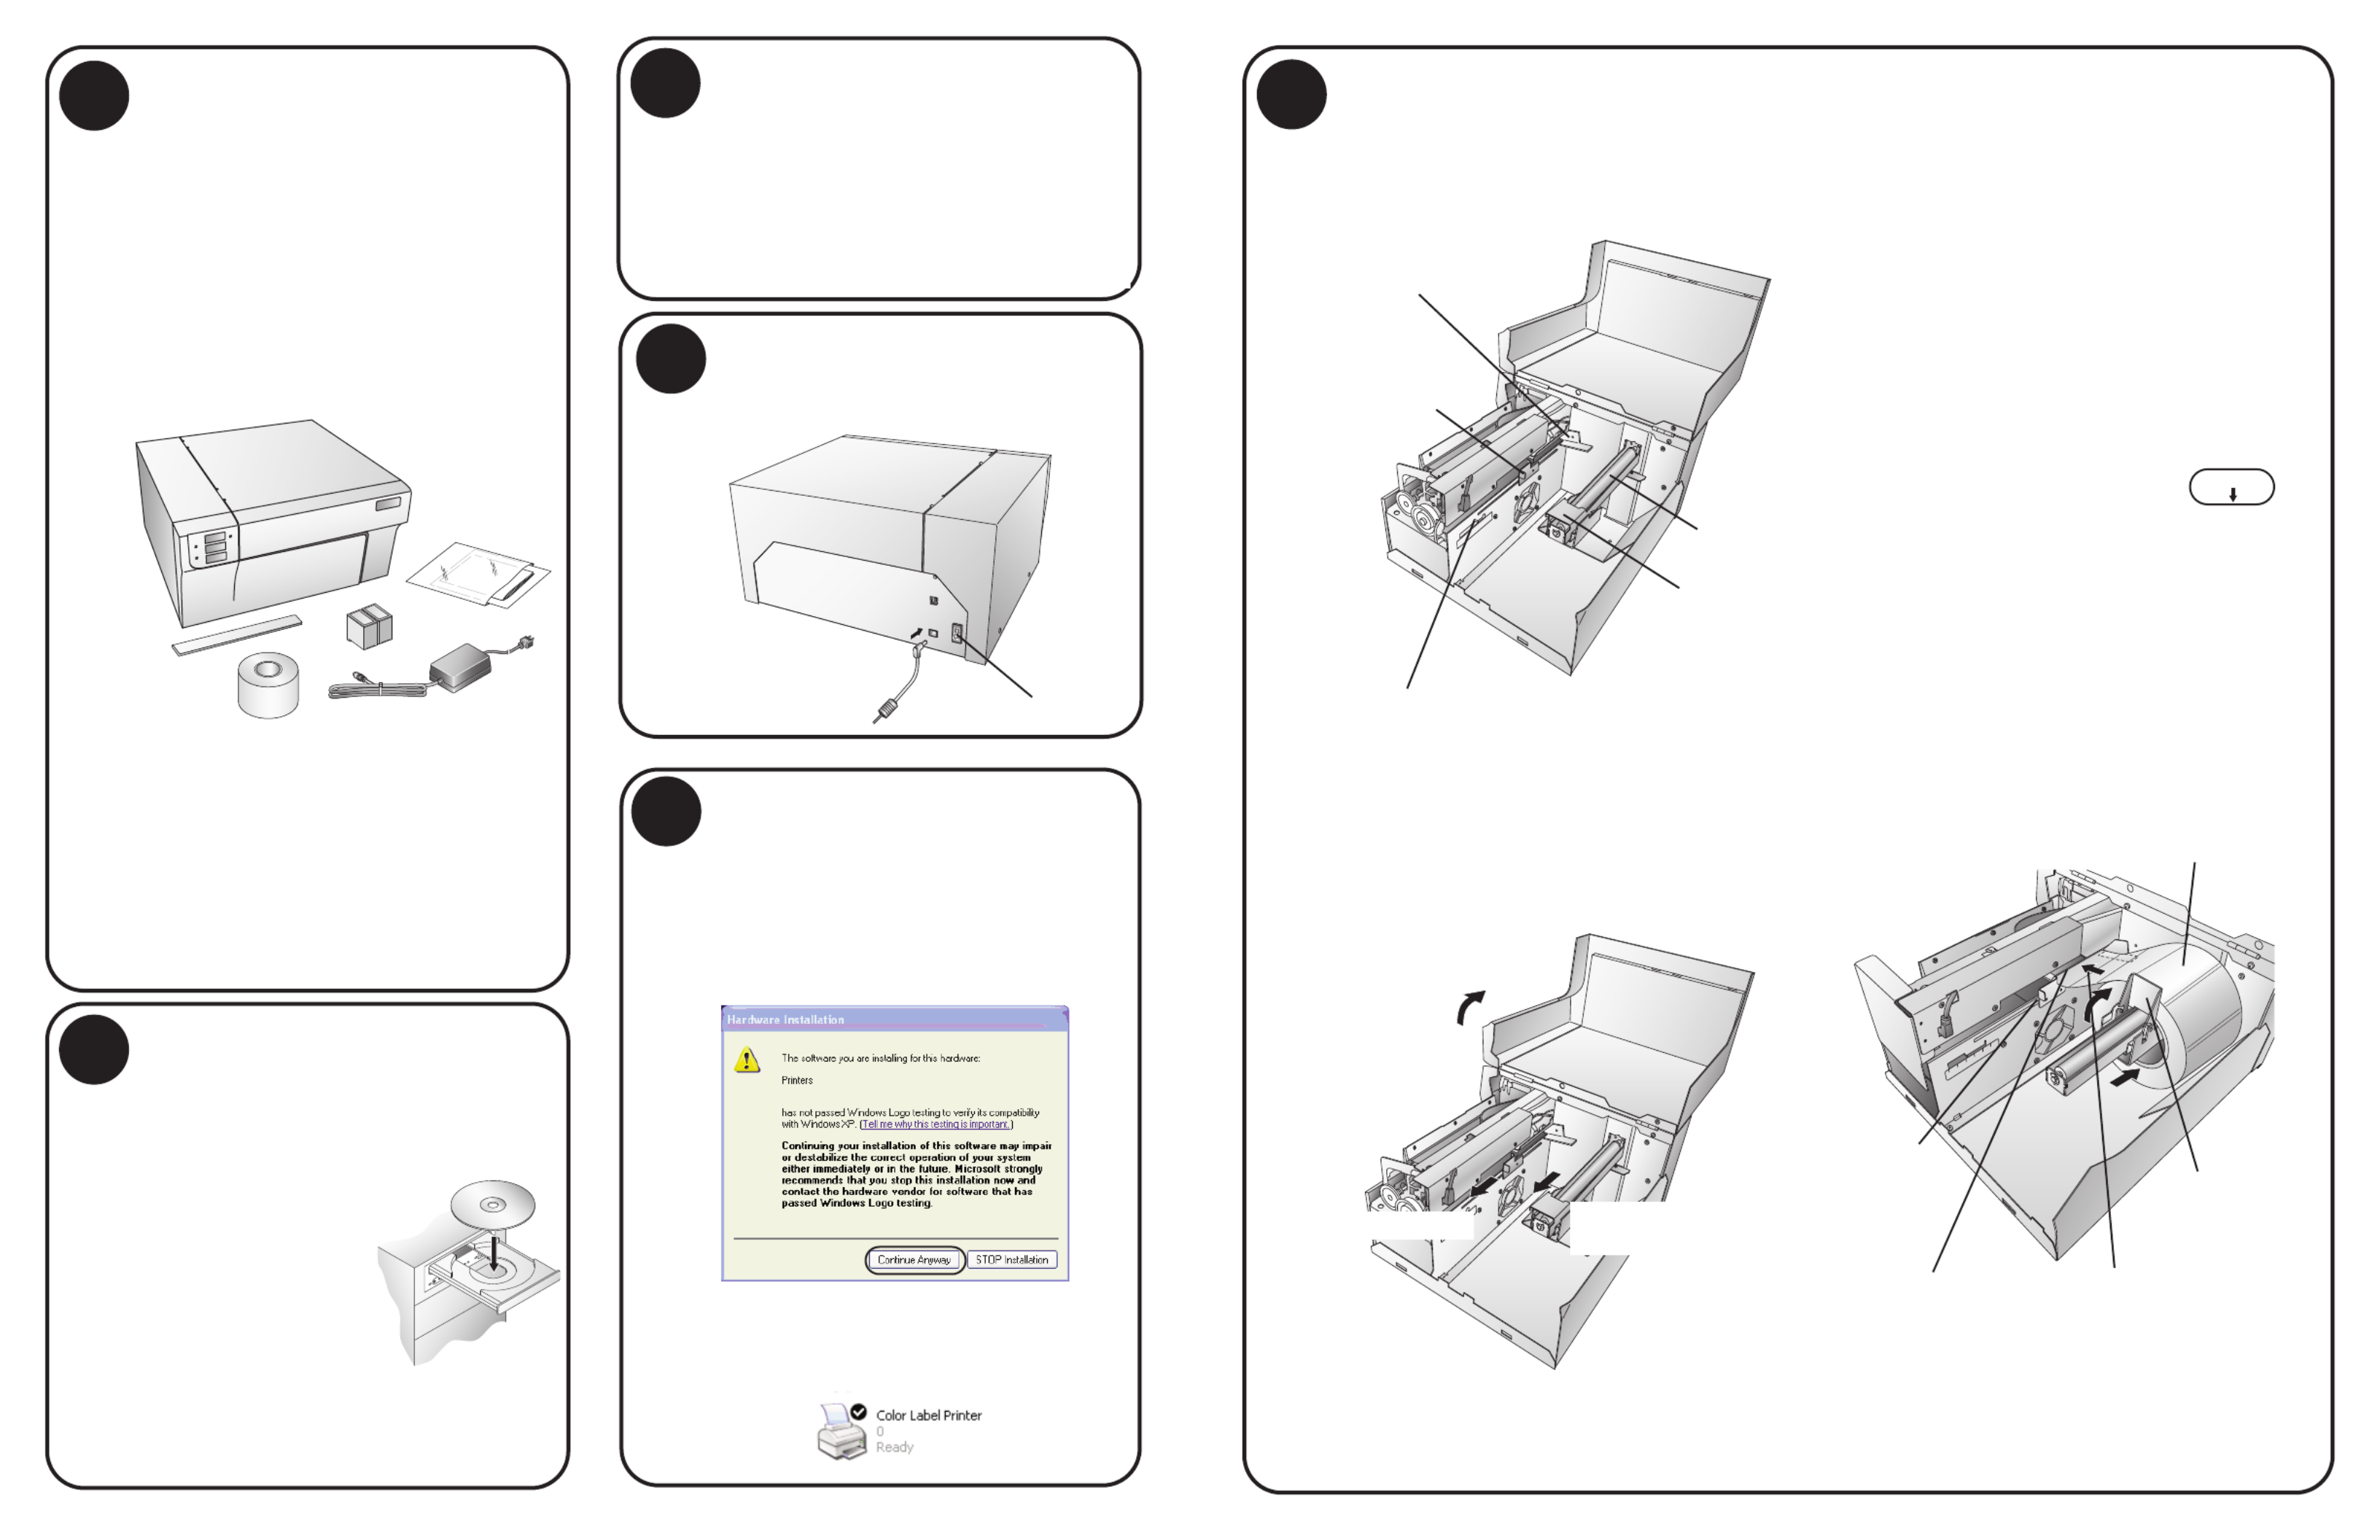
Unpack Your Printer
•Printer
•Separate Power Cord
•Power Adapter
•Software Installer CD
•Color Ink Cartridge
•Dye-Based Black Ink Cartridge
•Starter roll of label stock 6" x 4" High-Gloss
(Located inside the Printer in a cardboard
shipping insert)
•Tear Bar Guard
•This manual and other printed information
Important!
Before continuing open the printer cover. Remove
the cardboard insert holding the print carriage in
place and the cardboard insert around the roll arm.
Note
For optimal printing speed you must have
a PC with the following minimum
specifications:
•Pentium IV Processor
•512 MB of RAM
•5 GB of Free Hard Drive Space
5Install Label Material
2Quick Start Installer (PC)
The installer should prompt you to install label
material. It is recommended for the first install
that you use the starter label roll that ships with
your printer.
1. Open the Top Cover.
2. Lower the Roll Guide and pull it outward to
make room for your label stock.
3. Pull the Movable Throat Guide outward to
make room for the label stock.
4. Remove any shipping tape from your label
stock roll to ensure that it can unroll freely,
making certain that no adhesive portion is
exposed. It is important to note that any
exposed adhesive surface can attach itself the
the inner workings of the print mechanism
and cause a media jam.
5. Place your roll of label stock on the Roll Arm
and push it inward until it touches the stop.
6. Flip up the Roll Guide and slide it inward
until it touches the label stock. (The Roll
Guide will automatically pull back slightly
to the correct position)
7. Place the leading edge of label
stock under the "label stock"
symbols on the Throat Guides. The label
stock should be placed far enough into the
throat of the printer to correctly position the
Movable Throat Guide but not yet into the
printer itself. The label stock should be
biased against the Fixed Throat Guide.
8. Slide the Movable Throat Guide inward until
it almost touches the label stock. There must
be slightly more space between the Throat
Guides than the width of the label stock.
If the label stock is pinched by the guides,
poor print quality or even feeding problems
could result.
9. Feed the label stock further into the printer
until it senses the label and automatically
feeds it through the printer.
Roll Arm
Movable Throat Guide
Sensor Position Adjust
Roll Guide
Fixed Throat Guide
2. Lower the Roll Guide
and Pull it Outward.
1. Open Cover.
3. Pull Throat Guide Out.
5. Place label stock
on Roll Arm.
6. Slide Roll Guide
assembly inward.
8. Slide Throat
Guide inward,
until it almost
touches the
label stock.
1. Insert the Installation CD into your
computer. In a few moments the installer
program should
launch automatically.
If not, perform the
following steps:
a. Double click My
Computer Icon,
then double click
the icon of the
appropriate CD drive containing the
software installer disc.
b. Double click INSTALL.exe then click
the Quick Start Install Button.
Apply Power
3
Turn on the Power Switch.
Power Switch
Plug in the USB Cable
After a few moments Windows will detect
the printer and attempt to install the printer
driver. Follow the on-screen prompts to
install the driver. You will be prompted with
a dialog box like the one shown here:
Click "Continue Anyway".
Once installed the "Color Label Printer" icon
will appear in the printers folder.
Connecting the USB Cable
4
9. Feed the label stock further
into the printer until it senses the
label and automatically feeds it
through the printer.
7. Place the leading edge of
the label stock just past the
Throat Guides.
Label Stock
2Quick Start Installer (continued)
2. In the installer application click the Quick
Start Install Button. The QuickStart Install
will guide you step-by-step through the
installation process. As you complete each
step, click Next. Steps 3-7 are shown below
as well as on the monitor. You may follow
either to complete the setup.
For Macintosh instructions refer to
section 1G of the Users Manual.
1
Especificaciones del producto
| Marca: | Primera |
| Categoría: | Impresora de etiquetas |
| Modelo: | LX810e |
¿Necesitas ayuda?
Si necesitas ayuda con Primera LX810e haz una pregunta a continuación y otros usuarios te responderán
Impresora de etiquetas Primera Manuales

16 Septiembre 2024
28 Agosto 2024
27 Agosto 2024
26 Agosto 2024
25 Agosto 2024
25 Agosto 2024
Impresora de etiquetas Manuales
- Impresora de etiquetas Casio
- Impresora de etiquetas Epson
- Impresora de etiquetas Honeywell
- Impresora de etiquetas Toshiba
- Impresora de etiquetas Brother
- Impresora de etiquetas Renkforce
- Impresora de etiquetas Citizen
- Impresora de etiquetas Seiko
- Impresora de etiquetas Argox
- Impresora de etiquetas Phoenix
- Impresora de etiquetas Dymo
- Impresora de etiquetas Bixolon
- Impresora de etiquetas Olivetti
- Impresora de etiquetas Intermec
- Impresora de etiquetas Zebra
- Impresora de etiquetas Leitz
- Impresora de etiquetas GoDEX
- Impresora de etiquetas POSline
- Impresora de etiquetas Kroy
- Impresora de etiquetas Metapace
- Impresora de etiquetas Datacard
- Impresora de etiquetas Labelmate
- Impresora de etiquetas Brady
- Impresora de etiquetas Star Micronics
- Impresora de etiquetas Datamax-O'neil
- Impresora de etiquetas Panduit
- Impresora de etiquetas Dascom
- Impresora de etiquetas DULA
- Impresora de etiquetas TSC
- Impresora de etiquetas EC Line
- Impresora de etiquetas Tach-It
- Impresora de etiquetas Colop
- Impresora de etiquetas Qoltec
- Impresora de etiquetas SATO
- Impresora de etiquetas SII
- Impresora de etiquetas Start International
- Impresora de etiquetas Qian
- Impresora de etiquetas Custom
Últimos Impresora de etiquetas Manuales
27 Octubre 2024
27 Octubre 2024
18 Octubre 2024
16 Octubre 2024
16 Octubre 2024
15 Octubre 2024
13 Octubre 2024
11 Octubre 2024
10 Octubre 2024
8 Octubre 2024