Yamaha CRX-N560 Manual de Usario
Yamaha
Receptor de CD
CRX-N560
Lee a continuación 📖 el manual en español para Yamaha CRX-N560 (182 páginas) en la categoría Receptor de CD. Esta guía fue útil para 23 personas y fue valorada con 4.5 estrellas en promedio por 2 usuarios
Página 1/182

Network CD Receiver / Ampli-Tuner CD Réseau
© 2013 Yamaha Corporation Printed in Malaysia ZH10740-1
OWNER’S MANUAL
MODE D’EMPLOI
BEDIENUNGSANLEITUNG
GEBRUIKSAANWIJZING
Read the supplied booklet “Safety Brochure” before using the unit.
Lisez le livret fourni «Brochure sur la sécurité» avant d’utiliser l’unité.
Lesen Sie die „Sicherheitsbroschüre“, bevor Sie das Gerät verwenden.
Lees het meegeleverde boekje “Veiligheidsbrochure” voordat u dit toestel gebruikt.
G1
English Français Deutsch
Nederlands

2 En
Contents
Introduction......4
Supplied accessories......4
About this manual......4
Part name......5
Front panel......5
Rear panel......6
Front panel display......7
Adjusting display brightness......7
Remote control......8
Preparations......9
Connecting the speakers......9
Connecting antenna......10
Connecting to the network......11
Turning on the power......12
Setting the network devices......13
PC......13
NAS......13
Mobile devices......13
Listening to CD......14
Listening to iPod/USB devices......15
Playing iPod......15
Playing USB devices......15
Listening to the songs in the
computer......17
Setting the media sharing of music files......17
Playing back songs in the PC......18
Listening to external sources......19
More on playback......20
Shuffle playback......20
Repeat playback......20
Playback information......21
Adjusting sound quality......22
Listening to DAB stations
(CRX-N560D only)......23
Initial scan......23
Tuning in DAB stations......23
Presetting DAB stations......24
Selecting preset DAB stations......24
Deleting a preset station......24
Confirming the reception......25
Listening to FM radio stations......26
Tuning in FM stations......26
Presetting FM stations......26
Selecting preset FM stations......27
Deleting a preset station......27
Radio Data System......28
Listening to Internet radio......29
Listening to the Music with
AirPlay......30
Playing iPod......30
Playing iTunes......30
Using the clock......31
Setting the clock......31
Setting the wake-up timer......32
Sleep timer......33
Updating the firmware......34
Option settings......35
Option menu list......36
Troubleshooting......37
General......37
Network......38
iPod......39
Disc......40
USB devices......40
DAB reception (CRX-N560D only)......41
FM reception......41
Messages on the front panel display......42
Supported devices/media and
file formats......43
Specifications......45
Information about software......i

En 3
English
Awesome!
Great sound!!
The sound from a PC is
something else!......17, 18
High-resolution sound is
played back......22
More on music
A variety of external devices (Blu-ray/
DVD/mobile music player etc.) can
be connected...... 19
I can listen to the internet radio
from my audio system...... 29
Anytime,
anywhere,
music!
Convenient App! My smartphone as a
remote control ......18
Songs in my iPhone from
speakers wirelessly.......30

4 En
Introduction
Confirm the package contents and useful points of this manual.
Supplied accessories
•Change both batteries when the operation range of the remote control decreases.
Remote control
Batteries (× 2)
(AA, R6, UM-3)
FM antenna
(for CRX-N560)
DAB/FM antenna
(for CRX-N560D) Check the “+” and “-” of the batteries and
inset them the correct way around.
About this manual
•Instructions and illustrations used in this manual
refer to the CRX-N560, unless otherwise specified.
•How to operate this unit is described mainly using the
remote control.
•Illustrations may differ from actual item depicted.
•“iPod” described in this manual may also refer to
“iPhone” or “iPad.”
•Symbols:
Indicates precautions for use of the unit and its
feature limitations.
Indicates supplementary explanations for better
use.
&Indicates the corresponding reference page(s).

Part name
6 En
Rear panel 1Power cable (&P.12)
2DC OUT terminal
Supplies power to the Yamaha AV accessories from this
terminal. When using this, set [Use Accessory] in [System
Config] from the option setting, to [YES] (&P.35). For
details, refer to the owner’s manual supplied with the
accessory.
3NETWORK terminal (&P.11)
Connects to a network using a commercially available
network cable.
4FM (DAB/FM) antenna terminal (&P.10)
5DIGITAL IN 1 terminal (optical input) (&P.19)
6DIGITAL IN 2 terminal (coaxial input) (&P.19)
7AUX 1 terminal (RCA input) (&P.19)
8AUX 2 terminal (mini jack input) (&P.19)
9SUBWOOFER terminal (&P.9)
0SPEAKERS terminal (&P.9)
Part name
8 En
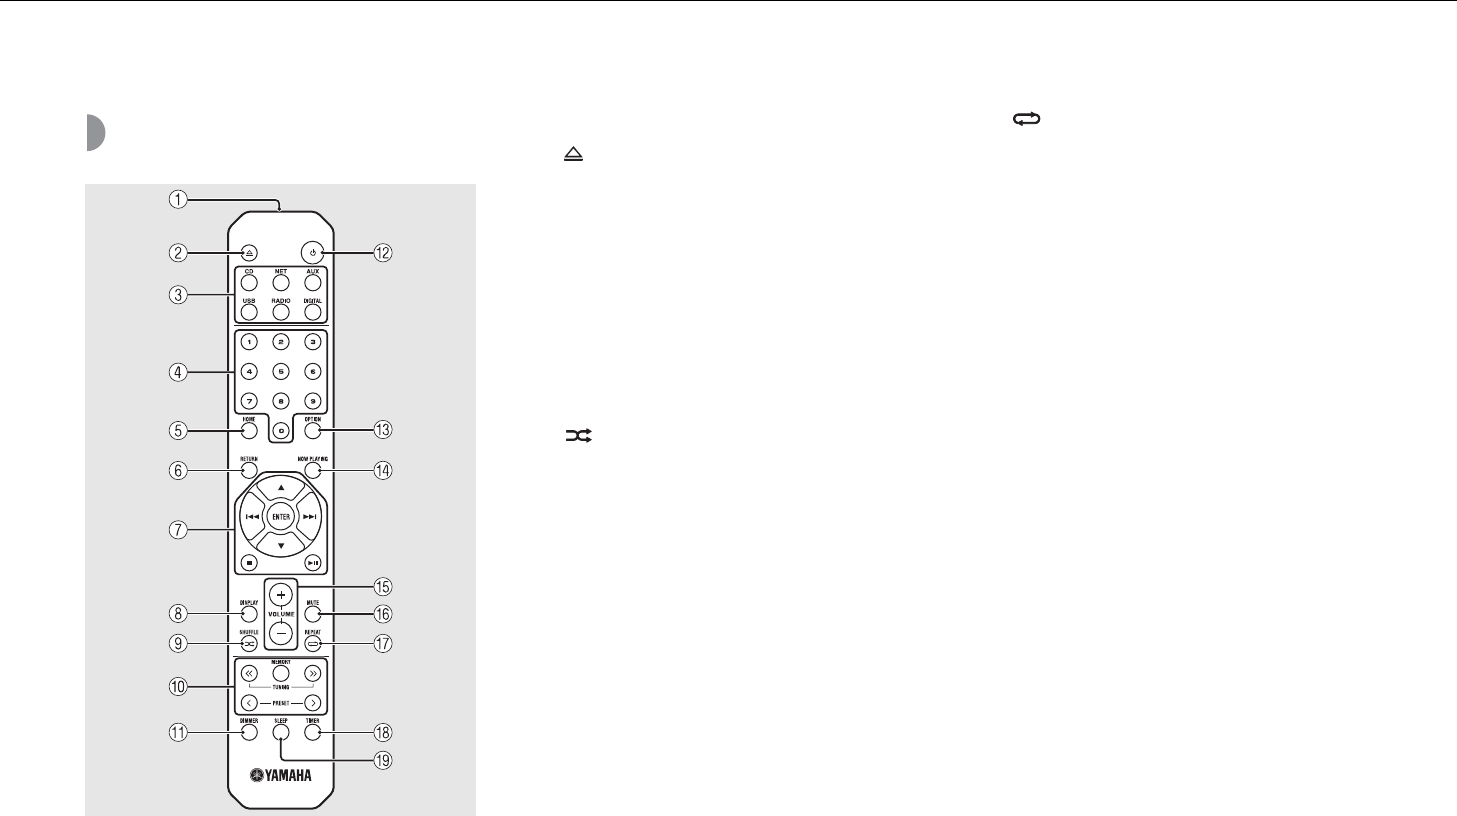
Remote control 1Infrared signal transmitter
2 (Open/close the disc tray) (&P.14)
3Source buttons
Switch the audio source to be played.
4Numeric buttons (&P.14)
5HOME (&P.16, 18, 29)
6RETURN (&P.14, 16, 18, 29)
7Audio control, cursor control buttons
(&P.14, 16, 18, 29)
8DISPLAY (&P.21)
9 (SHUFFLE) (&P.20)
0DAB/FM control buttons (&P.23, 24, 26, 27)
ADIMMER (&P.7)
BA (Power) (&P.12)
COPTION (&P.22, 25, 31, 35)
DNOW PLAYING (&P.16, 18, 29)
EVOLUME +/–
Controls the volume.
FMUTE
Turns mute on or off.
G (REPEAT) (&P.20)
HTIMER (&P.32)
ISLEEP (&P.33)

En 9
English
Preparations
Connect speakers or antenna and turn the unit on.
Do not connect the power cable of the unit until you have finished connecting all cables.
Connecting the speakers
1Remove the insulation from the end of
the speaker cable to expose the bare
wires.
2Connect the speaker to the unit, as the
illustration shows.
•Prepare speakers and speaker cables separately.
•For connection of the speakers, refer to the
owner’s manual supplied with them.
15 mm (5/8 in.)
•Take care not to allow the bare speaker wires to touch each other or any metal part of the unit. This could damage the
unit and/or the speakers.
•Make sure that left and right (L, R) connections and polarity (red: +, black: -) are correct. If connections are incorrect, the
sound will be unnatural.
•Use speakers of at least 6 Ω impedance.
•You can also connect a subwoofer with built-in amplifier to the unit.
2
Right speaker
Left speaker
Subwoofer
Monaural pin cable
Speaker
cable

Preparations
10 En
Connecting antenna
1Connect the supplied antenna to the
unit.
2Install it with pins where the unit can
obtain good reception.
•Be sure to stretch out the antenna as the illustration shows.
•If radio reception with the supplied antenna is not satisfactory, a commercially available outdoor antenna may improve
reception.
1
2
Supplied antenna

Preparations
En 11
English
Connecting to the
network
You can play back music files stored on your PC, mobile
devices, DLNA*-compatible NAS, or audio contents on the
Internet, by connecting this unit to the network. You can
also operate the unit with your mobile device.
* Digital Living Network Alliance
Connect the unit to the network as shown
on the right.
•Connect with a commercially available STP (shielded
twisted pair) network cable (CAT-5 or higher, straight-
throughcable).
•For details on Internet connection, refer to the owner’s manuals of your network devices.
•If you are using a router that supports DHCP, you do not need to configure any network settings for the unit. If you are
using a router that does not support DHCP, configure the network setting from [Network Config] in the option setting
(&P.35).
•Wired connections are recommended for devices other than the mobile to ensure high sound quality.
•Some security software installed on your PC or the firewall settings of network devices (such as a router) may block the
access of the unit to the network devices or the Internet. In this case, change the setting of the security software or
network devices.
•When setting the subnet manually, each server must be connected to the same subnet as the unit (&P.36).
LAN
WAN
This unit
Broadband
router
Internet
Modem
Mobile device
PC
Network attached
storage (NAS)
Network cable

En 13
English
Setting the network devices
Configure your devices connected to the network to play back music files stored on your PC or NAS, or configure your mobile device to control this unit.
PC
Configure the media sharing setting of
your PC (&P.17).
NAS
Configure the settings to access your NAS.
•Enable DHCP setting of your NAS if needed.
•For more detailed settings, refer to the owner’s manual
supplied with your NAS.
Mobile devices
Install the dedicated application
“NETWORK PLAYER CONTROLLER” to your
mobile devices (&P.18).
•The application supports iPhone/iPad/iPod touch and
Android mobile devices.
•The mobile device needs to be connected to the same
router as the unit.

14 En
Listening to CD
This unit allows playback of audio CDs and data CDs in which the MP3/WMA files are recorded.
For details on playable CDs, see “Supported devices/medias” (P.43).
1Turn INPUT to select [CD]. Or, press
on the remote control.
2Set a CD in a disc tray.
•Press to open/close the disc tray.
3Playback starts.
•The remote control functions are shown below.
S
T
Skip to the first file of the previous or
next folder when playing back MP3/
WMA files.
Play/pause
Stop
Skip to the beginning of the song
being played back or the previous
song.
Skip to the next song.
Starts shuffle playback (&P.20).
Starts repeat playback (&P.20).
1 - 9, 0 Specify the song number.
RETURN Cancel the song number.
ENTER Apply the song number.
2
1
INPUT
1
CD
3
•Files on a data CD are played back in
alphanumeric order.
•When CD playback is stopped, playback will
resume from the beginning of the song last
played. Pressing while playback is stopped will
clear resume playback.

Listening to iPod/USB devices
16 En
Remote control operation for iPods/USB
devices
Skip to the beginning of the song being
played back or previous song (for iPod, press
and hold to fast rewind).
Skip to the next song (for iPod, press and
hold to fast forward).
Stop
Play/pause
Shuffle playback (&P.20)
Repeat playback (&P.20)
Switching the information display of iPod
•When operating your iPod with Yamaha’s
application “NETWORK PLAYER CONTROLLER,” the
information display switches to the extended
mode.
To switch the information display mode, press and
hold the DISPLAY button.
-Standard mode (default): Operate your iPod
while viewing the screen of the iPod and select
a song to play back.
-Extended mode: Operate the remote control
while viewing the iPod information shown on
the front panel display (browsing operation)
and select a song to play back. The remote
control functions are as shown below.
S/TShow other item.
ENTER
Confirm the selected item and
proceed to the next level or start
playback.
HOME Show the top-level item.
RETURN Back to the previous item.
NOW
PLAYING
Finish browsing and display the
playback content information.

En 19
English
Listening to external sources
This unit allows playback of external devices, such as a DVD player or mobile music player. Use the terminal (DIGITAL IN 1/2 or AUX 1/2) according to the device to
be connected (&P.6). For the connection of each external device, refer to its supplied owner’s manual.
1Unplug the power cable of the unit
and connect the external device to the
unit.
•Prepare commercially available cables for
connection.
2Plug the power cable of the unit back
into the wall outlet and press to
turn the unit on.
3Change the music source.
•Press or according to the connecting
terminal for the external device you wish to play
back.
•Press to change the source to AUX1/AUX2
(analog input), press to change the source
to DIGITAL IN1/DIGITAL IN2 (digital input).
4Play back the connected external
device.
•For details on playback, refer to the owner’s
manual supplied with the external device. •Decrease the volume of the unit and the external device before connection. Otherwise, playback volume may be
too loud.
1
RCA stereo
cable
DVD disc player, etc.
3.5 mm stereo
mini-plug cable
Mobile music
player
2
A
3
Optical cable
Coaxial digital audio
cable
Blu-ray disc player, etc.

20 En
More on playback
You can enjoy music in varied song order or sound quality, and view music information during playback.
Operations described in this section apply to all devices, such as PC (server), iPod, USB device, or CD.
Shuffle playback
Press during playback.
•The shuffle indicator in the front panel display switches
as shown below each time you press the button.
* The range of shuffle depends on the media being played
back.
Repeat playback
Press during playback.
•The repeat indicator in the front panel display switches
as shown below each time you press the button.
* The range of repeat depends on the playback media.
Perform shuffle playback.*
Not displayed Does not perform shuffle playback.
Repeat the song being played back.
Perform repeat playback.*
Not displayed Does not perform repeat playback.
REPEAT SHUFFLE
•Shuffle playback and repeat playback can be
performed at the same time (except ).

More on playback
En 21
English
Playback information
Song title, elapsed time, etc., can be shown on the front
panel display.
Press during playback.
•Display switches in the order as shown below each time
you press .
*1 If the song title cannot be obtained, the file title may be
displayed.
*2 Only when playing an audio CD.
*3 Only when playing an audio CD and when there is
information to display.
USB/iPod/AirPlay/Server CD
Song title*1Playing time
Album tile Remaining time of the
song*2
Artist name Remaining time of the
disc*2
Playing time Song title*1, 3
Album tile*3
Artist name*3
AL
M
B
e
U
t
M
eora
DISPLAY
•Characters shown on the front panel display are
alphanumerics only.
•Information is not displayed when the iPod display
mode is the standard mode (&P.16).

More on playback
22 En
Adjusting sound quality
Use the option setting to adjust sound quality.
1Press .
•Option menu is shown on the front panel display.
2Press S/T to select the desired item
and press .
3Press S/T to change the setting and
press .
•The setting is applied.
•Press to return to the previous item.
•To cancel the sound quality setting, press .
•To set other items, repeat steps 2 and 3.
4Press to finish the option setting.
Option menu regarding sound quality
1, 4
OPTION
2, 3
S/T,
ENTER
RETURN
(Setting value. Bold: default)
Equalizer
Adjusts low frequency [EQ Low], middle frequency [EQ
Mid], and high frequency [EQ High]. The setting is also
applied when using headphones.
(-10 to 0 to +10)
Balance
Adjusts the volume balance of the left and right speakers.
This setting is not applied when using headphones.
(Lch. +10 to --CENTER-- to Rch.+10)
Music Enhancer
Regenerates musical elements that are lost through
compression.
(ON, OFF)
When playing back a high quality music source, such as
FLAC or WAV, it is recommended to set to [OFF]. When
playing back an audio CD that has not been compressed,
this function is not available even if [ON] is set.

En 23
English
Listening to DAB stations (CRX-N560D only)
You can listen to radio of higher quality sound with Digital Audio Broadcasting (DAB) and DAB+ (upgraded version of DAB).
Connect the supplied antenna (&P.10) and perform an initial scan before you tune into DAB for the first time.
Initial scan
Press repeatedly to select [DAB].
•Initial scan starts automatically when you select [DAB]
for the first time.
•When scanning is complete, the number of receivable
DAB stations is shown on the front panel display
momentarily, and the first station stored in station order
is played.
Tuning in DAB stations
1Press repeatedly to select [DAB].
•When the unit cannot receive the DAB signal, “Off
Air” is shown on the front panel display.
2Press TUNING / to select a DAB
station.
Secondary indicator
(appears if station has a sub station)
1
RADIO
2
TUNING
/
S/T,
ENTER
OPTION
•You can also perform initial scan from the option
setting.
1Press when the source is DAB.
-Option menu is shown on the front panel
display.
2Press S/T to select [Initial Scan] and press
.
-Initial scan starts and finishes automatically.
•If the initial scan is performed, stored DAB station
information and preset DAB stations are cleared.
•This unit can receive only Band III DAB frequencies.
Frequency in MHz/Channel label

Listening to DAB stations (CRX-N560D only)
En 25
English
Confirming the
reception
You can confirm the DAB signal level. This is useful when
you set the antenna.
1Press when the source is [DAB].
•Option menu is shown on the front panel display.
2Press S/T to select [DAB Tune Aid]
and press .
3Press S/T to change the channel
label.
•The measured DAB signal reception level is
displayed.
•The level is from 0 (none) to 100 (best).
4Press to finish the option setting.
1, 4
OPTION
2, 3
S/T,
ENTER
•When performing DAB Tune Aid and the DAB
signal is weak, try adjusting the position of the
antenna to obtain good reception.

26 En
Listening to FM radio stations
To listen to FM radio stations, connect the supplied antenna.
See “Connecting antenna” (P.10) for connecting the antenna to the unit.
Tuning in FM stations
1Press .
2Press and hold TUNING / .
•Automatic tuning starts, then stops automatically
when a station is tuned in.
Presetting FM stations
Tunes in stations with good reception and presets them
automatically.
1Press .
2Press and hold for 2 seconds or
more.
3Press .
•Auto preset starts and when it finishes,
“Completed!” is shown on the front panel display.
Auto preset
1
RADIO
2
TUNING
/
1
RADIO
2, 3
MEMORY
•If station reception is weak, you can tune into a
station manually by pressing the TUNING /
button repeatedly.
•Auto preset replaces all currently-stored stations
with newly-stored stations.
•You can preset up to 30 FM stations.
•To cancel the auto preset, press .

Listening to FM radio stations
En 27
English
1Tune into a station you want to store
(&P.26).
2Press .
•Preset number flashes on the front panel display.
3Press S/T to select the desired preset
number.
4Press to preset the station.
Selecting preset FM
stations
1Press .
2Press PRESET / to select a
station.
Manual preset
4
ENTER S/T
OPTION
3
2
MEMORY
1
RADIO
2
PRESET
/
•To cancel manual preset setting, press .
Deleting a preset station
Use the option setting to delete a preset station.
1Press when the source is FM.
-Option menu is shown on the front panel
display.
-To cancel deleting preset stations, press .
2Press S/T to select [Preset Delete] and press
.
3Press S/T to select the preset number to be
deleted.
4Press .
-The preset station is deleted and [Deleted!] is
shown on the front panel display.
5Press to finish the option setting.

Listening to FM radio stations
28 En
Radio Data System
The unit can receive Radio Data System information.
Press when the source is FM.
•Each press of the button changes the information
displays shown below.
Frequency (default)
PTY (Program Type)
RT (Radio Text)
CT (Clock Time)
DISPLAY
•If the signal transmission of the Radio Data System
station is too weak, this unit may not be able to
receive Radio Data System information
completely. In particular, RT (Radio Text)
information uses a lot of bandwidth, so it may be
less available compared to other types of
information.

En 29
English
Listening to Internet radio
You can listen to world-wide radio stations via Internet.
Make sure that the unit is connected to the Internet properly (&P.11).
1Press repeatedly to select [Net
Radio].
2Browse the Internet and select a radio
station.
•The remote control functions are shown below.
3Playback starts.
•To stop playback, press .
S/TShows other item.
ENTER
Confirm the selected item and
proceed to the next level or start
playback.
HOME Show the top-level item.
RETURN Back to the previous item.
NOW
PLAYING
Finish browsing and display the
playback content information.
1
NET
2, 3
DISPLAY
•Playback information can be shown by pressing
the DISPLAY button while Internet radio is played
back. Information changes as shown below each
time you press it.
•You can register your favorite Internet radio
stations to the “Bookmarks” folder by selecting
[Net Radio] as the source on the unit and then
accessing the following website with the web
browser on your PC.
http://yradio.vtuner.com/
To use this feature, you need the vTuner ID of the
unit and your e-mail address to create your
personal account. You can check the vTuner ID
(MAC address of the unit) in [Network Info]
(&P.36) in the option setting.
Radio station name (default)
Song title
Playing time

30 En
Listening to the Music with AirPlay
The AirPlay function allows you to play back iTunes/iPod music on the unit wirelessly via a network.
Make sure that the unit and your PC or iPod are connected to the same router (&P.11).
Playing iPod
1Turn on the unit and display the
playback screen on the iPod.
•If the iPod recognizes the unit, is shown on
the screen of the iPod.
2Tap and select the unit’s name.
•The source automatically switches to [AirPlay] and
playback starts (except in the eco standby mode).
Playing iTunes
1Turn on the unit and start iTunes.
•If the iTunes recognizes the unit, is shown on
the screen of iTunes.
2Click and select the unit’s name.
•The source automatically switches to [AirPlay]
(except in the eco standby mode).
3Play back songs with iTunes.
1
2
Example
Example
1
2
•When you use iTunes/iPod controls to adjust
volume, the volume may be unexpectedly loud.
This could result in damage to the unit or
speakers. If the volume increases during playback,
stop playback on iPod/iTunes immediately.
•You can also use the unit and remote control to
play back, pause, stop, and skip songs.
•To control iTunes playback with the remote
control, you need to configure the iTunes
preferences to enable iTunes control from remote
speakers in advance.
Clearing AirPlay
•Tap/click on the iPod/iTunes screen and
select a device other than CRX-N560 from the
speaker list. Or, change the source to other than
AirPlay.

En 31
English
Using the clock
Once you set the clock, you can play your favorite song or radio program as an alarm.
Setting the clock
1Press .
•Option menu is shown on the front panel display.
2Select [System Config] with S/T and
press .
3Select [Clock Setting] with S/T and
press .
4Set the date and time.
•Change the setting with S/T and press to
confirm it.
•Perform the procedure in the order of year,
month, day, hour, and minute.
•To cancel the setting, press .
•When the setting completes, [Completed!] is
shown.
5Press to finish the option setting.
2, 3, 4
S/T,
ENTER
RETURN
1, 5
OPTION
DISPLAY
•The clock setting will be lost if you disconnect the
power cable from the wall outlet for about a week.
Set the clock again.
•The clock format (12-hour/24-hour) can be
changed if you press the DISPLAY button while
setting the clock.

Using the clock
32 En
Setting the wake-up
timer
Music or beep will be started at the time you set.
1Press and hold .
•[Timer Setting] and time are shown on the front
panel display, and and hour flash.
2Set the following items, 1 to 3.
•Press S/T to select a setting value and press
to set the item.
•The display switches to the next item.
•To cancel the setting, press .
Continue to the next page \
1Start-up time
Set the hour and minute.
2Volume
Can be set between [5] to [59], and [MAX].
3Repeat
Repeat: Wake-up timer sounds everyday at
the set time.
No Repeat: Wake-up timer sounds once.
2
S/T,
ENTER
OPTION
1
TIMER
A
•Set the clock before setting the wake-up timer.
•Wake-up timer is not available when [Power
saving] is set to [Eco]. Set it to [Normal] (&P.12).
•You can also set the wake-up timer using the
option setting.
1Press .
-The setting menu is shown on the front panel
display.
2Press S/T to select [Timer Setting] and press
.
3Perform step 2 on the left.
4Press to finish the option setting.
5Set the music source, play back the source, and
press .

Using the clock
En 33
English
•When the setting completes, [Completed!] is
shown and lights up on the front panel
display.
3Press .
•The unit enters the standby mode and the beep
sounds at the time you set.
•If you wish to play back music at the time you set,
select an audio source and play it back before
pressing in this step. See (*) at the bottom of
tips on the right for details on audio source
playback.
Sleep timer
You can set the time to elapse which the unit
automatically enters to standby mode.
Press several times to select the time.
•Time can be selected from 30/60/90/120 min., or OFF.
• lights up shortly after the time is selected, and the
sleep timer is set.
•To cancel the sleep timer, press again.
3
A
TIMER
SLEEP
•If the source is removed from the unit after the
wake-up timer is set, the unit will beep at the start-
up time.
•If any music source is played back at the start-up
time, flashes and playback will continue.
•After setting the wake-up timer, you can enable or
disable it by pressing the TIMER button when the
unit is on.
•To stop the beep, press or A; otherwise, it will
stop after 60 minutes.
* When the music source is set to AUX, Server,
DIGITAL IN, or AirPlay, the unit beeps at the start-
up time.

34 En
Updating the firmware
When new firmware is released, a message to update your current firmware will be shown on the front panel display (when the unit is connected to the Internet
only). In this page, an updating method via a network using the option setting is shown.
1Press .
•The option menu is shown on the front panel
display.
2Select [System Config] with S/T and
press .
3Select [Firm Update] with S/T and
press .
4Select [Network] with S/T and press
.
•Update starts.
•When update finishes, messages are shown in the
following order: “Update success.”, “Please…”, and
“power off!.”
5Unplug the power cable from the wall
outlet and plug it back after about 30
seconds.
•Update is applied.
2, 3, 4
S/T,
ENTER
1
OPTION
•Do not operate the unit or disconnect the power
cable and network cables while updating.
•Once the message prompting update is shown on
the front panel display, it will not be shown again,
even if you do not perform updating. However,
when you turn on the unit after the power cable
has been disconnected from the wall outlet for a
while, the message will be shown.
•When Internet speed is not fast enough or the unit
is connected to the wireless network via a wireless
network adapter, network update may not be
possible depending on the condition of the
wireless connection. In this case, try again or
update the firmware using a USB memory device.
The firmware can be downloaded from the
Yamaha Website.
To update the firmware using a USB memory
device
You can download the firmware to the USB memory
device, and connect that USB memory device to the
USB jack on the unit.
•Select [USB] in step 4 and press the ENTER button
to start the update.

En 35
English
Option settings
Option settings allow you to configure the unit to suit how you will use it.
1Press .
•Option menu is shown on the front panel display
(&P.36).
2Select a desired option menu with S/T
and press .
3Change the setting with S/T and
press .
•Repeat step 3 if the sub menu is required to be
set.
•Press to cancel the setting and return to the
previous level.
•Repeat steps 2 and 3 if you set another menu
item.
4Press to finish the option setting.
2, 3
S/T,
ENTER
1, 4
OPTION
RETURN
•To set [Advanced Setup] in the option menu, press
the OPTION button on the remote control while
pressing and holding (stop button) of the
unit, then proceed to step 3.

En 37
English
Troubleshooting
Refer to the table below when the unit does not function properly. If your problem is not listed below or if the instruction below does not help, turn off the unit,
disconnect the power cable, and contact the nearest authorized Yamaha dealer or service center.
First, check that the connectors of each cable are securely inserted in to jacks on each device.
General
Problem Cause Solution
The unit enters the standby mode soon
after the power is turned on.
The unit does not operate properly.
The power cable is not properly connected. Connect the power cable firmly.
The power does not turn off.
The internal microcomputer has frozen, due to an external electric shock
(such as lightning or excessive static electricity) or to a drop in the power
supply voltage.
Hold down A on the front panel for more than 10 seconds to initialize and
reboot the unit. (If the problem persists, unplug the power cable from the
wall outlet and plug it again after 30 seconds or more.)
No sound.
No appropriate source has been selected. Select an appropriate source with INPUT on the front panel or the source
buttons on the remote control (&P.5, 8).
Speaker connections are not secure. Secure the connections (&P.9).
The volume is minimum or mute. Turn up the volume.
The power is suddenly turned off. The sleep timer may be set (&P.33). Turn on the unit and play the source again.
Auto Power Off is set (&P.12).
The clock setting has been cleared. The power cable has been disconnected or there was power outage. Connect the power cable, and set the clock again (&P.31).
Sound is heard from the speaker on one
side only. Source device or speakers are not connected properly. Connect the source device or speaker cables properly (&P.9, 19). If the
problem persists, the cables may be defective.
There is noise interference from digital or
high-frequency equipment. This unit is too close to the digital or high-frequency equipment. Place this unit farther away from such equipment.
The remote control does not work or does
not function properly.
The remote control may be operated outside its operation range. Operate the remote control within its operation range (&P.12).
The remote control sensor on this unit may be exposed to direct sunlight or
strong lighting such as an inverter type fluorescent lamp. Change the orientation of lighting or the unit, or location of the unit.
The battery may be worn out. Replace the batteries with new ones (&P.4).
There are obstacles between the sensor of this unit and the remote control. Remove the obstacles.

En 43
English
Supported devices/media and file formats
Supported devices/
medias
PC with Windows Media Player 11 or Windows Media
Player 12 installed.
NAS that is compatible with DLNA version 1.5.
•This unit supports USB mass storage class devices (e.g., flash
memories or portable audio players) using FAT16 or FAT32
format.
•Do not connect devices other than USB mass storage class
devices (such as USB chargers or USB hubs), PCs, card
readers, an external HDD, etc.
•USB devices with encryption cannot be used.
(As of August 2013)
Note
iPod is licensed on the condition that individuals perform
privately duplication and playback of uncopyrighted
material or material legally approved of duplication and
playback. Infringement of copyright is prohibited by law.
•This unit is designed for use with audio CD, CD-R/RW (ISO
9660 format) with any of the following logos printed on the
disc or the disc jacket.
Audio CD
CD-R/RW*
* Discs which bear one of the following.
FOR CONSUMER
FOR CONSUMER USE
FOR MUSIC USE ONLY
•8-cm discs are playable with this unit.
Set a disc in the inner recessed area of the disc tray.
Notes on discs
•Do not set any other type of disc other than stated above in
this unit. Doing so may damage the unit.
•CD-R/RW cannot be played back unless finalized.
•Some discs cannot be played back depending on the disc
characteristics or recording conditions.
•Do not use any non-standard shaped discs such as a heart-
shaped disc.
•Do not use discs with many scratches or a crack on their
surface, or warped/glued discs.
Handling discs
•Do not touch the surface of the disc.
Hold a disc by its edge or center hole.
•Use a soft-tipped pen when writing on
the label side of a disc.
•Do not put tape, seal, glue, etc., on a disc.
•Do not use a protective cover to prevent scratches.
•Do not set foreign object on the disc tray.
•Do not set more than one disc in this unit at one time. This
could cause damage to both this unit and the discs.
•If a disc becomes dirty, wipe it with a
clean, dry soft cloth from the center
out to the edge. Do not use record
cleaner or paint thinner.
•Do not use any lens cleaners as they
may cause malfunction.
•Do not expose discs to direct
sunlight, high temperature, high humidity, or dust.
•When a disc is not being used, remove it from this unit and
store in an appropriate case.
PCs
NAS
USB devices
iPod
iPod
iPod touch (1st, 2nd, 3rd, 4th and 5th
generations), iPod nano (2nd, 3rd, 4th, 5th,
6th and 7th generations)
iPhone iPhone 5, iPhone 4S, iPhone 4, iPhone 3GS,
iPhone 3G, iPhone
iPad iPad (4th generation), iPad mini, iPad (3rd
generation), iPad 2, iPad
Discs

Supported devices/media and file formats
44 En
File format
File format the unit supporting is as follows.
•The unit supports playback of WAV (PCM format only),
MP3, WMA, MPEG-4 AAC and FLAC files (1- or 2-channel
audio only).
•The unit is compatible with sampling rates of up to 192
kHz for WAV and FLAC files, and 48 kHz for other files.
•To play back FLAC files, you need to install server
software that supports sharing of FLAC files via DLNA on
your PC or use a NAS that supports FLAC files.
•Digital Rights Management (DRM) contents cannot be
played back.
•The unit supports playback of MP3 and WMA files with a
sampling rate of up to 48 kHz.
•The unit is compatible with both constant and variable
bitrates of from 8 to 320 kbps for MP3 files, and from 16
to 320 kbps for WMA files.
•This unit can play back a maximum of 512 files, 255
folders (maximum of 511 files in a folder).
•Digital Rights Management (DRM) files cannot be
played back.
DLNA/USB
Discs
AirPlay works with iPhone, iPad, and iPod touch with iOS
4.3.3 or later, Mac with OS X Mountain Lion, and Mac and PC
with iTunes 10.2.2 or later.
“Made for iPod,” “Made for iPhone,” and “Made for iPad”
mean that an electronic accessory has been designed to
connect specifically to iPod, iPhone, or iPad, respectively,
and has been certified by the developer to meet Apple
performance standards.
Apple is not responsible for the operation of this device or
its compliance with safety and regulatory standards.
Please note that the use of this accessory with iPod, iPhone,
or iPad may affect wireless performance.
AirPlay, iPad, iPhone, iPod, iPod nano, iPod touch and
iTunes are trademarks of Apple Inc., registered in the U.S.
and other countries.
MPEG Layer-3 audio coding technology licensed from
Fraunhofer IIS and Thomson.
This unit supports network connections.
DLNA™ and DLNA CERTIFIED™ are trademarks or registered
trademarks of Digital Living Network Alliance. All rights
reserved. Unauthorized use is strictly prohibited.
Windows™
Windows is a registered trademark of Microsoft Corporation
in the United States and other countries.
Internet Explorer, Windows Media Audio and Windows
Media Player are either registered trademarks or trademarks
of Microsoft Corporation in the United States and/or other
countries.
Android™
Android and Google Play are trademarks of Google, Inc.
(For CRX-N560D)
The unit supports DAB/DAB+ tuning.

En 45
English
Specifications
(As of August 2013)
Specifications are subject to change without notice.
Player section
CD
Media CD, CD-R/RW
Audio format Audio CD, MP3, WMA
Laser
Type Semiconductor laser GaAs/GaAlAs
Wave length 790 nm
Output power 10 mW
iPod
(digital
connection)
Supported iPod
See page 43.Supported iPhone
Supported iPad
USB Supported file format MP3, WMA, MPEG4 AAC, WAV*, FLAC*
* up to 192 kHz/24 bit
AUX IN Input
connector
AUX1 Stereo L/R: RCA
AUX2 3.5 mm stereo mini jack
DIGITAL IN Input
connector
DIGITAL IN 1 Optical
DIGITAL IN 2 Coaxial
Network
Interface 100Base-TX/10Base-T
Internet radio vTuner service supported
PC client function DLNA Ver. 1.5 (DMP/DMR function)
supported
Supported file format MP3, WMA, MPEG4 AAC, WAV*, FLAC*
* up to 192 kHz/24 bit
AirPlay AirPlay supported
Tuner section
Tuning range DAB (CRX-N560D only) 174 to 240 MHz (Band III)
FM 87.50 to 108.00 MHz
Amplifier section
Maximum output power 32 W + 32 W (6 Ω 1 kHz, 10% THD)
Total harmonic distortion AUX1 1 kHz/12.5 W 0.05% or less
EQ control EQ High (treble)/EQ Mid (middle)/EQ Low
(bass): ±10 dB
Headphones Stereo L/R: 3.5mm stereo mini jack
Adapted impedance: 16 Ω - 32 Ω
General
Power supply AC 230 V, 50 Hz
Power consumption 44 W
Power consumption in the standby mode 6 W or less
Power consumption in the eco standby mode 0.5 W or less
Dimensions (W × H × D) 215 × 110 × 288 mm
(8-1/2 × 4-3/8 × 11-3/8 in)
Weight 2.7 kg (6.0 lbs.)

Fr 3
Français
Incroyable !
Un son extraordinaire !
Le son d’un PC est radicalement
différent !......17, 18
Une qualité sonore haute
résolution......22
En savoir plus
sur la musique
Je peux raccorder de nombreux
appareils externes (lecteur de musique
portable, Blu-ray/DVD, etc.)...... 19
Je peux écouter une webradio
sur mon système audio...... 29
La musique
où je veux, quand
je veux !
Une application super pratique ! Mon
smartphone me sert de télécommande ......18
J’écoute les morceaux de
mon iPhone sans fil sur des
enceintes.......30

4 Fr
Introduction
Vérifiez le contenu de l’emballage et les points utiles de ce manuel.
Accessoires fournis
•Remplacez les deux piles lorsque la portée de la télécommande diminue.
Télécommande
Piles (× 2)
(AA, R6, UM-3)
Antenne FM
(pour CRX-N560)
Antenne DAB/FM
(pour CRX-N560D) Vérifiez les bornes « + » et « - » des piles et
insérez-les dans le bon sens.
Quelques mots sur ce
mode d’emploi
•Les instructions et les illustrations figurant dans
ce manuel se réfèrent au CRX-N560, sauf mention
contraire.
•Le fonctionnement de cet appareil est décrit
principalement en utilisant la télécommande.
•Les illustrations peuvent varier du véritable article
représenté.
•L’« iPod », décrit dans ce manuel peut également faire
référence à un « iPhone » ou à un « iPad ».
•Symboles :
Signale les précautions à prendre concernant
l’utilisation de l’appareil et les limites de ses
fonctions.
Donne des explications supplémentaires
permettant une meilleure utilisation.
&Indique la ou les pages de référence
correspondantes.

Fr 5
Français
Nom des pièces
Familiarisez-vous avec toutes les pièces et les fonctions suivantes.
Panneau avant 1Récepteur de télécommande
2INPUT
À tourner vers la gauche ou vers la droite pour changer
de source audio. (La source apparaît sur l’afficheur du
panneau avant.)
3 (&P.14, 16, 18)
PRESET</> (&P.27)
4A (Alimentation) (&P.12)
5PHONES
Prise permettant de brancher un casque.
6Plateau de chargement du disque (&P.14)
7Prise USB (&P.15)
8 (Arrêt) (&P.14, 16, 18, 29)
9 (Ouvrir/fermer le tiroir de disque) (&P.14)
0VOLUME
Pour régler le volume.
A (Lecture/pause) (&P.14, 16, 18)
BAfficheur du panneau avant (&P.7)

Nom des pièces
6 Fr
Panneau arrière 1Câble d’alimentation (&P.12)
2Borne DC OUT
Pour alimenter les accessoires AV Yamaha à partir de
cette borne. Lorsque vous l’utilisez, réglez [Use
Accessory] (sous [System Config] dans le réglage des
options) sur [YES] (&P.35). Pour plus d’informations,
consultez le mode d’emploi de l’accessoire.
3Borne NETWORK (&P.11)
Pour se connecter à un réseau à l’aide d’un câble réseau
disponible dans le commerce.
4Borne d’antenne FM (DAB/FM) (&P.10)
5Borne DIGITAL IN 1 (entrée optique) (&P.19)
6Borne DIGITAL IN 2 (entrée coaxiale) (&P.19)
7Borne AUX 1 (entrée RCA) (&P.19)
8Borne AUX 2 (entrée mini-jack) (&P.19)
9Borne SUBWOOFER (&P.9)
0Borne SPEAKERS (&P.9)

Nom des pièces
Fr 7
Français
Afficheur du panneau avant
1Horloge
Affiche l’heure lorsque l’appareil est sous tension.
2Témoin TUNED
S’allume lorsqu’une station de radio est syntonisée sur
l’appareil.
3Afficheur multifonction
Affiche différentes informations, telles que l’horloge en
mode veille, les informations musicales ou la
radiofréquence (caractères alphanumériques
uniquement).
4Témoin MUTE
S’allume lorsque le son est coupé (&P.8).
5Témoin du réveil
Clignote pendant le réglage du réveil et s’allume lorsque
la minuterie est réglée (&P.32).
6Témoin de la minuterie de mise en veille
S’allume lorsque la minuterie de mise en veille est réglée
(&P.33).
7Témoin de lecture aléatoire/répétée
S’allume lorsque vous réglez votre iPod, CD, dispositif
USB ou ordinateur sur la lecture aléatoire ou répétée
(&P.20).
8Témoin STEREO
S’allume lorsque l’appareil reçoit un signal puissant
provenant d’une émission FM stéréo.
9Témoins de fonctionnement
Affiche les touches de commande disponibles S/T/
ENTER (&P.8) de la télécommande.
0Témoin 2nd (CRX-N560D uniquement)
Apparaît lorsque la station DAB dispose d’une station
secondaire (&P.23).
Réglage de la luminosité de l’afficheur
Vous pouvez régler la luminosité de l’afficheur du
panneau avant en appuyant sur la touche DIMMER
de la télécommande (&P.8).
•Chaque pression sur la touche modifie la
luminosité : luminosité forte (par défaut),
moyenne ou faible.

Nom des pièces
8 Fr
Télécommande 1Émetteur de signaux infrarouges
2 (Ouvrir/fermer le tiroir de disque) (&P.14)
3Touches de sélection de la source
Pour commuter la source audio à lire.
4Touches numériques (&P.14)
5HOME (&P.16, 18, 29)
6RETURN (&P.14, 16, 18, 29)
7Touches de commande du son, du curseur
(&P.14, 16, 18, 29)
8DISPLAY (&P.21)
9 (SHUFFLE) (&P.20)
0Touches de commande DAB/FM
(&P.23, 24, 26, 27)
ADIMMER (&P.7)
BA (Alimentation) (&P.12)
COPTION (&P.22, 25, 31, 35)
DNOW PLAYING (&P.16, 18, 29)
EVOLUME +/–
Pour régler le volume.
FMUTE
Coupe ou rétablit le son.
G (REPEAT) (&P.20)
HTIMER (&P.32)
ISLEEP (&P.33)

Fr 9
Français
Préparations
Pour raccorder les enceintes ou l’antenne et mettre l’appareil sous tension.
Ne branchez pas le câble d’alimentation de l’appareil avant d’avoir fini de raccorder tous les câbles.
Raccordement des
enceintes
1Retirez l’isolation de l’extrémité du
câble d’enceinte pour révéler les fils
dénudés.
2Branchez l’enceinte à l’appareil,
comme illustré.
•Préparez les enceintes et les câbles d’enceinte
séparément.
•Pour obtenir de plus amples informations sur les
enceintes, consultez le mode d’emploi qui les
accompagne.
15 mm
•Veillez à ce que les fils dénudés des enceintes n’entrent pas en contact entre eux ni avec une pièce métallique de
l’appareil, car cela risquerait d’endommager l’appareil et/ou les enceintes.
•Vérifiez que les raccordements (L, R) et la polarité (rouge : +, noir : -) sont corrects à gauche et à droite. Si les
raccordements sont incorrects, le son ne sera pas naturel.
•Utilisez des enceintes dont l’impédance est d’au moins 6 Ω.
•Vous pouvez également raccorder un caisson de graves avec amplificateur intégré à l’appareil.
2
Enceinte droite
Enceinte gauche
Caisson de graves
Câble de broche mono
Câble
d’enceinte

Préparations
Fr 11
Français
Connexion au réseau
Vous pouvez lire des fichiers musicaux mémorisés sur
votre PC, des périphériques mobiles, un NAS compatible
DLNA* ou un contenu audio sur Internet en connectant
cet appareil au réseau. Vous pouvez également utiliser
l’appareil avec votre périphérique mobile.
* Digital Living Network Alliance
Connectez l’appareil au réseau, comme
illustré à droite.
•Effectuez la connexion avec un câble réseau STP (paire
torsadée blindée) disponible dans le commerce (câble
droit, de catégorie CAT-5 ou supérieure).
•Pour plus d’informations sur la connexion à Internet, consultez les modes d’emploi de vos périphériques réseau.
•Si vous utilisez un routeur prenant en charge le DHCP, il est inutile de configurer tous les paramètres réseau de l’appareil.
Si vous utilisez un routeur ne prenant pas en charge le DHCP, configurez les paramètres réseau sous [Network Config]
dans le réglage des options (&P.35).
•Les connexions filaires sont recommandées pour les périphériques non mobiles, afin d’assurer une qualité sonore élevée.
•Certains logiciels de sécurité installés sur votre PC ou les paramètres de pare-feu de périphériques réseau (tels qu’un
routeur) peuvent bloquer l’accès de l’appareil à ces derniers ou à Internet. Dans ce cas, modifiez le réglage du logiciel de
sécurité ou des périphériques réseau.
•Pour le réglage manuel du sous-réseau, chaque serveur doit être connecté au même sous-réseau que l’appareil (&P.36).
LAN
WAN
Cet appareil
Routeur à
large bande
Internet
Modem
Périphérique mobile
PC
Système de stockage en
réseau (NAS)
Câble réseau

Préparations
12 Fr
Mise sous tension
Branchez le câble d’alimentation à la prise
murale et appuyez sur .
•L’appareil se met sous tension.
•Appuyez à nouveau sur pour le mettre hors tension
(mode veille).
•La « veille écologique » (par défaut) réduit la
consommation électrique de l’appareil tout en limitant
certaines fonctionnalités (comme indiqué dans le
tableau à droite).
1Appuyez sur .
•Le menu des options apparaît sur l’afficheur du
panneau avant.
2Annulez la veille écologique.
•Réglez l’élément dans l’ordre suivant : [System
Config] - [Power Saving] - [Normal].
•Changez d’élément avec S/T, puis appuyez sur
pour valider la sélection.
3Appuyez sur pour terminer le
réglage des options.
Statut en veille/veille écologique
* Fonctionnement avec la télécommande uniquement
Menu des options relatif à l’alimentation (System Config)
Annulation de la veille écologique
6 m maximum
A
A
1, 3
OPTION
2
S/T,
ENTER
Veille Veille
écologique
Charge des iPod/dispositifs
USB 3—
Activation/désactivation du
réveil* 3—
Fonctionnement des touches
de sélection de la source* 33
Chargement/éjection de CD 33
AirPlay 3—
Mise sous tension par
l’application 3—
Affichage de l’horloge 3—
(Valeur de réglage. Gras : par défaut)
Power Saving
Configurez les réglages de l’alimentation.
(Normal, Eco)
Lorsque vous sélectionnez [Eco], rien n’apparaît sur
l’afficheur du panneau avant en mode veille écologique.
Auto Power Off
Réglez l’heure à laquelle l’appareil se met en mode veille
si aucune opération n’est effectuée.
(Timer 2H, Timer 4H, Timer 8H, Timer 12H, OFF)

14 Fr
Écoute de CD
Cet appareil permet de lire des CD audio et des CD de données sur lesquels sont enregistrés des fichiers MP3/WMA.
Pour plus d’informations sur les CD lisibles, reportez-vous à la section « Périphériques/supports pris en charge » (P.43).
1Pour sélectionner [CD], tournez INPUT
ou appuyez sur la touche de la
télécommande.
2Placez un CD dans un tiroir de disque.
•Appuyez sur pour ouvrir/fermer le tiroir de
disque.
3La lecture démarre.
•Les fonctions de la télécommande sont indiquées
ci-dessous.
S
T
Passe directement au premier fichier du
dossier précédent ou suivant pendant
la lecture de fichiers MP3/WMA.
Lecture/pause
Arrêt
Passe directement au début du
morceau en cours de lecture ou du
morceau précédent.
Passe au morceau suivant.
Démarre la lecture aléatoire (&P.20).
Démarre la lecture répétée (&P.20).
1 - 9, 0 Spécifie le numéro du morceau.
RETURN Annule le numéro du morceau.
ENTER Applique le numéro du morceau.
2
1
INPUT
1
CD
3
•Les fichiers d’un CD de données sont lus dans
l’ordre alphanumérique.
•Lorsque la lecture du CD s’arrête, la lecture
reprend au début du dernier morceau lu. Une
pression sur lorsque la lecture du CD s’arrête
annule la reprise de la lecture.

Fr 15
Français
Écoute des iPod/dispositifs USB
Cet appareil permet de lire des iPod ou des dispositifs USB sur lesquels sont enregistrés des fichiers musicaux.
Pour plus d’informations sur les iPod/dispositifs USB lisibles, reportez-vous à la section « Périphériques/supports et formats de fichier pris en charge » (P.43).
Lecture des iPod
1Pour sélectionner [USB], tournez
INPUT ou appuyez sur la touche de
la télécommande.
2Raccordez l’iPod avec le câble USB.
•Préparez le câble USB fourni avec votre iPod.
•La source commute sur [iPod].
3La lecture démarre (&P.16).
Lecture des dispositifs
USB
1Pour sélectionner [USB], tournez
INPUT ou appuyez sur la touche de
la télécommande.
2Raccordez un dispositif USB au port
USB.
3La lecture démarre (&P.16).
1
INPUT
1
USB
2
•Certains iPod/dispositifs USB peuvent ne pas
fonctionner correctement, même s’ils répondent
aux conditions requises. Il est possible que tous les
types d’iPod/de dispositifs USB ne soient pas
compatibles.
•Yamaha et ses fournisseurs déclinent toute
responsabilité concernant la perte des données
enregistrées sur un iPod ou un dispositif USB
raccordé à cet appareil. Par mesure de précaution,
il est recommandé d’effectuer des copies de
sauvegarde des fichiers importants.
•Arrêtez la lecture avant de débrancher le dispositif
USB.
•Les iPod et les dispositifs USB se chargent
automatiquement lorsqu’ils sont raccordés à
l’appareil, sauf en mode de veille écologique.

Écoute des morceaux de l’ordinateur
18 Fr
Lecture de morceaux
sur le PC
1Appuyez à plusieurs reprises sur
pour sélectionner [Server].
2Naviguez et sélectionnez un morceau.
3Démarrez la lecture.
S/TAffiche un autre élément.
ENTER
Valide l’élément sélectionné et
passe au niveau suivant, ou
démarre la lecture.
HOME Affiche l’élément du niveau
supérieur.
RETURN Revient à l’élément précédent.
NOW
PLAYING
Termine la navigation et affiche les
informations de contenu de la
lecture.
Lecture/pause
/ Passe au morceau suivant ou
précédent du dossier.
Arrêt
Lecture aléatoire (&P.20)
Lecture répétée (&P.20)
1
NET
2, 3
•Si la lecture n’est pas possible, vérifiez que cet
appareil et le PC (serveur) sont connectés au
même routeur (&P.11).
Utiliser de l’appareil avec votre périphérique
mobile
Une fois que vous avez installé l’application
« NETWORK PLAYER CONTROLLER » sur votre
périphérique mobile, vous pouvez utiliser l’appareil
avec celui-ci.
•Fonctionnalités
-Mise sous/hors tension, réglage du volume ou
autre opération de base
-Modification de la source musicale
-Affichage des informations du tuner radio
-Sélection, lecture et arrêt des morceaux
-Lecture des morceaux mémorisés sur des
périphériques
Pour télécharger l’application ou les dernières
informations, accédez à l’App Store ou à Google Play
et recherchez « NETWORK PLAYER CONTROLLER ».

Fr 19
Français
Écoute de sources externes
Cet appareil permet de lire des périphériques externes, par exemple un lecteur DVD ou un lecteur de musique portable. Utilisez la borne (DIGITAL IN 1/2 ou
AUX 1/2) en fonction du périphérique à raccorder (&P.6). Pour le raccordement de chaque périphérique externe, consultez le mode d’emploi qui l’accompagne.
1Débranchez le câble d’alimentation de
l’appareil et raccordez le périphérique
externe à l’appareil.
•Préparez les câbles disponibles dans le commerce
pour le raccordement.
2Rebranchez le câble d’alimentation de
l’appareil à la prise murale et appuyez
sur pour mettre l’appareil sous
tension.
3Modifiez la source musicale.
•Appuyez sur ou en fonction de la borne
de connexion pour le périphérique externe que
vous souhaitez lire.
•Appuyez sur pour basculer la source sur
AUX1/AUX2 (entrée analogique), appuyez sur
pour basculer la source sur DIGITAL IN1/
DIGITAL IN2 (entrée numérique).
4Lisez le périphérique externe raccordé.
•Pour plus d’informations sur la lecture, consultez
le mode d’emploi du périphérique externe. •Baissez le volume de l’appareil et du périphérique externe avant la connexion. Sinon, le volume de lecture risque
d’être trop fort.
1
Câble
stéréo RCA
Lecteur de disques DVD, etc.
Câble mini-jack
stéréo de 3,5 mm
Lecteur de
musique
portable
2
A
3
Câble optique
Câble audio coaxial
numérique
Lecteur de disques Blu-ray, etc.

20 Fr
En savoir plus sur la lecture
Vous pouvez écouter de la musique dans différents ordres ou qualités sonores, et afficher les informations de la musique pendant la lecture.
Les opérations décrites dans cette section s’appliquent à tous les périphériques : PC (serveur), iPod, dispositif USB ou CD.
Lecture aléatoire
Appuyez sur pendant la lecture.
•Le témoin de lecture aléatoire de l’afficheur du panneau
avant commute comme suit à chaque pression sur
cette touche.
* La plage de lecture aléatoire dépend du support en cours
de lecture.
Lecture répétée
Appuyez sur pendant la lecture.
•Le témoin de lecture répétée de l’afficheur du panneau
avant commute comme suit à chaque pression sur
cette touche.
* La plage de lecture répétée dépend du support de lecture.
Démarre la lecture aléatoire.*
Non affiché N’effectue pas la lecture aléatoire.
Répète le morceau en cours de lecture.
Démarre la lecture répétée.*
Non affiché N’effectue pas la lecture répétée.
REPEAT SHUFFLE
•La lecture aléatoire et la lecture répétée peuvent
être effectuées en même temps (sauf ).

Écoute de stations DAB (CRX-N560D uniquement)
24 Fr
Préréglage de stations DAB
Utilisez la fonction de préréglage pour mémoriser vos
30 stations DAB favorites.
1
Syntonisez une station DAB que vous souhaitez
prérégler (
&
P.23), puis appuyez sur .
•Le numéro de préréglage clignote sur l’afficheur
du panneau avant.
2Appuyez sur S/T pour sélectionner
le numéro de préréglage souhaité.
3
Appuyez sur pour terminer le préréglage.
Sélection des stations
DAB préréglées
1Appuyez à plusieurs reprises sur
pour sélectionner [DAB].
2Appuyez sur PRESET / pour
sélectionner une station préréglée.
OPTION
1
MEMORY
3
ENTER S/T
2
DISPLAY
1
RADIO
2
PRESET
/
•Pour annuler le préréglage DAB, appuyez sur .
•Vous pouvez modifier les informations de la
station DAB apparaissant sur l’afficheur du
panneau avant en appuyant sur la touche
DISPLAY. L’affichage commute dans l’ordre
indiqué ci-dessous à chaque pression sur la
touche DISPLAY.
Suppression d’une station préréglée
Utilisez le réglage des options pour supprimer une
station préréglée.
1Appuyez sur lorsque la source est DAB.
-Le menu des options apparaît sur l’afficheur du
panneau avant.
2Appuyez sur S/T pour sélectionner [Preset
Delete], puis appuyez sur .
3Appuyez sur S/T pour sélectionner le numéro
de préréglage à supprimer.
4Appuyez sur .
-Une station préréglée est supprimée.
5Appuyez sur pour terminer le réglage des
options.
DLS (Dynamic Label Segment) (par défaut)
ENSEMBLE
CHANNEL/FREQ (Label de canal et fréquence)
SIGQ. (qualité du signal)
AUDIO FORMAT

Écoute de stations DAB (CRX-N560D uniquement)
Fr 25
Français
Confirmation de la
réception
Vous pouvez valider le niveau du signal DAB. Ceci est utile
lorsque vous installez l’antenne.
1Appuyez sur lorsque la source est
[DAB].
•Le menu des options apparaît sur l’afficheur du
panneau avant.
2Appuyez sur S/T pour sélectionner
[DAB Tune Aid], puis appuyez sur .
3Appuyez sur S/T pour modifier le
label de canal.
•Le niveau de réception du signal DAB mesuré
s’affiche.
•Le niveau est compris entre 0 (aucun) et 100 (le
meilleur).
4Appuyez sur pour terminer le
réglage des options.
1, 4
OPTION
2, 3
S/T,
ENTER
•Lors de l’exécution de DAB Tune Aid et lorsque le
signal DAB est faible, essayez de régler la position
de l’antenne pour obtenir la bonne réception.

Guide de dépannage
40 Fr
Disque
Dispositifs USB
Les informations de lecture n’apparaissent
pas sur l’afficheur du panneau avant.
L’iPod ne prend pas en charge l’affichage des informations de lecture. Cette fonction est disponible uniquement avec un iPod convenablement
pris en charge par cet appareil (&P.43).
Le mode d’affichage est réglé sur le mode standard. Commutez le mode d’affichage sur le mode étendu (&P.16).
L’iPod ne se charge pas.
L’iPod n’est pas raccordé correctement. Reconnectez l’iPod à la prise USB (&P.15).
L’iPod n’est pas pris en charge par cet appareil. Utilisez un iPod pris en charge (&P.43).
L’appareil est en mode veille écologique. Réglez [Power Saving] sur [Normal] avec le réglage des options (&P.12).
Anomalies Causes possibles Solution
Anomalies Causes possibles Solution
La lecture ne commence pas après
l’insertion d’un disque.
Il est impossible d’utiliser certaines
touches.
Le disque placé dans l’appareil n’est peut-être pas compatible. Utilisez un disque pris en charge par l’appareil (&P.43).
La lecture ne démarre pas
immédiatement la pression sur la touche
de l’appareil ou sur la touche
de la télécommande (elle s’arrête
immédiatement).
Le disque est peut-être sale. Essuyez le disque (&P.43).
Le disque placé dans l’appareil n’est peut-être pas pris en charge. Utilisez un disque pris en charge par l’appareil (&P.43).
Si l’appareil est passé d’un endroit froid à un endroit chaud, de la
condensation s’être peut-être formée sur la lentille de lecture.
Attendez une heure ou deux pour que l’appareil s’habitue à la température
ambiante, puis réessayez.
Anomalies Causes possibles Solution
L’appareil ne détecte pas le dispositif USB.
Le dispositif USB n’est pas correctement raccordé à la prise USB. Mettez l’appareil hors tension, reconnectez votre dispositif USB, puis
remettez l’appareil sous tension (&P.15).
Le système de fichiers du dispositif USB n’est pas au format FAT16 ou
FAT32. Utilisez un dispositif USB au format FAT16 ou FAT32.
Impossible d’afficher les dossiers et
fichiers du dispositif USB. Les données du dispositif USB sont protégées par cryptage. Utilisez un dispositif USB sans fonction de cryptage.
Especificaciones del producto
| Marca: | Yamaha |
| Categoría: | Receptor de CD |
| Modelo: | CRX-N560 |
¿Necesitas ayuda?
Si necesitas ayuda con Yamaha CRX-N560 haz una pregunta a continuación y otros usuarios te responderán
Receptor de CD Yamaha Manuales

11 Julio 2024
Receptor de CD Manuales
Últimos Receptor de CD Manuales
18 Octubre 2024
5 Octubre 2024
28 Agosto 2024
25 Julio 2024
15 Julio 2024
13 Julio 2024
13 Julio 2024
10 Julio 2024