Allied Telesis AT-2973SX Manual de Usario
Allied Telesis
Tarjeta/adaptador de red
AT-2973SX
Lee a continuación 📖 el manual en español para Allied Telesis AT-2973SX (176 páginas) en la categoría Tarjeta/adaptador de red. Esta guía fue útil para 16 personas y fue valorada con 4.5 estrellas en promedio por 2 usuarios
Página 1/176

613-001252 Rev. B
NetExtreme II
Family Adapters
AT-2973SX
AT-2973T
AT-2973T/4
Installation and User’s Guide

Copyright © 2011 Allied Telesis, Inc.
All rights reserved. No part of this publication may be reproduced without prior written permission from Allied Telesis, Inc.
Broadcom® and the pulse logo are among the trademarks of Broadcom Corporation. All other product names, company names,
logos or other designations mentioned herein are trademarks or registered trademarks of their respective owners.

3
Electrical Safety and Emissions Standards
This product meets the following standards.
Federal Communications Commission Interference Statement
Declaration of Conformity
Manufacturer Name: Allied Telesis, Inc.
Declares that the product: NetExtreme II Family Adapters
Model Numbers: AT-2973SX, AT-2973T, AT-2973T/4
This equipment has been tested and found to comply with the limits for a Class B digital device, pursuant to Part 15 of
FCC Rules. These limits are designed to provide reasonable protection against harmful interference in a residential
installation. This equipment generates, uses and can radiate radio frequency energy and, if not installed and used in
accordance with the instructions, may cause harmful interference to radio or television reception. However, there is no
guarantee that interference will not occur in a particular installation. If this equipment does cause harmful interference to
radio or television reception, which can be determined by turning the equipment off and on, the user is encouraged to try
to correct the interference by one of the following measures:
- Reorient or relocate the receiving antenna.
- Increase the separation between the equipment and the receiver.
- Connect the equipment into an outlet on a circuit different from that to which the receiver is connected.
- Consult the dealer or an experienced radio/TV technician for help.
This device complies with part 15 of the FCC Rules. Operation is subject to the following two conditions:
(1) This device must not cause harmful interference, and
(2) this device must accept any interference received, including interference that may cause undesired operation.
FCC Caution: Any changes or modifications not expressly approved by the party responsible for compliance could void
the user’s authority to operate this equipment.
IMPORTANT NOTE:
FCC Radiation Exposure Statement:
This equipment complies with FCC radiation exposure limits set forth for an uncontrolled environment. End users must
follow the specific operating instructions for satisfying RF exposure compliance.
This transmitter must not be co-located or operating in conjunction with any other antenna or transmitter.
IEEE802.11b or 802.11g operation of this product in the U.S.A. is firmware-limited to channels 1 through 11.
Industry Canada
This Class A digital apparatus complies with Canadian ICES-003.
Cet appareil numérique de la classe A est conforme à la norme NMB-003 du Canada.
European Union Restriction of the Use of Certain Hazardous Substances
(RoHS) in Electrical and Electronic Equipment
This Allied Telesis RoHS-compliant product conforms to the European Union Restriction of the Use of Certain Hazardous
Substances (RoHS) in Electrical and Electronic Equipment. Allied Telesis ensures RoHS conformance by requiring
supplier Declarations of Conformity, monitoring incoming materials, and maintaining manufacturing process controls.

4
RFI Emissions FCC Class B, EN55022 Class B, VCCI Class B, C-TICK, CE
Immunity EN55024
Electrical Safety EN60950-1 (TUV), UL 60950-1 (CULUS)
Translated Safety Statements
Important: The indicates that a translation of the safety statement is available in a PDF
document titled “Translated Safety Statements” on the Allied Telesis website at
www.alliedtelesis.com/support/software. After you have accessed this website, enter the model
number in the Search by Product Name box and then click Find to view the current list of
documents.
Laser Safety EN60825

5
Contents
Preface ............................................................................................................................................................ 11
Safety Symbols Used in this Document..................................................................................................... 12
Where to Find Web-based Guides............................................................................................................. 13
Contacting Allied Telesis............................................................................................................................ 14
Online Support..................................................................................................................................... 14
Email and Telephone Support ............................................................................................................. 14
Returning Products.............................................................................................................................. 14
For Sales or Corporate Information ..................................................................................................... 14
Warranty .............................................................................................................................................. 14
Management Software Updates .......................................................................................................... 14
Chapter 1: Introducing the AT-2973SX, AT-2973T, and AT-2973T/4 Adapters ............................................. 15
Functional Descriptions.............................................................................................................................. 16
AT-2973SX Adapter ............................................................................................................................ 17
AT-2973T Adapter ............................................................................................................................... 18
AT-2973T/4 Adapter ............................................................................................................................ 20
Features ..................................................................................................................................................... 22
TCP Offload Engine (TOE) .................................................................................................................. 23
Internet Small Computer Systems Interface (iSCSI) ........................................................................... 24
Power Management ............................................................................................................................ 24
Wake on LAN (WOL) Feature ............................................................................................................. 24
Adaptive Interrupt Frequency .............................................................................................................. 25
ASIC with Embedded RISC Processor................................................................................................ 25
Supported Operating Environments .................................................................................................... 25
Chapter 2: Installing the Hardware ................................................................................................................. 27
Reviewing the Contents of Your Shipment ................................................................................................ 28
Reviewing Safety Precautions ................................................................................................................... 29
Pre-Installation Checklist............................................................................................................................ 31
Replacing the Bracket ................................................................................................................................ 32
Installing a Network Adapter Card ............................................................................................................. 34
Connecting the Network Cables................................................................................................................. 38
Chapter 3: Installing Broadcom Boot Agent Driver Software .......................................................................... 41
Overview .................................................................................................................................................... 42
Setting Up MBA in a Client Environment ................................................................................................... 43
Enabling the MBA Driver ..................................................................................................................... 43
Configuring the MBA Driver ................................................................................................................. 43
Setting Up the BIOS ............................................................................................................................ 44
Setting Up MBA in a Server Environment: Red Hat Linux PXE Server ..................................................... 45
Chapter 4: Installing the Monolithic Software Driver ....................................................................................... 47
Using the NetXtreme II Monolithic Driver................................................................................................... 48
Inserting the NetXtreme II Monolithic Driver in a WinPE 2.0 Image........................................................... 50
Configuring the Speed and Duplex Settings .............................................................................................. 52
Chapter 5: Installing the NDIS2 Driver Software ............................................................................................ 55
Overview .................................................................................................................................................... 56

Contents
6
Checking Pre-installation Requirements .................................................................................................... 57
Installing the NDIS2 Driver Software on MS-DOS Platforms ..................................................................... 58
Creating a Startup Disk ........................................................................................................................ 58
Modifying the Startup Disk ................................................................................................................... 59
Installing the DOS NDIS2 Driver Software........................................................................................... 61
Using Keywords for the Drivers .................................................................................................................. 63
Chapter 6: Installing the Linux Drivers ............................................................................................................ 65
Overview..................................................................................................................................................... 66
Limitations ............................................................................................................................................ 66
Packaging ............................................................................................................................................ 67
Installing Linux Driver Software .................................................................................................................. 68
Installing the Source RPM Package..................................................................................................... 68
Building the Driver from the Source TAR File ...................................................................................... 70
Load and Run Necessary iSCSI Software Components...................................................................... 72
Unloading the Linux Driver................................................................................................................... 72
Patching PCI Files (Optional)............................................................................................................... 73
Network Installations ............................................................................................................................ 74
Setting Values for Optional Properties ................................................................................................. 74
Checking the bnx2 Driver Defaults....................................................................................................... 77
Checking Driver Messages .................................................................................................................. 78
Teaming with Channel Bonding ........................................................................................................... 82
Statistics............................................................................................................................................... 82
Linux iSCSI Offload.............................................................................................................................. 82
Chapter 7: Installing the Windows Drivers ...................................................................................................... 87
Installing the Windows Driver Software ...................................................................................................... 88
Using the Installer ................................................................................................................................ 89
Using Silent Installation........................................................................................................................ 94
Removing the Device Drivers ..................................................................................................................... 97
Chapter 8: Setting Advanced Properties ......................................................................................................... 99
Accessing the Advanced Tab ................................................................................................................... 100
Selecting the Advanced Tab in Windows Server 2003 ...................................................................... 100
Selecting the Advanced Tab in Windows Server 2008, Windows Server 2008 R2, and Windows 7.103
Selecting the Advanced Tab in Windows Vista.................................................................................. 104
Modifying Advanced Properties................................................................................................................107
Updating the Ethernet@
WireSpeed Property .................................................................................................................................108
Updating the Flow Control Property...................................................................................................108
Updating the Interrupt Moderation Property.......................................................................................110
Updating the Checksum Offload Property..........................................................................................111
Updating the Large Send Offload Property........................................................................................112
Updating the Jumbo MTU Property....................................................................................................113
Updating the Network Address Property............................................................................................114
Updating the RSS Queues Property ..................................................................................................115
Updating the Priority & VLAN Property ..............................................................................................116
Updating the Receive Buffers Property..............................................................................................117
Updating the Receive Side Scaling Property .....................................................................................117
Updating the Speed & Duplex Mode Property ................................................................................... 118
Updating the TCP Connection Offload Properties ............................................................................. 120
Updating the Transmit Buffers Property.............................................................................................121
Updating the VLAN ID Property .........................................................................................................121
Chapter 9: Installing CIM and SNMP for Manageability ................................................................................123
Installing CIM............................................................................................................................................124
Loading the CIM Libraries ..................................................................................................................125

AT-2973SX, AT-2973T, and AT-2973T/4 NetExtreme II Family Adapters Installation and User’s Guide
7
Installing SNMP........................................................................................................................................ 127
BASP Subagent............................................ ................................. .................................................... 127
BASP Extensible-Agent....................................................... ................................................... ........... 127
Loading the SNMP Libraries.............................................................................................................. 128
Chapter 10: Installing Management Applications ......................................................................................... 131
Installing Broadcom Advanced Control Suite 3 and Related Management Applications ......................... 132
Checking .NET Framework Requirements ........................................................................................ 133
Using the Installer.............................................................................................................................. 134
Using the Silent Install Option ........................................................................................................... 134
Modifying Management Applications ....................................................................................................... 137
Repairing Management Applications ....................................................................................................... 138
Removing Management Applications....................................................................................................... 139
Chapter 11: Troubleshooting ........................................................................................................................ 141
Checking Hardware Diagnostics .............................................................................................................. 142
Checking Port LEDs................................................................................................................................. 143
Consulting the Troubleshooting Checklist................................................................................................ 144
Checking Current Drivers .................................................................................................................. 144
Running a Cable Length Test............................................................................................................ 145
Testing Network Connectivity ............................................................................................................ 145
Solving Microsoft Windows Server 2008 R2 Hyper-V Issues .................................................................. 147
Single Network Adapter..................................................................................................................... 147
Teamed Network Adapters................................................................................................................ 147
Removing the Device Drivers ............................................................................................................ 148
Upgrading from Windows Server 2000 to Windows Server 2003 ..................................................... 148
Preparing an Answer File .................................................................................................................. 148
Solving Broadcom Boot Agent and Broadcom Advanced Server Program (BASP) Issues ..................... 150
Solving Miscellaneous Issues .................................................................................................................. 152
Chapter 12: User Diagnostics ....................................................................................................................... 155
Overview .................................................................................................................................................. 156
System Requirements.............................................................................................................................. 157
Performing Diagnostics ............................................................................................................................ 158
Diagnostic Test Descriptions.................................................................................................................... 161
Appendix A: Specifications .......................................................................................................................... 167
Physical Specifications............................................................................................................................. 167
Environmental Specifications................................................................................................................... 167
Power Specifications................................................................................................................................ 168
Performance Specifications ..................................................................................................................... 168
Operating Specifications .......................................................................................................................... 168
10/100/1000Base-T Twisted-Pair Port Connectors.................................................................................. 168
Appendix B: Cleaning Fiber Optic Connectors ............................................................................................ 171
Using a Cartridge-Type Cleaner .............................................................................................................. 172
Using a Swab........................................................................................................................................... 174

Contents
8

9
Figures
Figure 1. AT-2973SX Adapter .............................................................................................................................................17
Figure 2. AT-2973SX Faceplate ..........................................................................................................................................17
Figure 3. AT-2973T Adapter ................................................................................................................................................18
Figure 4. AT-2973T Faceplate.............................................................................................................................................19
Figure 5. AT-2973T/4 Adapter .............................................................................................................................................20
Figure 6. AT-2973T/4 Faceplate..........................................................................................................................................21
Figure 7. Removing the Low-Profile Bracket .......................................................................................................................32
Figure 8. Fastening Screws onto Standard Bracket ............................................................................................................33
Figure 9. Removing the PC Cover.......................................................................................................................................35
Figure 10. Removing the Faceplate From PCI Slot .............................................................................................................35
Figure 11. Inserting the Adapter with a High-profile Bracket ...............................................................................................36
Figure 12. Securing the Adapter with a High-profile Bracket...............................................................................................37
Figure 13. Found New Hardware Wizard Page...................................................................................................................90
Figure 14. Broadcom NetXtreme II Driver Installer - InstallShield Wizard Page..................................................................91
Figure 15. License Agreement Page ...................................................................................................................................92
Figure 16. Ready to Install the Program Page.....................................................................................................................93
Figure 17. InstallShield Wizard Completed Page ................................................................................................................94
Figure 18. System Properties Dialog Box..........................................................................................................................101
Figure 19. Advanced Tab ..................................................................................................................................................102
Figure 20. Windows Server 2008, Windows Server 2008 R2, and
Windows 7 Search Box ......................................................................................................................................................103
Figure 21. Device Manager Window..................................................................................................................................104
Figure 22. Windows Vista Start Menu ...............................................................................................................................105
Figure 23. Windows Vista Run Window.............................................................................................................................105
Figure 24. BACS CIM Option Window...............................................................................................................................126
Figure 25. BACS SNMP Option Window...........................................................................................................................129
Figure 26. RJ-45 Connector and Port Pin Layout..............................................................................................................168
Figure 27. Ferrule in an SC Connector Plug......................................................................................................................171
Figure 28. Unclean and Clean Ferrule...............................................................................................................................171
Figure 29. Cartridge Cleaner .............................................................................................................................................172
Figure 30. Rubbing the Ferrule Tip on the Cleaning Surface ............................................................................................172
Figure 31. Lint-Free and Alcohol-Free Swabs ...................................................................................................................174
Figure 32. Cleaning a Recessed Ferrule...........................................................................................................................174

Figures
10

11
Preface
This guide contains instructions on how to install the AT-2973SX,
AT-2973T, AT-2973T/4 adapters and configure the adapters using the
driver software.
The Preface discusses the following topics:
“Safety Symbols Used in this Document” on page 12
“Where to Find Web-based Guides” on page 13
“Contacting Allied Telesis” on page 14
“Management Software Updates” on page 14
Preface
12
Safety Symbols Used in this Document
This document uses the safety symbols defined in Table 1.
Table 1. Safety Symbols
Symbol Meaning Description
Caution Performing or omitting a specific action may
result in equipment damage or loss of data.
Warning Performing or omitting a specific action may
result in electrical shock.

AT-2973SX,, AT-2973T, and AT-2973T NetExtreme II Family Adapters Installation and User’s Guide
13
Where to Find Web-based Guides
The installation and user guides for all Allied Telesis products are available
in portable document format (PDF) on our web site at
www.alliedtelesis.com/support/software. After you have accessed this
website, enter the model number in the Search by Product Name box
and then click Find to view the current list of documents.

Preface
14
Contacting Allied Telesis
This section provides Allied Telesis contact information for technical
support as well as sales or corporate information.
Online Support You can request technical support online by accessing the Allied Telesis
Knowledge Base: www.alliedtelesis.com/support/kb.aspx. You can use
the Knowledge Base to submit questions to our technical support staff and
review answers to previously asked questions.
Email and
Telephone
Support
For Technical Support via email or telephone, refer to the Support section
of the Allied Telesis web site: www.alliedtelesis.com/support.
Returning
Products
Products for return or repair must first be assigned a return materials
authorization (RMA) number. A product sent to Allied Telesis without an
RMA number will be returned to the sender at the sender’s expense. For
instructions on how to obtain an RMA number, go to the Support section
on our web site at www.alliedtelesis.com/support/rma.aspx.
For Sales or
Corporate
Information
You can contact Allied Telesis for sales or corporate information through
our web site at http://www.alliedtelesis.com/purchase.
Warranty Go to www.alliedtelesis.com/warranty for the specific terms and
conditions of the warranty and for warranty registration for the AT-2973SX,
AT-2973T, and AT-2973T/4 adapters.
Management
Software Updates
New releases of management software for our managed products are
available from both of the following web sites:
Allied Telesis web site: www.alliedtelesis.com/support/software/
Allied Telesis FTP server:ftp://ftp.alliedtelesis.com
If you prefer to download new software from the Allied Telesis FTP server
from your workstation’s command prompt, you will need FTP client
software and you must log in to the server. Enter “anonymous” for the user
name and your email address for the password.
15
Chapter 1
Introducing the AT-2973SX, AT-2973T,
and AT-2973T/4 Adapters
This chapter provides an introduction to the Allied Telesis AT-2973SX,
AT-2973T, and AT-2973T/4 NetExtreme II Family Adapters and discusses
the following topics:
“Functional Descriptions” on page 16
“Features” on page 22

Chapter 1: Introducing the AT-2973SX, AT-2973T, and AT-2973T/4 Adapters
16
Functional Descriptions
The AT-2973SX, AT-2973T, and AT-2973T/4 Broadcom NetXtreme II
adapters are a new class of Gigabit Ethernet (GbE) converged network
interface controller (C-NIC) that can simultaneously perform accelerated
data networking and storage networking on a standard Ethernet network.
The C-NIC offers acceleration for all popular protocols used in the data
center, such as:
TCP Offload Engine (TOE) for accelerating TCP
Internet Small Computer Systems Interface (iSCSI) offload for
accelerating network storage access featuring centralized boot
functionality (iSCSI boot)
Enterprise networks that use multiple protocols and multiple network
fabrics benefit from the C-NICs ability to combine data communications,
storage, and clustering over a single Ethernet fabric by boosting server
CPU processing performance and memory utilization while alleviating I/O
bottlenecks.
The AT-2973SX adapter is set to a speed of 1000 Mbps in full duplex
mode automatically. You cannot change the speed or duplex mode of this
adapter.
The AT-2973T and AT-2973T/4 adapters include a 10/100/1000-Mbps
Ethernet MAC with both half-duplex and full-duplex capability and a 10/
100/1000-Mbps PHY. The transceiver is fully compatible with the IEEE
802.3 standard for auto-negotiation of speed.
As part of the company’s green range, all of three adapters are
engineered to reduce power consumption. They incorporate centralized
power management features that automatically place idle circuitry into a
lower power mode to save energy.
The following sections provide functional descriptions of the AT-2973SX,
AT-2973T, and AT-2973T/4 adapters:
“AT-2973SX Adapter” on page 17
“AT-2973T Adapter” on page 18
“AT-2973T/4 Adapter” on page 20

AT-2973SX, AT-2973T, and AT-2973T/4 NetExtreme II Family Adapters Installation and User’s Guide
17
AT-2973SX
Adapter
The AT-2973SX adapter connects a PCI-E compliant server or workstation
to a Gigabit Ethernet network using fiber optic cabling and a connector that
meets 62.5/125 µm or 50/125 µm multimode specifications. This adapter
operates at speeds of 1000 Mbps in full-duplex mode.
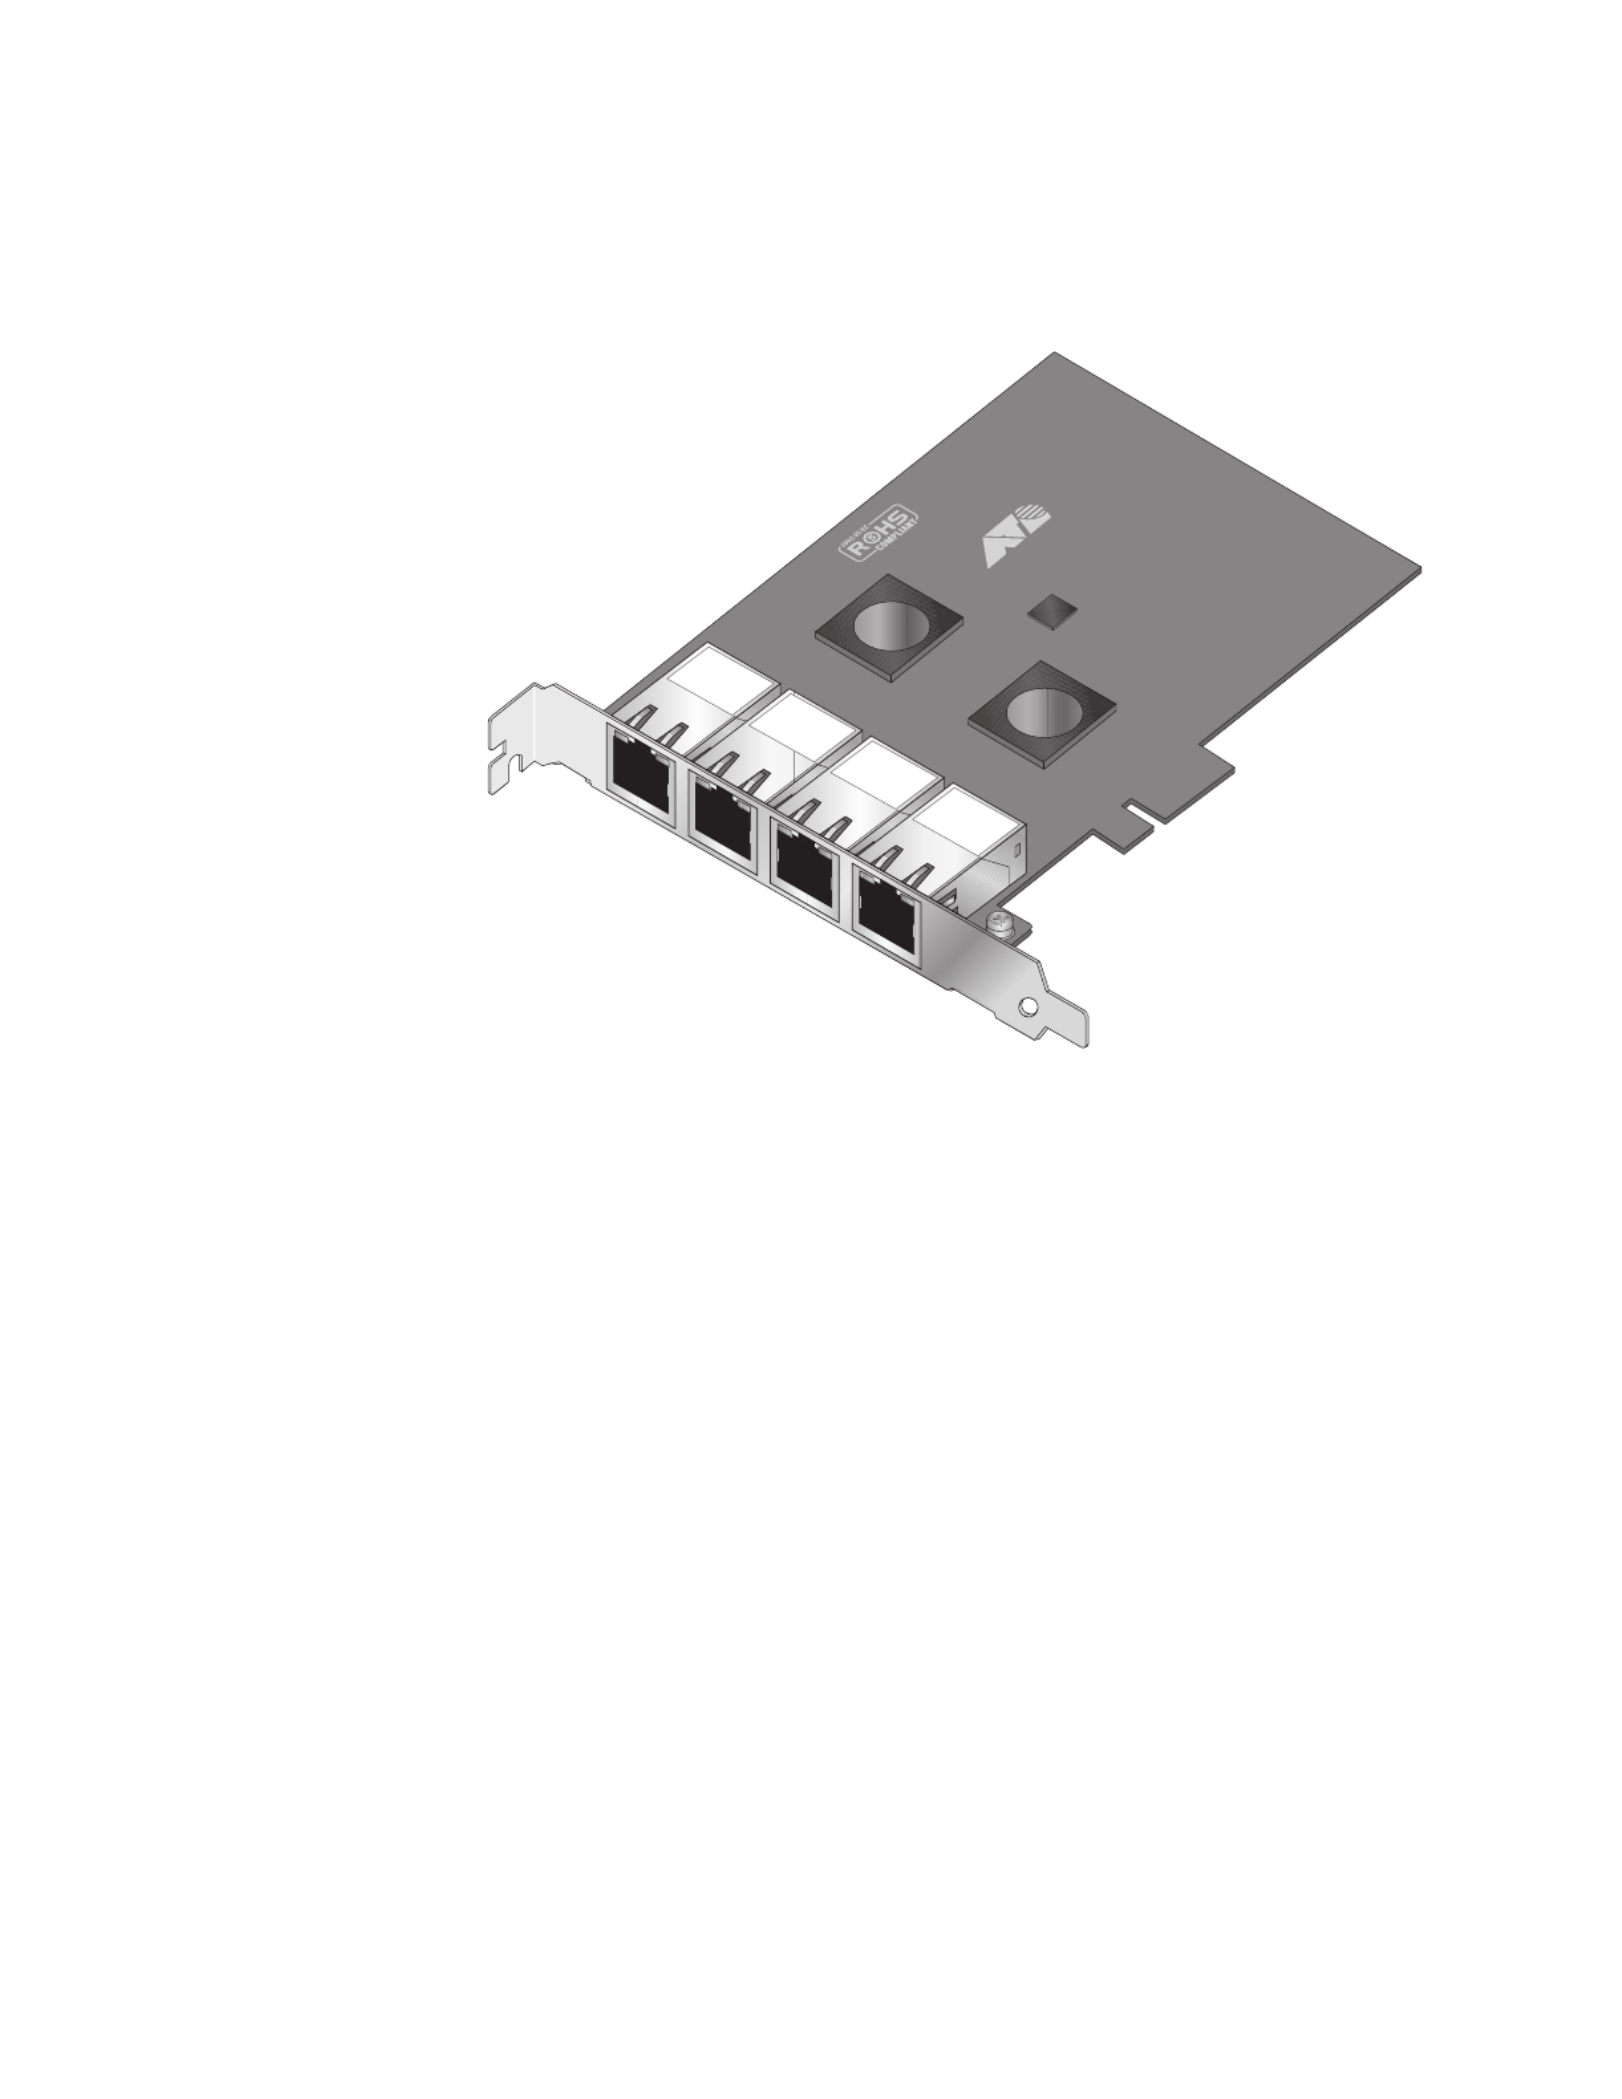
The AT-2973SX adapter is show in Figure 1.
Figure 1. AT-2973SX Adapter
AT-2973SX Adapter Physical Description
The faceplate on the AT-2973SX adapter provides two fiber optic
connectors for attaching the adapter to a compatible link partner. See
Figure 2 for an illustration of the adapter’s faceplate.
The AT-2973SX adapter has two fiber ports and two LEDs per port, as
shown in Figure 2 and described in Table 1 on page 18. The state of the
network link and activity is indicated by a single LED located adjacent to
the port connector.
Figure 2. AT-2973SX Faceplate
1696
100
ACT LNK
ATI
1699
100
ACT LNK

Chapter 1: Introducing the AT-2973SX, AT-2973T, and AT-2973T/4 Adapters
18
For AT-2973SX LED information, see Table 1.
AT-2973T
Adapter
The AT-2973T adapter operates at speeds of 10/100/1000T Mbps in both
full-duplex and half-duplex modes. This adapter has two twisted-pair
connectors and two LEDs, as shown in Figure 3.
Figure 3. AT-2973T Adapter
AT-2973T Adapter Physical Description
The faceplate on the AT-2973T adapter provides two twisted-pair
connectors for attaching the adapter to a compatible link partner. See
Figure 4 on page 19 for an illustration of the adapter’s faceplate and LEDs.
Table 1. Network Link and Activity Indicated by the RJ-45 Port LEDs
Port LED LED Appearance Network State
Link LED Off No link (cable disconnected)
Continuously
illuminated
Link
Activity LED Off No network activity
Blinking No network activity
1700
100
ATI
L/A 1
L/A 2
AT-2973SX, AT-2973T, and AT-2973T/4 NetExtreme II Family Adapters Installation and User’s Guide
19
Figure 4. AT-2973T Faceplate
For copper-wire Ethernet connections, the state of the network link and
activity is indicated by the LEDs on the RJ-45 connector. The LED labeled
L/A1 indicates port 1 and the LED labeled L/A2 indicates port 2. See
Table 2.
Table 2. Network Link and Activity Indicated by the RJ-45 Port LEDs
Port LED LED Appearance Network State
Link LED Off No link (cable disconnected)
Continuously
illuminated
Link
Activity LED Off No network activity
Blinking No network activity
1701
100
L/A 1
L/A 2
Chapter 1: Introducing the AT-2973SX, AT-2973T, and AT-2973T/4 Adapters
20
AT-2973T/4
Adapter
The AT-2973T/4 adapter is a PCI-Express adapter that operates at
speeds of 10/100/1000T Mbps in both full-duplex and half-duplex modes.
This adapter has four twisted-pair connectors and eight LEDs, as shown in
Figure 5.
Figure 5. AT-2973T/4 Adapter
1861
T
LNK ACT
ATI
AT-2973SX, AT-2973T, and AT-2973T/4 NetExtreme II Family Adapters Installation and User’s Guide
21
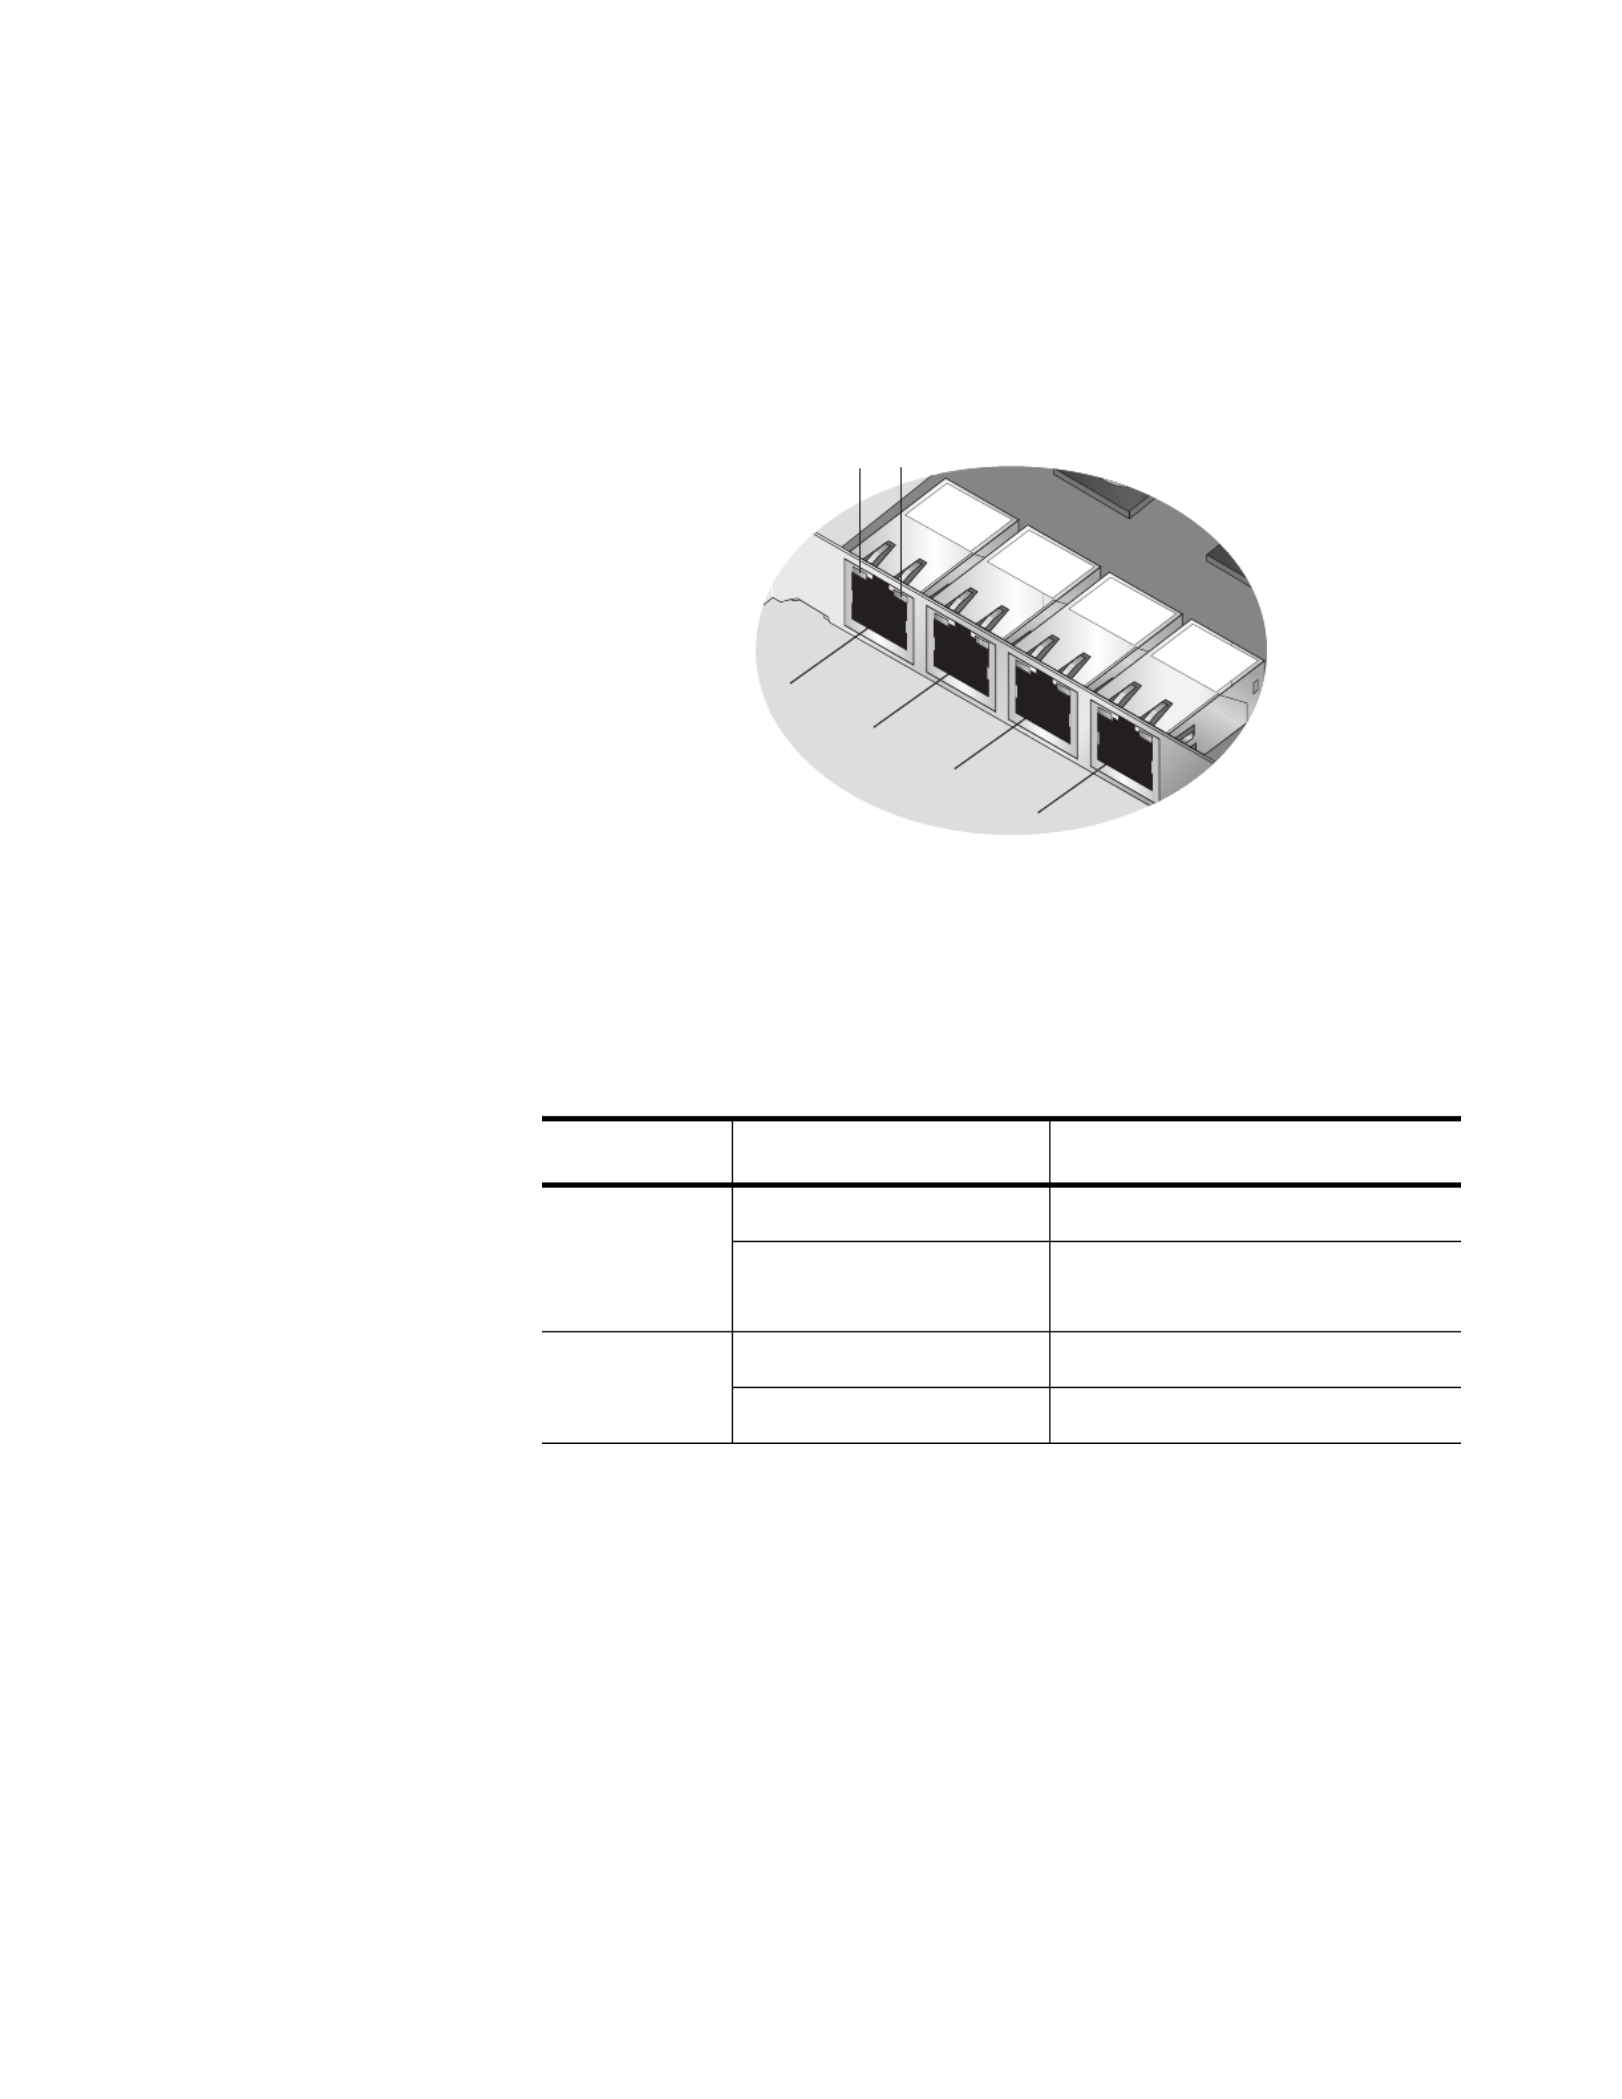
AT-2973T/4 Adapter Physical Description
The faceplate on the AT-2973T/4 adapter provides four twisted-pair
connectors for attaching the adapter to a compatible link partner. The ports
numbers are not shown on the card. See Figure 6 for the port numbers
and the LED assignments. When the adapter is mounted vertically, the top
LED is the Link LED and the bottom LED is the activity (ACT) LED.
Figure 6. AT-2973T/4 Faceplate
For copper-wire Ethernet connections, the state of the network link and
activity is indicated by the LEDs on the RJ-45 connector, as described in
Table 3.
Table 3. Network Link and Activity Indicated by the RJ-45 Port LEDs
Port LED LED Appearance Network State
Link LED Off No link (cable disconnected)
Continuously
illuminated
Link
Activity LED Off No network activity
Blinking Network activity
1862
T
LNK ACT
ATI
LINK ACT
PORT 1
PORT 2
PORT 3
PORT 4

Chapter 1: Introducing the AT-2973SX, AT-2973T, and AT-2973T/4 Adapters
22
Features
The following list of features for the AT-2973SX, AT-2973T, AT-2973T/4
adapters applies to all of the supported operating systems:
TCP Offload Engine (TOE)
Internet Small Computer Systems Interface (iSCSI) offload
Single-chip solution
– Integrated 10/100/1000BASE-T transceivers
– 10/100/1000 triple-speed MAC
– Host interfaces
– SerDes interface for optical transceiver
connection
– PCI Express v1.1 p22-x4 and v2.0 compliant (Gigabit
Ethernet)
– Full fast-path TCP offload
Other performance features
– TCP, IP, UDP checksum
– TCP segmentation
– Adaptive interrupts
– Receive Side Scaling (RSS)
Manageability
– Broadcom Advanced Control Suite (BACS) 3
diagnostic and configuration software suite
– Supports PXE 2.0 specification (Linux Red
Hat PXE Server, SUSE Linux Enterprise
Server, Windows Server 2000, Windows Server
2003, Windows Server 2008, Windows Server
2008 R2, Intel APITEST, DOS UNDI)
– Wake on LAN support
– Statistics for Simple Network Management
Protocol (SNMP) MIB II, Ethernet-like MIB, and
Ethernet MIB (IEEE Std 802.3z, Clause 30)

AT-2973SX, AT-2973T, and AT-2973T/4 NetExtreme II Family Adapters Installation and User’s Guide
23
– SMBus controller
– ACPI 1.1a compliant (multiple power modes)
– IPMI support
Advanced network features
– Jumbo frames (up to 9 KB). The OS and the link
partner must support jumbo frames.
– Virtual LANs
– IEEE Std 802.3ad Teaming
– Smart Load Balancing Teaming
– Smart Load Balancing TOE Teaming (with the
correct configuration)
– Flow Control (IEEE Std 802.3x)
– LiveLink™ (supported in both the 32-bit and 64-bit
Windows operating systems)
– Logical Link Control (IEEE Std 802.2)
Layer-2 Priority Encoding (IEEE Std 802.1p)
High-speed on-chip RISC processor
Up to 4 classes of service (CoS)
Integrated 96 KB frame buffer memory
iSCSI Boot support
TCP Offload
Engine (TOE)
The TCP/IP protocol suite is used to provide transport services for a wide
range of applications for the Internet, LAN, and for file transfer. The TCP
protocol is specifically designed to insure that data packets are delivered
error free and in the correct sequence from an application running a one
computer to the receiving application. The TCP protocol suite historically
has run on the host CPU, but with higher data rates, this consumes a very
high percentage of its resources while leaving little resources for the
applications. With the use of the Broadcom NetXtreme II adapter and the
TCP Offload Engine feature, the TCP/IP processing can be moved to
hardware, freeing the CPU for application processing and other higher
priority tasks .
The TCP/IP protocol suite is used to provide transport services for a wide
range of applications for the Internet, LAN, and for file transfer. Without the
TCP Offload Engine, the TCP/IP protocol suite runs on the host CPU,
consuming a very high percentage of its resources and leaving little
resources for the applications. With the use of the Broadcom NetXtreme II

Chapter 1: Introducing the AT-2973SX, AT-2973T, and AT-2973T/4 Adapters
24
adapter, the TCP/IP processing can be moved to hardware, freeing the
CPU for more important tasks such as application processing.
The Broadcom NetXtreme II adapter's TOE functionality allows
simultaneous operation of up to 1024 fully offloaded TCP connections for
1-Gbps network adapters. The TOE support on the adapter significantly
reduces the host CPU utilization while preserving the implementation of
the operating system stack.
Internet Small
Computer
Systems Interface
(iSCSI)
The IETF has standardized the Internet Small Computer Systems
Interface (iSCSI). SCSI is a popular protocol that enables systems to
communicate with storage devices, using block-level transfer (that is,
address data stored on a storage device that is not a whole file). In
addition, iSCSI maps the SCSI request and response application
protocols and its standardized command set over TCP/IP networks.
As iSCSI utilizes TCP as its sole transport protocol, it greatly benefits from
hardware acceleration of the TCP processing (that is, use of a TOE).
However, iSCSI as a Layer 5 protocol has additional mechanisms beyond
the TCP layer. iSCSI processing can also be offloaded, thereby reducing
CPU utilization even further.
The Broadcom NetXtreme II adapter targets best-system performance,
maintains system flexibility to changes, and supports current and future
OS convergence and integration. Therefore, the adapter's iSCSI offload
architecture is unique as evident by the split between hardware and host
processing.
Power
Management
When the system is down and waiting for a wake-up signal, the adapter
speed connection may be at 10 Mbps or 100 Mbps. However, it can return
to 1000 Mbps when the system is up and running if it is connected to a
1000 Mbps capable switch. For this reason, connect systems that use the
Wake on LAN (WOL) feature to a switch capable of both 1000 and 10/100
Mbps speeds.
Wake on LAN
(WOL) Feature
The WOL feature sets the speed at which the network adapter connects to
the network while the adapter is in Wake on LAN (WOL) mode which is
enabled automatically. The default speed for WOL mode is 100 Mb. An
adapter can negotiate speeds between 10 Mb and 100 Mb. You cannot
configure this feature because it is enabled automatically.
Note
The WOL feature is supported on the AT-2973T and AT-2973T/4
adapters. It is not supported on the AT-2973SX adapter. For more
information, see “Limitations” on page 66.

AT-2973SX, AT-2973T, and AT-2973T/4 NetExtreme II Family Adapters Installation and User’s Guide
25
Note
For specific systems, see your system documentation for
information about support of the WOL feature.
Adaptive
Interrupt
Frequency
The adapter driver intelligently adjusts host interrupt frequency based on
traffic conditions to increase overall application throughput. When traffic is
light, the adapter driver interrupts the host for each received packet,
minimizing latency. When traffic is heavy, the adapter issues one host
interrupt for multiple, back-to-back incoming packets, preserving host CPU
cycles.
ASIC with
Embedded RISC
Processor
The core control for Broadcom NetXtreme II adapters resides in a tightly
integrated, high-performance ASIC. The ASIC includes a RISC processor.
This functionality provides the flexibility to add new features to the card
and adapts it to future network requirements through software downloads.
This functionality also enables the adapter drivers to exploit the built-in
host offload functions on the adapter as host operating systems are
enhanced to take advantage of these functions.
Supported
Operating
Environments
The Broadcom NetXtreme II adapter has software support for the following
operating systems:
Microsoft Windows Server 2003 (32-bit and 64-bit extended)
Microsoft Windows Server 2008 (32-bit and 64-bit extended)
Microsoft Windows Server 2008 R2 (32-bit and 64-bit extended)
Microsoft Windows Vista (32-bit and 64-bit extended)
Microsoft Windows 7 (32-bit and 64-bit extended)
Microsoft Windows Server 2008 R2 Hyper-V
Linux (32-bit and 64-bit extended)
MS-DOS
ESX Server (VMware)
Citrix XenServer

Chapter 1: Introducing the AT-2973SX, AT-2973T, and AT-2973T/4 Adapters
26

27
Chapter 2
Installing the Hardware
This chapter describes how to install the AT-2973SX, AT-2973T, and
AT-2973T/4 adapters in a PC and discusses the following topics:
“Reviewing the Contents of Your Shipment” on page 28
“Reviewing Safety Precautions” on page 29
“Pre-Installation Checklist” on page 31
“Replacing the Bracket” on page 32
“Installing a Network Adapter Card” on page 34
“Connecting the Network Cables” on page 38
Especificaciones del producto
| Marca: | Allied Telesis |
| Categoría: | Tarjeta/adaptador de red |
| Modelo: | AT-2973SX |
¿Necesitas ayuda?
Si necesitas ayuda con Allied Telesis AT-2973SX haz una pregunta a continuación y otros usuarios te responderán
Tarjeta/adaptador de red Allied Telesis Manuales

11 Septiembre 2024
11 Septiembre 2024
11 Septiembre 2024
11 Septiembre 2024
11 Septiembre 2024
11 Septiembre 2024
11 Septiembre 2024
11 Septiembre 2024
11 Septiembre 2024
Tarjeta/adaptador de red Manuales
- Tarjeta/adaptador de red Sony
- Tarjeta/adaptador de red Philips
- Tarjeta/adaptador de red Onkyo
- Tarjeta/adaptador de red Pioneer
- Tarjeta/adaptador de red Yamaha
- Tarjeta/adaptador de red Yealink
- Tarjeta/adaptador de red Abus
- Tarjeta/adaptador de red Allnet
- Tarjeta/adaptador de red Alecto
- Tarjeta/adaptador de red Apc
- Tarjeta/adaptador de red Aluratek
- Tarjeta/adaptador de red Airlive
- Tarjeta/adaptador de red Anker
- Tarjeta/adaptador de red Suunto
- Tarjeta/adaptador de red Edimax
- Tarjeta/adaptador de red Strong
- Tarjeta/adaptador de red Icy Box
- Tarjeta/adaptador de red Nedis
- Tarjeta/adaptador de red Gembird
- Tarjeta/adaptador de red Asus
- Tarjeta/adaptador de red Eminent
- Tarjeta/adaptador de red Sharkoon
- Tarjeta/adaptador de red Targus
- Tarjeta/adaptador de red Vivanco
- Tarjeta/adaptador de red Sitecom
- Tarjeta/adaptador de red TP Link
- Tarjeta/adaptador de red Lenovo
- Tarjeta/adaptador de red Manhattan
- Tarjeta/adaptador de red Black Box
- Tarjeta/adaptador de red Trust
- Tarjeta/adaptador de red Tripp Lite
- Tarjeta/adaptador de red Axis
- Tarjeta/adaptador de red Hama
- Tarjeta/adaptador de red Kensington
- Tarjeta/adaptador de red Sennheiser
- Tarjeta/adaptador de red AVM
- Tarjeta/adaptador de red Gigabyte
- Tarjeta/adaptador de red Microsoft
- Tarjeta/adaptador de red Nec
- Tarjeta/adaptador de red Techly
- Tarjeta/adaptador de red Emerson
- Tarjeta/adaptador de red Totolink
- Tarjeta/adaptador de red Cisco
- Tarjeta/adaptador de red Steren
- Tarjeta/adaptador de red Iiyama
- Tarjeta/adaptador de red Netis
- Tarjeta/adaptador de red Teufel
- Tarjeta/adaptador de red Digitus
- Tarjeta/adaptador de red Belkin
- Tarjeta/adaptador de red Devolo
- Tarjeta/adaptador de red Linksys
- Tarjeta/adaptador de red Buffalo
- Tarjeta/adaptador de red Klipsch
- Tarjeta/adaptador de red Supermicro
- Tarjeta/adaptador de red GeoVision
- Tarjeta/adaptador de red Netgear
- Tarjeta/adaptador de red LevelOne
- Tarjeta/adaptador de red Terris
- Tarjeta/adaptador de red ICIDU
- Tarjeta/adaptador de red Valcom
- Tarjeta/adaptador de red Goobay
- Tarjeta/adaptador de red Mercusys
- Tarjeta/adaptador de red Planet
- Tarjeta/adaptador de red Simplecom
- Tarjeta/adaptador de red ZyXEL
- Tarjeta/adaptador de red Clas Ohlson
- Tarjeta/adaptador de red Intel
- Tarjeta/adaptador de red Mede8er
- Tarjeta/adaptador de red Konig
- Tarjeta/adaptador de red Sweex
- Tarjeta/adaptador de red MSI
- Tarjeta/adaptador de red D-Link
- Tarjeta/adaptador de red Tenda
- Tarjeta/adaptador de red Audac
- Tarjeta/adaptador de red ESI
- Tarjeta/adaptador de red Ubiquiti Networks
- Tarjeta/adaptador de red Veho
- Tarjeta/adaptador de red Eaton
- Tarjeta/adaptador de red Thrustmaster
- Tarjeta/adaptador de red Pinnacle
- Tarjeta/adaptador de red Trendnet
- Tarjeta/adaptador de red Mikrotik
- Tarjeta/adaptador de red ATen
- Tarjeta/adaptador de red Ipevo
- Tarjeta/adaptador de red Emtec
- Tarjeta/adaptador de red Russound
- Tarjeta/adaptador de red Conceptronic
- Tarjeta/adaptador de red EverFocus
- Tarjeta/adaptador de red Paradigm
- Tarjeta/adaptador de red Vivotek
- Tarjeta/adaptador de red EQ3
- Tarjeta/adaptador de red Satechi
- Tarjeta/adaptador de red Hawking Technologies
- Tarjeta/adaptador de red Martin Logan
- Tarjeta/adaptador de red SEH
- Tarjeta/adaptador de red OSD Audio
- Tarjeta/adaptador de red Arctic Cooling
- Tarjeta/adaptador de red Crestron
- Tarjeta/adaptador de red Aeon Labs
- Tarjeta/adaptador de red Vantec
- Tarjeta/adaptador de red Sonnet
- Tarjeta/adaptador de red Twelve South
- Tarjeta/adaptador de red Logilink
- Tarjeta/adaptador de red Moxa
- Tarjeta/adaptador de red StarTech.com
- Tarjeta/adaptador de red SIIG
- Tarjeta/adaptador de red IOGEAR
- Tarjeta/adaptador de red Hercules
- Tarjeta/adaptador de red Heckler Design
- Tarjeta/adaptador de red Ferguson
- Tarjeta/adaptador de red Hughes & Kettner
- Tarjeta/adaptador de red Micro Connect
- Tarjeta/adaptador de red Extron
- Tarjeta/adaptador de red SVS
- Tarjeta/adaptador de red Antec
- Tarjeta/adaptador de red Intellinet
- Tarjeta/adaptador de red ELO
- Tarjeta/adaptador de red Lancom
- Tarjeta/adaptador de red Motu
- Tarjeta/adaptador de red SMC
- Tarjeta/adaptador de red Star Micronics
- Tarjeta/adaptador de red CradlePoint
- Tarjeta/adaptador de red Digium
- Tarjeta/adaptador de red Riello
- Tarjeta/adaptador de red Savio
- Tarjeta/adaptador de red EVOLVEO
- Tarjeta/adaptador de red Kramer
- Tarjeta/adaptador de red Iconbit
- Tarjeta/adaptador de red InLine
- Tarjeta/adaptador de red 7inova
- Tarjeta/adaptador de red Media-tech
- Tarjeta/adaptador de red Microchip
- Tarjeta/adaptador de red Oehlbach
- Tarjeta/adaptador de red Perfect Choice
- Tarjeta/adaptador de red NUVO
- Tarjeta/adaptador de red Cudy
- Tarjeta/adaptador de red Lindy
- Tarjeta/adaptador de red Canyon
- Tarjeta/adaptador de red Rosewill
- Tarjeta/adaptador de red Digicom
- Tarjeta/adaptador de red Ernitec
- Tarjeta/adaptador de red Ugreen
- Tarjeta/adaptador de red Tycon Systems
- Tarjeta/adaptador de red Code Corporation
- Tarjeta/adaptador de red Hamlet
- Tarjeta/adaptador de red Vivolink
- Tarjeta/adaptador de red Atto
- Tarjeta/adaptador de red Raidsonic
- Tarjeta/adaptador de red Approx
- Tarjeta/adaptador de red Cambium Networks
- Tarjeta/adaptador de red Barox
- Tarjeta/adaptador de red I-Tec
- Tarjeta/adaptador de red AMX
- Tarjeta/adaptador de red Rocstor
- Tarjeta/adaptador de red Raspberry Pi
- Tarjeta/adaptador de red Mach Power
- Tarjeta/adaptador de red EXSYS
- Tarjeta/adaptador de red Altronix
- Tarjeta/adaptador de red J5 Create
- Tarjeta/adaptador de red Microsemi
- Tarjeta/adaptador de red Atlantis Land
- Tarjeta/adaptador de red CLUB3D
- Tarjeta/adaptador de red IDIS
- Tarjeta/adaptador de red Xcellon
- Tarjeta/adaptador de red Luxul
Últimos Tarjeta/adaptador de red Manuales
26 Octubre 2024
22 Octubre 2024
16 Octubre 2024
16 Octubre 2024
14 Octubre 2024
9 Octubre 2024
6 Octubre 2024
6 Octubre 2024
5 Octubre 2024
4 Octubre 2024