Extron MVC 121 Plus Manual de Usario
Extron
consola de mezclas
MVC 121 Plus
Lee a continuación 📖 el manual en español para Extron MVC 121 Plus (2 páginas) en la categoría consola de mezclas. Esta guía fue útil para 10 personas y fue valorada con 4.5 estrellas en promedio por 2 usuarios
Página 1/2
IMPORTANT:
Go to www.extron.com for the
complete user guide, installation
instructions, and specifications.
MVC 121 Plus • Setup Guide
The Extron MVC 121 Plus is an audio mixer and volume controller that will mix up to two mono mic/line inputs (balanced/
unbalanced) with one stereo line level input (balanced/unbalanced). All audio input signals are converted from analog to digital
prior to processing or routing. Each mic/line input and the line level input have their own gain control adjustment screws. The
mixed variable output also features a volume control knob on the front panel.
NOTE: For full installation, configuration, and operation details, see the , available at MVC 121 Plus User Guide
www.extron.com.
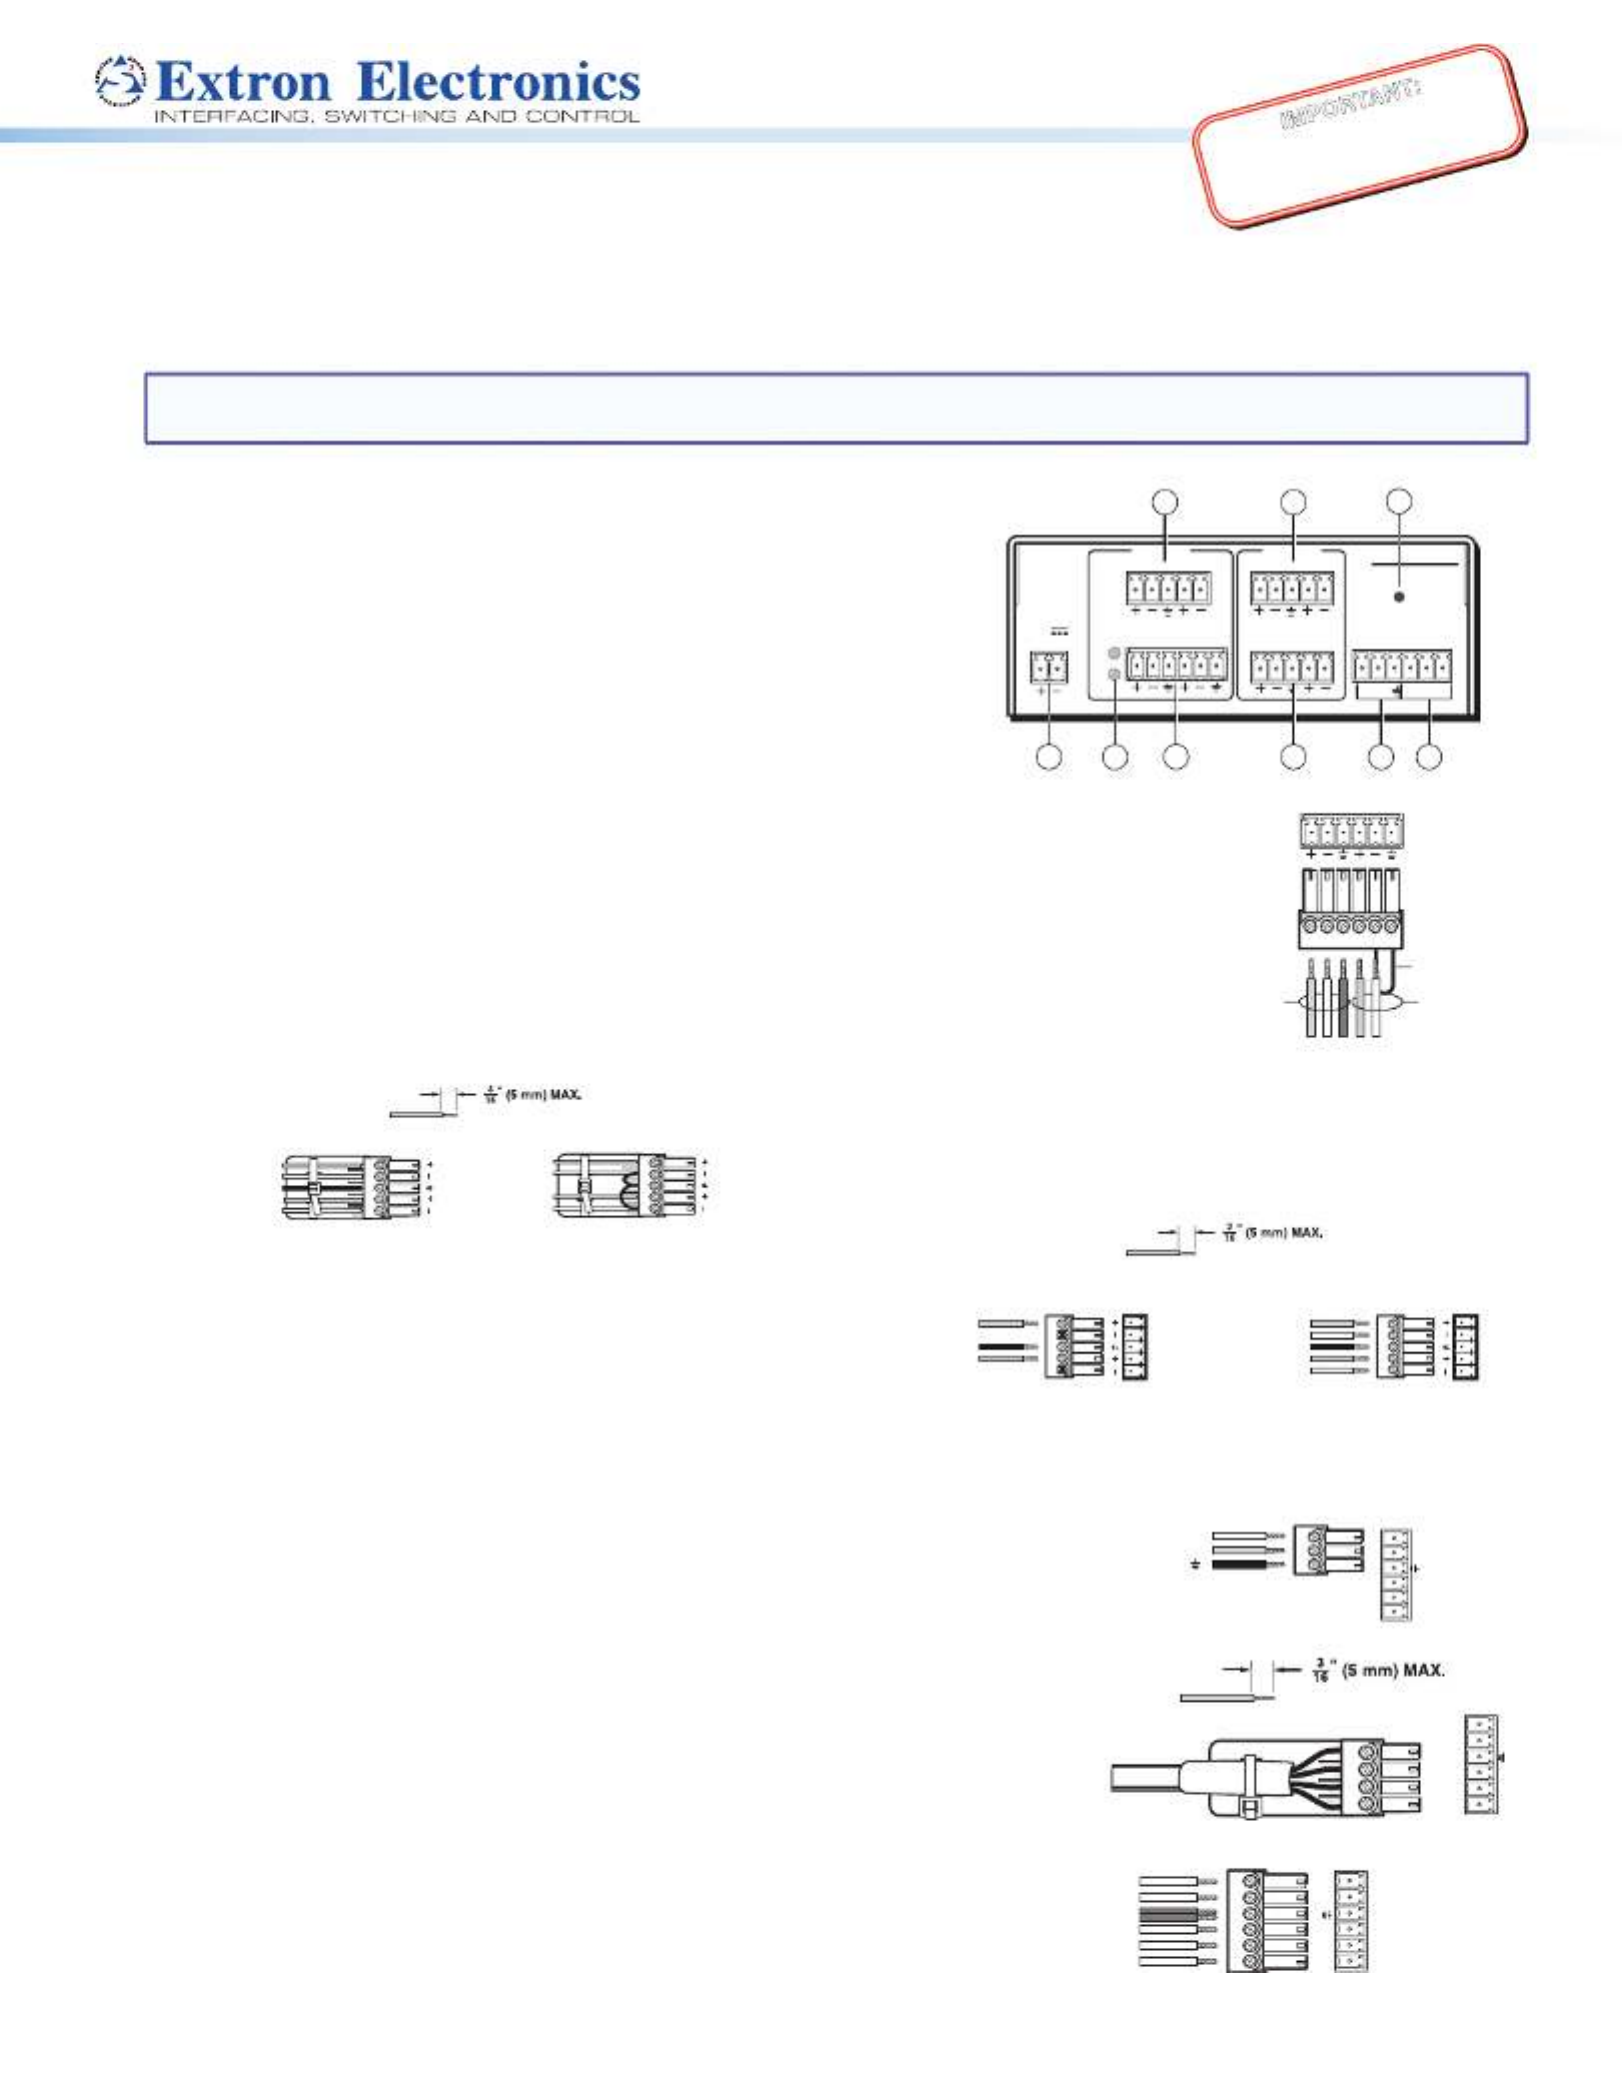
Rear Panel Features and Connections
a 12 VDC power connector f Fixed output connector
b Mic 1 and 2 Phantom power LED g RS-232 connector
c Mic/Line input connectors (1 – 2) h Digital input connector
d Line input connector (3) i Reset button
e Variable output connector
Installing the MVC 121 Plus
1. Disconnect power from all equipment.
2. (Optional) Mount the unit to a rack or furniture.
3. Connect the audio inputs.
• Connect up to two balanced or unbalanced mono mic/line level input devices to
connector above (see the 6-pole wiring diagram on the right). Alternatively, c
two 3-pole connectors may be used.
• A balanced or unbalanced stereo line level input may be connected to above (see the 5-pole wiring diagram below). d
Balanced audio
Tip
Ring
Tip
Ring
L R
Slee
ves
Unbalanced audio
Tip
Sleeve
Sleeve
Tip
L R
Do not tin the wires!
4. Connect the audio output.
• For variable balanced or unbalanced stereo output controlled
by the front panel knob of the MVC 121 Plus, connect an
amplier to the Variable connector e, above (see the wiring
diagram on the right).
• For xed stereo output, connect an output device to Fixed
connector f (see the wiring diagram above).
5. Connect a control device. Connect a host device, such as a computer, to
one of the following MVC ports to congure and control the MVC 121 plus via
Simple Instruction Set (SIS™) commands.
• RS-232 port (rear panel) — Connect a host device to the Tx, Rx, and
_ (ground) pins of this 6-pole captive screw connector (g). The default
baud rate for this port is 38400 baud, 1 stop bit, no parity, 8 data bits, and
no ow control (see the wiring diagram on the right).
• Config port (front panel) — See Front Panel Features on the next page.
6. Digital input connector. Up to three congurable input ports (see h on the
rear panel diagram above) allow connection to various devices including motion
detectors, alarms, buttons, photo (light) sensors, and temperature sensors. This
connector shares a common ground with the RS-232 connector (see the wiring
diagram on the right).
Both the RS-232 and digital input connectors may be used simultaneously by
using a 6-pin captive screw connector with two wires sharing the ground connector
(see the diagram on the right).
1 2MIC/LINE
Balanced MIC
Unbalanced MI
C
Jumper
Unbalanced Stereo Output
Tip
NO GROUND HERE.
Slee
ve(s)
Tip
NO GROUND HERE.
Balanced Stereo Output
Tip
Ring
Sleeve(s)
Tip
Ring
L R
L R
Left
Right
Left
Right
Do not tin the wires!
Transmit (Tx)
Receive (Rx)
Ground (Gnd,
)
RS-232
21Tx Rx
DIGI IN
3
Do not tin the wires!
1
2
3
_
RS-232
21Tx Rx
DIGI IN
3
2
1
+48V
MIC
1 2MIC/LINE
LINE 3L R RL
POWER
0.4A MAX
12V
RS-232
VARIABLE
FIXEDL R DIGI IN
MVC 121 Plus
Tx Rx 1 2 3
INPUTS OUTPUTS
RESET
123
4 5
67
9
8
RS-232 DIGI IN
Tx Rx 1 2 3

68-1937-50 Rev. B
10 13
Extron USA Headquarters
+1.800.633.9876 (Inside USA/Canada Only)
Extron USA - West: +1.714.491.1500 FAX: +1.714.491.1517
+1.919.850.1000 FAX: +1.919.850.1001Extron USA - East:
© 2013 Extron Electronics — All rights reserved. All trademarks mentioned are the property of their respective owners. www.extron.com
MVC 121 Plus • Setup Guide (continued)
7. Reset button. The recessed reset button (see i on the rear panel diagram
on the previous page) is used to access various modes of resets. The green
power LED on the front panel indicates the reset mode that was used.
8. Connect power to the MVC by connecting the included 12 VDC external
power supply to the rear panel power connector (see a on the rear panel
diagram). The wiring diagram is shown on the right.
9. Install the software. Conguration and control is done via both hardware
encoders and software. The control software, DSP Congurator, is available
at www.extron.com Software and Manual Download from the Website (see
below). The control software help le contains operation descriptions.
Front Panel Features (see the front panel diagram at right)
a — This power indicator lights green when the MVC 121 Plus Power/Reset LED
is operational. The LED also blinks per mode reset.
b — Connect a PC to the USB Mini-B connector for Configuration (Config) port
conguring the MVC using the DSP Congurator Software. The MVC 121 Plus
USB driver must be installed prior to using this port.
c — Rotating the encoder screw clockwise increases the gain setting. Rotating the encoder screw Mic 1 input gain control
counterclockwise decreases the gain. This adjustment controls the single gain point in the mix matrix that mixes mono mic 1
levels to the stereo output bus.
d — Rotating the encoder screw clockwise increases the gain setting. Rotating the encoder screw Mic 2 input gain control
counterclockwise decreases the gain setting. This adjustment controls the single gain point in the mix matrix that mixes
mono mic 2 levels to the stereo output bus.
e — Rotating the encoder screw clockwise increases the gain setting. Rotating the encoder Line level input 3 gain control
screw counterclockwise decreases the gain setting. This adjustment controls the single gain point in the mix matrix that
mixes line level input 3 to the stereo output bus.
f — As the mix-point gain or output volume increases or decreases, the LED indicator bar lights LED ladder indicator bar
from the bottom to the top to indicate the current mix-point or volume level. As the volume is increased or decreased within
a volume range, the top lit LED ashes once. If the knob is turned past maximum volume, all 8 LEDs ash for as long as the
knob continues to be turned. After 3 seconds of inactivity, the knob controls the variable volume output.
g Volume level adjust knob — Rotating the adjustment knob clockwise increases the output volume. Rotating the knob
counterclockwise decreases the volume.
Software and Manual Download from the Website
1. Using any internet browser, go to www.extron.com.
2. From the Extron home page, select the from the drop-down menu.
3. Select the tab on the MVC 121 Plus product page.
4. Select the User Guide from the list of available documentation and click on it to either view or download it to the hard drive
for future reference.
5. To download the control software, on the tab select .
6. The link navigates to the selected software download page. Fill out the form, then download the software to the hard drive.
NOTE: On the first installation of DSP Configurator, the USB driver loads automatically. Follow the on-screen instructions.
Once the USB driver has loaded, DSP Configurator continues to load.
By default, the program installs in and an icon is placed on the desktop.
SECTION A–A
Power Supply
Output Cord
Ridges
A
Smooth
A
Ridges
Smooth
2-P
ole Orange
Captive Scre
w
Connector
(12V)
Tie Wrap
3/16”
(5 mm) Max.
VOLUME
CONFIG
MIX
MIC MIC LINE
321
MIXER/VOLUME CONTROLLER
MVC 121 Plus
21 3 4 5 6 7
Especificaciones del producto
| Marca: | Extron |
| Categoría: | consola de mezclas |
| Modelo: | MVC 121 Plus |
¿Necesitas ayuda?
Si necesitas ayuda con Extron MVC 121 Plus haz una pregunta a continuación y otros usuarios te responderán
consola de mezclas Extron Manuales

18 Septiembre 2024
18 Septiembre 2024
consola de mezclas Manuales
- consola de mezclas Electrolux
- consola de mezclas Bosch
- consola de mezclas Philips
- consola de mezclas Inventum
- consola de mezclas JBL
- consola de mezclas Kenwood
- consola de mezclas Krups
- consola de mezclas Pioneer
- consola de mezclas Siemens
- consola de mezclas Yamaha
- consola de mezclas Alpina
- consola de mezclas Alecto
- consola de mezclas Allen-Heath
- consola de mezclas Akai
- consola de mezclas Arendo
- consola de mezclas American Audio
- consola de mezclas Alto
- consola de mezclas ADB
- consola de mezclas Severin
- consola de mezclas Nedis
- consola de mezclas Korona
- consola de mezclas Black And Decker
- consola de mezclas KitchenAid
- consola de mezclas Tristar
- consola de mezclas Domo
- consola de mezclas Nordland
- consola de mezclas Pyle
- consola de mezclas Hyundai
- consola de mezclas Bestron
- consola de mezclas Moulinex
- consola de mezclas Melissa
- consola de mezclas Clatronic
- consola de mezclas Fritel
- consola de mezclas Taurus
- consola de mezclas Cuisinart
- consola de mezclas Concept
- consola de mezclas Solac
- consola de mezclas Sunbeam
- consola de mezclas Stirling
- consola de mezclas Audio-Technica
- consola de mezclas Mesko
- consola de mezclas Gemini
- consola de mezclas Toa
- consola de mezclas Roland
- consola de mezclas ART
- consola de mezclas Denon
- consola de mezclas Vonyx
- consola de mezclas Philco
- consola de mezclas Korg
- consola de mezclas LD Systems
- consola de mezclas Marquant
- consola de mezclas Bogen
- consola de mezclas Technics
- consola de mezclas Koenic
- consola de mezclas Steren
- consola de mezclas Allen & Heath
- consola de mezclas Bose
- consola de mezclas Exquisit
- consola de mezclas Proline
- consola de mezclas Mackie
- consola de mezclas Envivo
- consola de mezclas Bomann
- consola de mezclas RCF
- consola de mezclas Ion
- consola de mezclas Pyle Pro
- consola de mezclas Peavey
- consola de mezclas Behringer
- consola de mezclas PreSonus
- consola de mezclas Valcom
- consola de mezclas Tascam
- consola de mezclas Midas
- consola de mezclas Auna
- consola de mezclas Blaze
- consola de mezclas IDance
- consola de mezclas Samson
- consola de mezclas Bifinett
- consola de mezclas Primo
- consola de mezclas Shure
- consola de mezclas QTX
- consola de mezclas Konig
- consola de mezclas Reloop
- consola de mezclas Numark
- consola de mezclas Chandler
- consola de mezclas Wharfedale
- consola de mezclas Soundcraft
- consola de mezclas Fredenstein
- consola de mezclas Swissonic
- consola de mezclas Team
- consola de mezclas Dynacord
- consola de mezclas ProfiCook
- consola de mezclas QSC
- consola de mezclas Omnitronic
- consola de mezclas Roadstar
- consola de mezclas Scott
- consola de mezclas Efbe-schott
- consola de mezclas Apart
- consola de mezclas Radial Engineering
- consola de mezclas ATen
- consola de mezclas Showtec
- consola de mezclas Turmix
- consola de mezclas Russound
- consola de mezclas Skytec
- consola de mezclas DBX
- consola de mezclas Waves
- consola de mezclas Monoprice
- consola de mezclas Ibiza Sound
- consola de mezclas Elysia
- consola de mezclas Proel
- consola de mezclas HQ Power
- consola de mezclas Solid State Logic
- consola de mezclas OSD Audio
- consola de mezclas Crestron
- consola de mezclas Adastra
- consola de mezclas Zolid
- consola de mezclas Dash
- consola de mezclas Stanton
- consola de mezclas TeachLogic
- consola de mezclas Power Dynamics
- consola de mezclas Citronic
- consola de mezclas Kalorik
- consola de mezclas SPL
- consola de mezclas Monacor
- consola de mezclas Warm Audio
- consola de mezclas Martin
- consola de mezclas Audiophony
- consola de mezclas JB Systems
- consola de mezclas Sonifex
- consola de mezclas Manley
- consola de mezclas DAP Audio
- consola de mezclas Redmond
- consola de mezclas Ashly
- consola de mezclas Dangerous Music
- consola de mezclas Venga
- consola de mezclas Crown
- consola de mezclas Dateq
- consola de mezclas Speco Technologies
- consola de mezclas Avid
- consola de mezclas M-GAME
- consola de mezclas Ecler
- consola de mezclas Flama
- consola de mezclas Icon
- consola de mezclas Stagg
- consola de mezclas Santos
- consola de mezclas TC Helicon
- consola de mezclas Kramer
- consola de mezclas Fun Generation
- consola de mezclas Karma
- consola de mezclas ANT
- consola de mezclas IMG Stage Line
- consola de mezclas Atlas Sound
- consola de mezclas Rane
- consola de mezclas Nektar
- consola de mezclas Phonic
- consola de mezclas Koda
- consola de mezclas JTS
- consola de mezclas RCS
- consola de mezclas Klark Teknik
- consola de mezclas Sound Devices
- consola de mezclas DAP
- consola de mezclas Alfatron
- consola de mezclas CAD Audio
- consola de mezclas Trident
- consola de mezclas Rolls
- consola de mezclas Heritage Audio
- consola de mezclas IMG Stageline
- consola de mezclas The T.mix
- consola de mezclas Inter-M
- consola de mezclas Cloud
- consola de mezclas Bellari
- consola de mezclas OWI
- consola de mezclas Glemm
- consola de mezclas Røde
Últimos consola de mezclas Manuales
27 Octubre 2024
27 Octubre 2024
27 Octubre 2024
23 Octubre 2024
21 Octubre 2024
20 Octubre 2024
20 Octubre 2024
20 Octubre 2024
20 Octubre 2024
20 Octubre 2024