Vivanco HDX 4.1 Auto Manual de Usario
Lee a continuación 📖 el manual en español para Vivanco HDX 4.1 Auto (14 páginas) en la categoría Cambiar. Esta guía fue útil para 6 personas y fue valorada con 4.5 estrellas en promedio por 2 usuarios
Página 1/14

Vivanco GmbH, Ewige Weide 15, D-22926 Ahrensburg, hotline@vivanco.de
1
HDX 4.1 auto - HDMI 4 to 1 Automatic Switching Unit
(GB) Operating Instructions -> 2
( D ) Bedienungsanleitung -> 3
( F ) Notice d'emploi -> 4
( E ) Instrucciones de uso -> 5
( I ) Istruzioni per l’uso -> 6
(NL) Gebruiksaanwijzing -> 7
(PL) Instrukcja obsługi -> 8
(P) Manual de instruções -> 9
(DK) Betjeningsvejledning -> 10
(S) Bruksanvisningar -> 11
(FIN) Käyttöohje -> 12
(RUS) -> 13
Connections Front Panel Operation
Vivanco GmbH, Ewige Weide 15, D-22926 Ahrensburg, hotline@vivanco.de
2
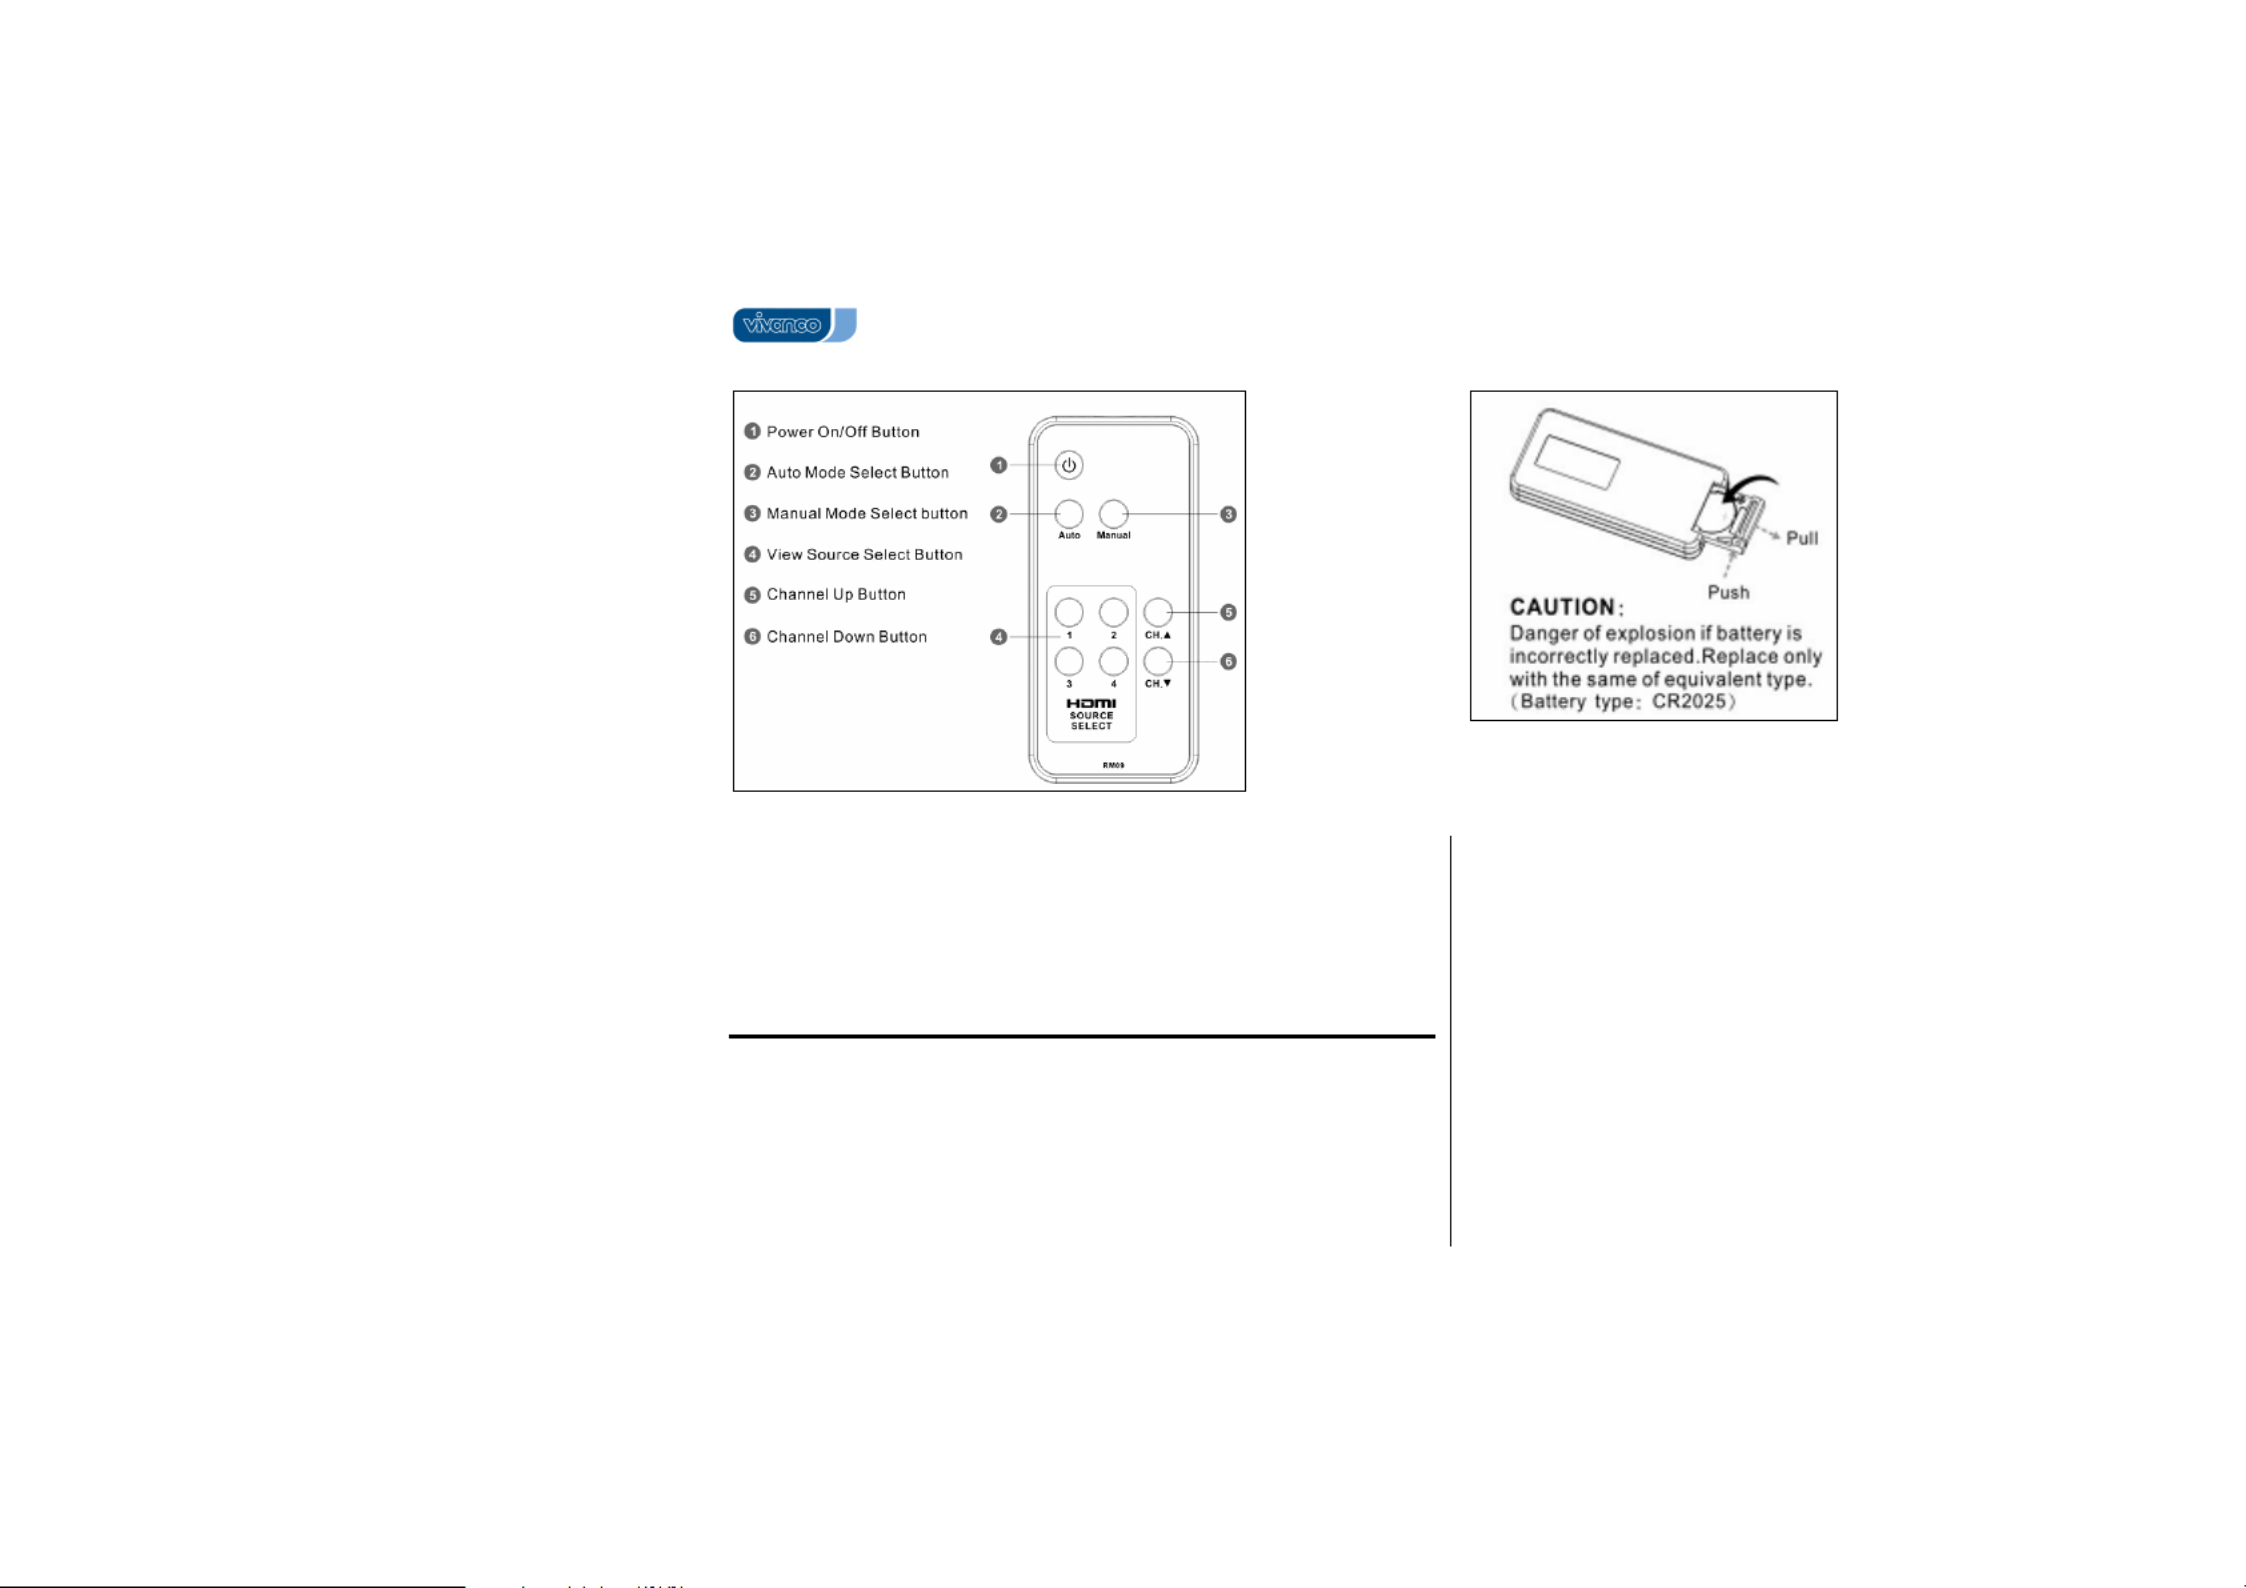
Remote Control
Technical data
Video: 480p, 480i, 720p, 720i, 1080i and 1080p resolution, VGA / SVGA / XGA /
UXGA, Operation pixel frequency range: 25-166 MHz
HDMI 1.2 compliant, HDCP Compliant
Input: 4* HDMI Single Link, TMDS
Output : 1* HDMI Single Link, TMDS
Cable lengths (in/out): typically 1,8 m
Power input: 9 VDC, max 600 mA & 100-250 V 50-60 Hz (Adapter)
Dimensions(LxHxW): 17x 9,7 x 3,7 cm
(GB) Operating Instructions
The HDMI Switching Unit allows multiple HDMI device access , such HDX 4.1 auto
as DVD players, recorders, HD games consoles and satellite, cable tuner and other
set-top boxes to one HDMI (HD ready) display (LCD/Plasma TV, Beamer).
Safety precautions:
Please ensure sufficient ventilation. Ensure that ventilation is not impeded by
covering the ventilation openings at the bottom with items, such as newspapers,
table-cloths, curtains, etc..
Please don´t use apparatus at higher temperatures than: 50° C.
Please don´t expose apparatus to dripping or splashing and don´t place objects
filled with liquids, such as vases, onto the apparatus.
Please take attention to the environmental aspects of battery disposal: use your
national battery recycling system.
Danger of explosion if battery is incorrectly Lithium Battery: Caution:
replaced. Replace only with the same or equivalent type recommended by the
manufacturer. Dispose of used batteries according to the manufacturer’s instructions.
Don´t use unit outdoors
Always remove the device from the mains socket before cleaning or if the unit
is not being used for a longer time.
In the event of malfunction, have the device repaired by a specialist.
Installation and Operation
1. Switch off all HDMI source devices and the HDMI display device (TV). Use
standard HDMI leads in order to connect HDMI outputs of your audio video
sources to the switching unit´s HDMI inputs and the unit´s HDMI to OUTPUT
the displays HDMI input. See fig. Connections.
2. Connect 9V AC/DC or DC/DC (9V/600mA) power adapter to the switch box’s

Vivanco GmbH, Ewige Weide 15, D-22926 Ahrensburg, hotline@vivanco.de
3
power input socket (rear side) and plug-in power adpter into a power outlet.
3. Turn on the TV display.
4. Turn on the audio video sources
5. Press the Power On/Off Button (1), see fig. , for Front Panel Operation
switching unit on or off. – The unit will automatically turn itself off (to stand-by
mode), when there is no input source signal available for five minutes.
6. Remote control battery insertion: Open the battery compartment on the
underside of the controller, see fig.. Then insert lithium battery type CR 2025.
Make sure that the polarity is correct: the "+" and "-" markings on the battery
and in the compartment must match. To check functionality, press Power
On/Off Button (1), see fig , while directing the remote control Remote Control
towards the IR reciever (4) of the switching unit, see fig Front Panel
Operation. If everything is correct a LED indicator (6) on switching unit will light
up.
7. Manual Mode: To select manual mode press the appropriate button Manual (3)
on the remote control or on the front panel of the HDMI switching unit.The input
sources may now be selected via remote control, buttons (4), (5) or (6), or by
pressing one of the input selection buttons to (5) on the unit HDMI-1 HDMI 4
itself.- The unit does not turn to stand-by even if all inputs are without any
signal.
8. Automatic Mode: To select auto mode press the appropriate button Auto (2) on
the remote control or on the front panel of the HDMI switching unit. The unit will
then automatically detect and select the most recent input source. – The unit
will automatically turn itself off (to stand-by mode), when there is no input
source signal available for five minutes on any input.The unit can be reactivated
by pressing power button (1) on the front of the unit.
Frequently asked Questions
• Switch box will not operate: Make sure that power adapter is plugged-in
properly and power LED is on.
• No picture/signal or poor picture: 1. Make sure that video display is HDCP
compliant. 2. Ensure HDMI leads lentghts: max 1,8 m or use of EQ leads. 3.
Ensure HDMI plugs tightly secured. 4. Turn-off all devices and then switch them
on again.
• The switching from one source to another takes several seconds until hailf a
minute: The HDCP (copy protection) authentification process per connected
device needs some time and is always repeated, when a new source is
selected. The total switching time is very much depending on the connected
devices.
• IR Controller will not work: Replace battery.
Hotline
If you any questions regarding the , please call the Vivanco UK Hotline: HDX 4.1 auto
tel: Tel. 01442 246088. Or send an e-mail to: consumer@vivanco.co.uk
(D) Bedienungsanleitung
Die HDMI Umschaltbox erlaubt den Anschluß von bis zu 4 HDMI-HDX 4.1 auto
Geräten, wie DVD Player, Rekorder, HD Spielekonsolen, HD Satelliten-Receiver und
andere SetTopBoxen usw. an ein HDMI (HD ready) hochauflösendes Anzeigegerät
(LCD/Plasma TV, Beamer).
Sicherheitshinweise:
Bitte für ausreichende Belüftung sorgen. Belüftungsschlitze an Geräteunterseite
nicht durch Gegenstände, wie Tischdecken, Zeitungen, Vorhänge usw. behindern.
Bitte Gerät nicht bei Temperaturen über 50° C betreiben.
Bitte Gerät vor Feuchtigkeit schützen, z.B. keine Behälter mit Flüssigkeiten
(Vasen) auf das Gerät stellen.
Bitte schützen Sie die Umwelt und nutzen Sie Ihr lokales
Batterieentsorgungssystem zum Aufarbeiten leerer Batterien.
Lithiumbatterie: VORSICHT: Explosionsgefahr bei unsachgemäßem
Auswechseln der Batterie! Batterie nur mit einem vom Hersteller empfohlenen
gleichwertigen Typ ersetzen. Entsorgung muß nach Anweisungen des Herstellers
erfolgen.
Benutzen Sie das Gerät nicht im Freien.
Vor dem Reinigen oder bei längeren Betriebsunterbrechungen das Gerät bitte
aus der Steckdose ziehen.
Bei eventuell auftretenden Störungen lassen Sie das Gerät bitte vom
Fachmann reparieren.
Anschließen und Bedienen
1. Bitte alle HDMI Geräte ausschalten. Dann verbinden Sie mittels
standardmäßiger HDMI-Kabel die HDMI-Buchsen der AV-Quellen mit den
HDMI Buchsen der Box und die HDMI OUTPUT-Buchse der Box mit dem
HDMI-Eingang Ihres Anzeigegerätes (TV). Siehe auch Abb. Connections
(=Verbindungen).
2. Verbinden Sie das 9 V Netzteil oder einen 9V Gleichspannungsadapter
(9V/600mA) mit der 9V-Buchse der Box (Geräterückseite) und einer
Stromsteckdose.
3. Schalten sie das HDMI-Anzeigegerät (TV-Gerät) ein.
4. Schalten Sie die angeschlossenen AV Geräte ein.
5. Drücken Sie die Ein/Aus-Taste (1) der Umschaltbox, s. Abb. Front Panel
Operation (= Bedienfeldfunktionen) zum Ein- bzw. Ausschalten des Gerätes. –
Especificaciones del producto
| Marca: | Vivanco |
| Categoría: | Cambiar |
| Modelo: | HDX 4.1 Auto |
| Color del producto: | Zwart |
| Peso.: | 34 g |
| Ancho: | 43 mm |
| Profundidad: | 46 mm |
| Altura: | 43 mm |
| Amable: | Voorlicht |
| Tipo de fuente de energía: | Batterij/Accu |
| Batería/Tiempo de carga de la batería: | 4 uur |
| Flujo-luminoso: | 200 lm |
| Toma de carga USB: | Ja |
| Batería recargable: | Ja |
| Número de efectos de iluminación: | 2 |
¿Necesitas ayuda?
Si necesitas ayuda con Vivanco HDX 4.1 Auto haz una pregunta a continuación y otros usuarios te responderán
Cambiar Vivanco Manuales

23 Agosto 2024
Cambiar Manuales
- Cambiar Bosch
- Cambiar Philips
- Cambiar Panasonic
- Cambiar Honeywell
- Cambiar Yamaha
- Cambiar Abus
- Cambiar Alcatel
- Cambiar Alecto
- Cambiar Apc
- Cambiar Alpine
- Cambiar Ansmann
- Cambiar Edimax
- Cambiar Intermatic
- Cambiar Flamingo
- Cambiar Brennenstuhl
- Cambiar Hikvision
- Cambiar Generac
- Cambiar Silvercrest
- Cambiar Nedis
- Cambiar Pyle
- Cambiar Asus
- Cambiar Eminent
- Cambiar Renkforce
- Cambiar TP Link
- Cambiar Manhattan
- Cambiar Black Box
- Cambiar Elro
- Cambiar Victron Energy
- Cambiar KlikaanKlikuit
- Cambiar Ei Electronics
- Cambiar Tripp Lite
- Cambiar DataVideo
- Cambiar Schneider
- Cambiar Theben
- Cambiar Elektrobock
- Cambiar Chamberlain
- Cambiar Sylvania
- Cambiar Velleman
- Cambiar Tork
- Cambiar Techly
- Cambiar Emerson
- Cambiar Totolink
- Cambiar Vemer
- Cambiar Profile
- Cambiar Cisco
- Cambiar Matrox
- Cambiar Steren
- Cambiar Perel
- Cambiar Engenius
- Cambiar Plantronics
- Cambiar IFM
- Cambiar Digitus
- Cambiar Kathrein
- Cambiar AV:link
- Cambiar Belkin
- Cambiar Linksys
- Cambiar Buffalo
- Cambiar Dahua Technology
- Cambiar Audiovox
- Cambiar Netgear
- Cambiar LevelOne
- Cambiar Kaiser
- Cambiar QNAP
- Cambiar Boss
- Cambiar Shimano
- Cambiar Merten
- Cambiar Goobay
- Cambiar Hager
- Cambiar Mercusys
- Cambiar Chacon
- Cambiar Elation
- Cambiar Sygonix
- Cambiar Planet
- Cambiar ZyXEL
- Cambiar Rex
- Cambiar Clas Ohlson
- Cambiar Powerfix
- Cambiar Tesla
- Cambiar EVE
- Cambiar D-Link
- Cambiar Tenda
- Cambiar UPM
- Cambiar Finder
- Cambiar Marmitek
- Cambiar Delta Dore
- Cambiar Ubiquiti Networks
- Cambiar EBERLE
- Cambiar Grasslin
- Cambiar Omnitronic
- Cambiar Eaton
- Cambiar Jung
- Cambiar CyberPower
- Cambiar Basetech
- Cambiar Trendnet
- Cambiar Mikrotik
- Cambiar WHALE
- Cambiar ATen
- Cambiar Fibaro
- Cambiar RGBlink
- Cambiar Gefen
- Cambiar Nexa
- Cambiar PAC
- Cambiar Wentronic
- Cambiar Dormakaba
- Cambiar Adder
- Cambiar Wago
- Cambiar Homematic IP
- Cambiar Monoprice
- Cambiar Tiptel
- Cambiar OSD Audio
- Cambiar SPC
- Cambiar Crestron
- Cambiar Unify
- Cambiar ORNO
- Cambiar Toolcraft
- Cambiar Berker
- Cambiar Electro Harmonix
- Cambiar Grandstream
- Cambiar Mercury
- Cambiar Provision ISR
- Cambiar Monacor
- Cambiar PCE
- Cambiar Logilink
- Cambiar Smart-AVI
- Cambiar StarTech.com
- Cambiar SIIG
- Cambiar Advantech
- Cambiar IOGEAR
- Cambiar Merlin Gerin
- Cambiar Micro Connect
- Cambiar Extron
- Cambiar KanexPro
- Cambiar Blustream
- Cambiar Avocent
- Cambiar Shelly
- Cambiar Intellinet
- Cambiar Ebode
- Cambiar Lancom
- Cambiar Robbe
- Cambiar B-tech
- Cambiar Speaka
- Cambiar Kopp
- Cambiar Vimar
- Cambiar Kemo
- Cambiar GAO
- Cambiar H-Tronic
- Cambiar Legrand
- Cambiar Kraus & Naimer
- Cambiar Noble
- Cambiar Intertechno
- Cambiar Ecler
- Cambiar Inverto
- Cambiar Triax
- Cambiar Rule
- Cambiar Kramer
- Cambiar CYP
- Cambiar Suevia
- Cambiar Phoenix Contact
- Cambiar Seuthe
- Cambiar Maclean Energy
- Cambiar SmartAVI
- Cambiar Cudy
- Cambiar Heitronic
- Cambiar Lindy
- Cambiar SEC24
- Cambiar Cooking Performance Group
- Cambiar Ernitec
- Cambiar Atlona
- Cambiar Adviti
- Cambiar Flic
- Cambiar IB Connect
- Cambiar Liberty
- Cambiar Hamlet
- Cambiar Paladin
- Cambiar Equip
- Cambiar Noark
- Cambiar Vivolink
- Cambiar Cambium Networks
- Cambiar 2USB
- Cambiar Roline
- Cambiar KVM-TEC
- Cambiar AMX
- Cambiar BZBGear
- Cambiar STI
- Cambiar Epiphan
- Cambiar Mach Power
- Cambiar Axing
- Cambiar Juniper
- Cambiar Raritan
- Cambiar ConnectPro
- Cambiar SunBriteTV
- Cambiar Atlantis Land
- Cambiar GEV
- Cambiar Pizzato Elettrica
- Cambiar Baco
- Cambiar SEADA
- Cambiar Doepke
- Cambiar Comet
- Cambiar IPGARD
- Cambiar CSL
- Cambiar Setti+
- Cambiar PureLink
Últimos Cambiar Manuales
27 Octubre 2024
27 Octubre 2024
22 Octubre 2024
22 Octubre 2024
22 Octubre 2024
18 Octubre 2024
18 Octubre 2024
18 Octubre 2024
18 Octubre 2024
18 Octubre 2024